
Growing up, my love for baking was inspired by my mom’s cherished recipes, like the vintage Maraschino Cherry Cake. This delightful dessert, originating from the 1940s, holds a special place in my heart as a tribute to her legacy. The light and airy white cake, made with egg whites, cherry juice, and maraschino cherries, is a timeless classic that never fails to impress.
The Vintage Cherry Chip Layer Cake, tinted with the natural pink hue of maraschino cherry juice, is a flavorful delight perfect for any celebration. The incorporation of chopped cherries adds a burst of sweetness to every bite, making it a must-try for cake enthusiasts. As I share this beloved recipe with you, I aim to capture the essence of retro charm and modern taste in each slice of this delectable treat.
Ingredients
In creating this vintage Maraschino Cherry Cake recipe, I focused on using quality ingredients to capture the essence of a timeless classic. Below are the key components divided into the main cake and frosting ingredients.
Main Cake Ingredients
- 2 ½ cups all-purpose flour
- 1 cup granulated sugar
- ½ teaspoon salt
- 2 teaspoons baking powder
- ½ cup unsalted butter, at room temperature
- ¾ cup chopped maraschino cherries
- 2 eggs
- 1 teaspoon rum extract
- ½ cup whole milk
- ¼ cup maraschino cherry juice
- ½ cup sour cream
- 1 ½ cups granulated sugar (300g)
- ¾ cup salted butter (170g)
- ½ teaspoon vanilla extract
- ¾ cup sour cream (180g)
- 1 egg
- 4 egg whites
- 2 ½ cups all-purpose flour (313g)
- 4 teaspoons baking powder
- ¼ cup milk
- ½ cup maraschino cherry juice
- ¾ cup
Tools and Equipment Needed
Tools:
- 2 Layer Cake Pans (8 inches in diameter)
- Butter or Cooking Spray for coating the baking pans
- 2 Large Mixing Bowls for batter and for creaming butter-sugar mixture
- Strainer and medium bowl for straining cherry syrup
- Sharp straight-blade knife or mini food processor for finely chopping maraschino cherries
- Paper towels to dry chopped cherries
- 2 small bowls for separating 4 large eggs
- 1 Medium Mixing Bowl for whipping 4 egg whites
- Electric Mixer
- Spatula
- Measuring cups and spoons
- Wire racks for cooling cakes
Preparations Before Baking
Before diving into the delightful process of baking this vintage maraschino cherry cake, it’s essential to prepare the key ingredients and tools. Let’s ensure everything is set up correctly to guarantee a successful baking experience.
Prepping the Cherries
To start, make sure to finely chop the maraschino cherries for the cake batter. You can use a knife or a food processor to achieve the desired consistency. Drain the cherries thoroughly on paper towels to remove excess syrup, ensuring they are ready to add a burst of cherry flavor to the cake.
Greasing and Flouring the Pans
Next, prepare the cake pans by greasing and flouring them to prevent the cake from sticking. Whether you are using heart-shaped pans, round pans, or a bundt pan, ensure they are well coated to easily release the cake after baking. This simple step is crucial for a beautifully shaped and easy-to-remove cake.
Instructions for Cake
I love the process of creating this delightful vintage maraschino cherry cake, and the following steps ensure a successful outcome.
Mixing the Dry Ingredients
- Preheat the oven to 350°F and prepare three 8-inch round cake pans by lining the bottoms with parchment paper circles and spraying the sides with cooking spray.
- In a large bowl, combine the flour and baking powder, ensuring they are evenly mixed before incorporating into the batter.
Combining the Wet Ingredients
- Cream the butter and sugar in a large bowl until light and fluffy, a process that takes about 4-5 minutes.
- Add the vanilla and sour cream to the butter mixture, mixing well to combine thoroughly.
- Incorporate the eggs and egg whites in two batches, making sure to scrape the sides of the bowl and mix well between each addition.
Incorporating Cherries into the Batter
- Chop the maraschino cherries finely using a food processor or chopping by hand until they are the desired consistency.
- Add the chopped cherries into the batter and gently fold them in, ensuring they are evenly distributed throughout the mixture.
- Divide the batter evenly between the prepared cake pans.
- Bake in the preheated oven for 24-28 minutes or until a toothpick inserted into the center comes out clean.
- Remove the cakes from the oven and allow them to cool in the pans for 10 minutes before transferring to wire racks to cool completely.
Instructions for Frosting
Let’s dive into the delightful process of frosting our Vintage Maraschino Cherry Cake with a decadent cherry-flavored frosting.
Creating the Base
- In a large bowl, combine the unsalted butter and shortening. Use an electric mixer on medium speed to beat the mixture until smooth.
- Add 4 cups of powdered sugar to the bowl and continue to beat until the mixture is smooth.
- Pour in 3 tablespoons of maraschino cherry juice and beat the frosting until fully incorporated.
- Repeat the process by adding another 4 cups of powdered sugar followed by 2 tablespoons of maraschino cherry juice, mixing well after each addition.
- Finish the frosting by adding the remaining 4 cups of powdered sugar. Mix until smooth, adding an extra tablespoon of cherry juice if needed to achieve a thick and slightly sticky consistency.
Adding Flavor and Color
- To enhance the cherry flavor and give a beautiful pink hue to the frosting, pour in 1 cup of heavy cream and 2 teaspoons of Cherry Baking Emulsion.
- If desired, add a few drops of pink gel food coloring to achieve the desired shade of pink. Mix well until the color is evenly distributed throughout the frosting.
- Using an electric mixer, whip the frosting on medium speed until it reaches a fluffy and spreadable consistency. This step may take a few minutes, so be patient.
- Check the texture of the frosting – it should be thick enough to hold its shape when spread on the cake but still easy to work with. Add more cherry juice or powdered sugar as needed to adjust the consistency.
- Once the frosting reaches the perfect texture, it is ready to generously cover your delicious Maraschino Cherry Cake with a luscious layer of cherry-infused frosting.
Assembly and Decoration
Layering the Cake
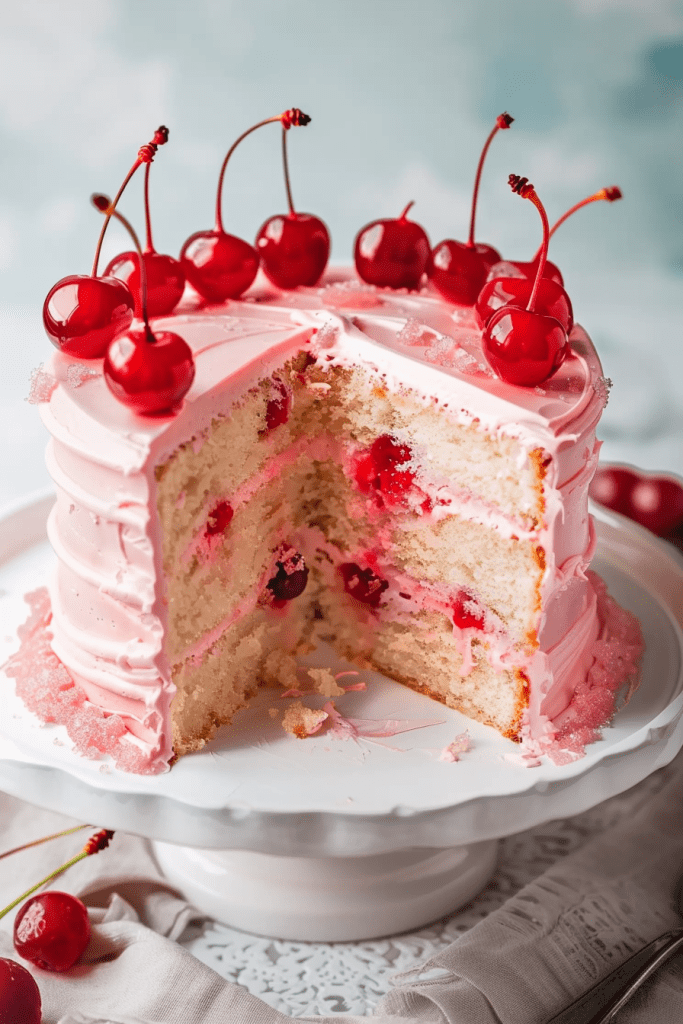
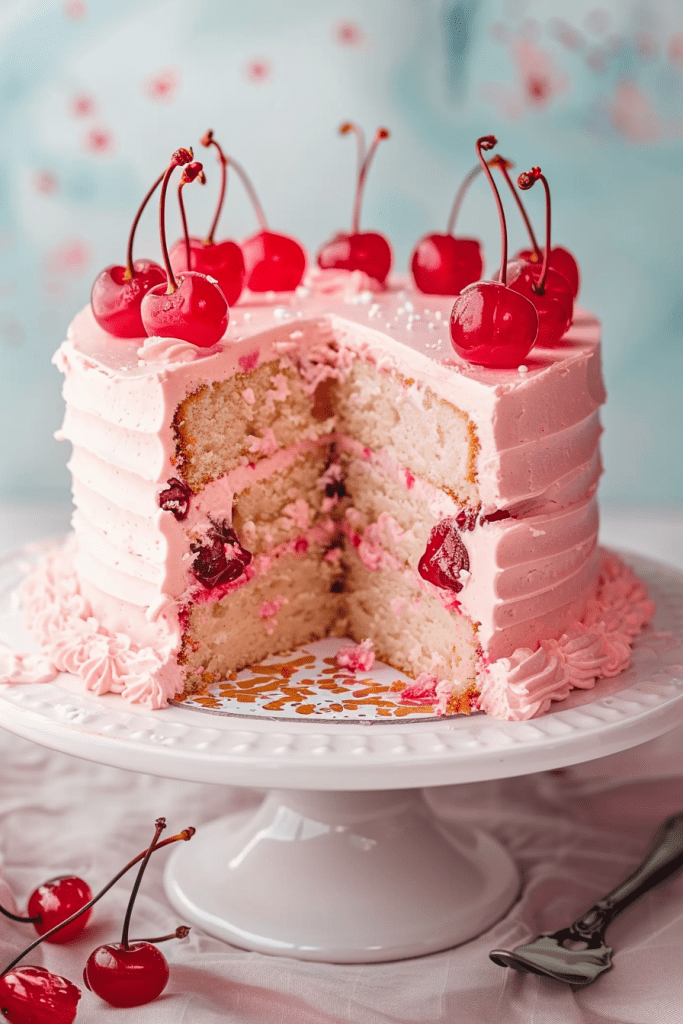
To assemble the Vintage Maraschino Cherry Cake, place a nonslip mat on the cake turntable and set an 8-inch cake board on top. Spread a small amount of frosting at the center of the board to act as glue. Begin by positioning one cake layer on the board, pipe a frosting dam around the edge, and spread cherry filling over the top. Repeat this process with the second cake layer and more filling, then gently place the final cake layer on top.
Applying the Frosting
For a bakery-style cherry-flavored frosting, use a cherry baking emulsion in your buttercream. Start by adding a small amount of frosting in the center of the cake board and spread it out evenly. Apply a frosting dam around the edge of the cake and smooth out the cherry filling on each layer. Add a thin layer of frosting on top and sides to create a crumb coat, then refrigerate the cake for 15 to 30 minutes.
Adding Final Touches
To finish the cake, spread a large dollop of frosting on top and even it out. Align an 8-inch round acrylic disc with parchment paper pressed onto the top of the cake to coat the sides with frosting completely. Use a cake scraper against the disc and rotate the turntable for a smooth finish. Chill the cake for 15 to 30 minutes, remove the disc, add more frosting on top if needed, smooth it out, and transfer the cake to a 10-inch round cake board for serving.
Serving and Storage
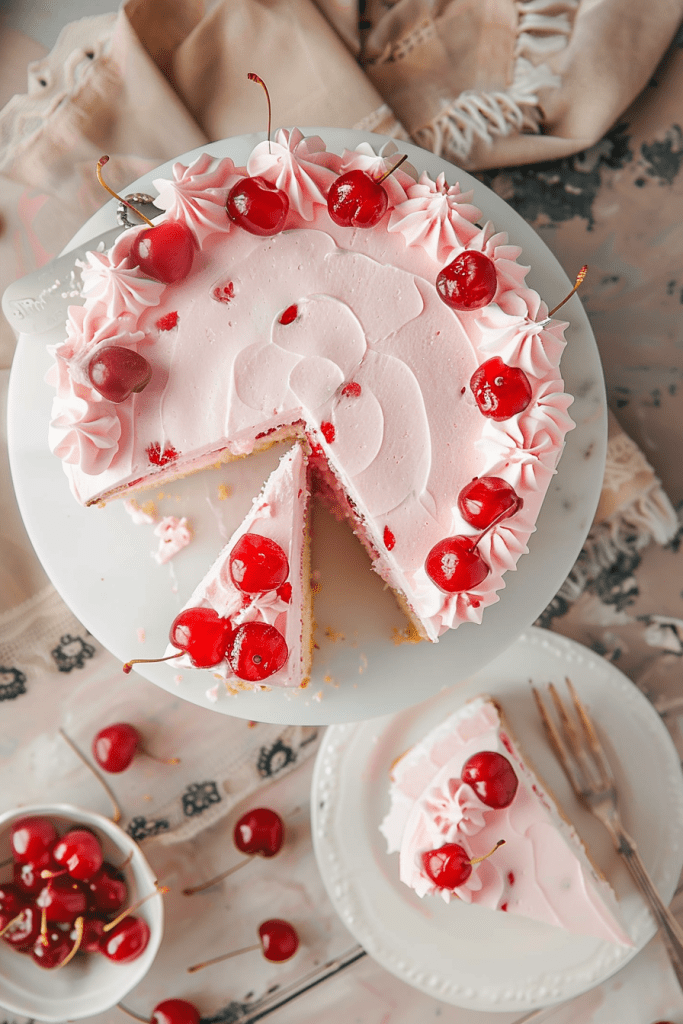
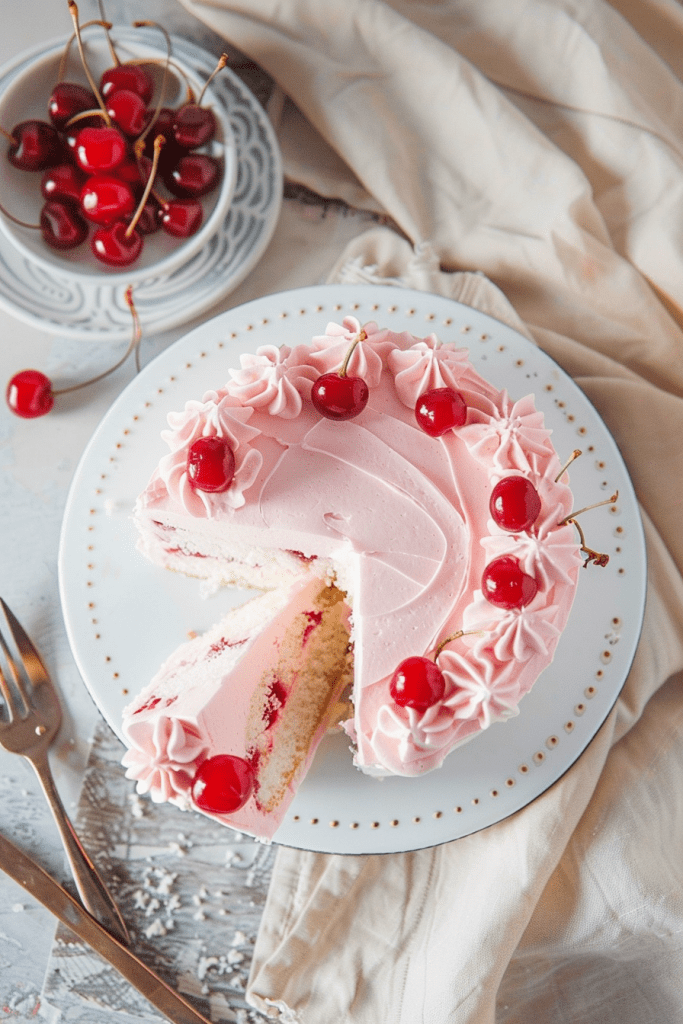
When serving Vintage Maraschino Cherry Cake, I recommend cutting neat slices with a sharp knife to showcase the beautiful layers of cherry goodness. For an added touch, garnish each slice with a whole or sliced maraschino cherry on top to enhance the visual appeal and highlight the flavors.
Best Practices for Serving
To elevate the serving experience, consider pairing the cake with a dollop of whipped cream or a scoop of vanilla ice cream. This additional element complements the sweetness of the cake and provides a delightful contrast in texture. Serving the cake slightly chilled can also enhance the flavors and create a refreshing treat.

Storage Tips
For optimal freshness, store any leftover Vintage Maraschino Cherry Cake in an airtight container at room temperature for up to 2 days. If you need to store it longer, refrigerate the cake for up to 5 days. Before serving refrigerated cake, allow it to come to room temperature for about 30 minutes to restore its soft texture and rich flavors.
Conclusion
Creating and sharing my Vintage Maraschino Cherry Cake recipe has been a nostalgic journey filled with sweet memories and a passion for baking. The process of bringing this classic dessert to life has not only been a delightful experience but also a way to honor my mother’s cherished recipe. I hope that by following this guide, you can also enjoy the same sense of joy and connection that baking brings. Remember, every slice of this cake is not just a treat for the taste buds but a celebration of tradition and love. So, gather your ingredients, preheat your oven, and let the aroma of cherries and sweetness fill your kitchen as you embark on your own baking adventure. Happy baking!