
Are you a fan of smooth, creamy cheesecakes with a sweet twist? If the answer is yes, you’re going to fall head over heels for this Dulce de Leche Cheesecake . This dessert is a rich, decadent experience, perfect for anyone who loves the deep caramelized sweetness of dulce de leche paired with the tanginess of cheesecake.
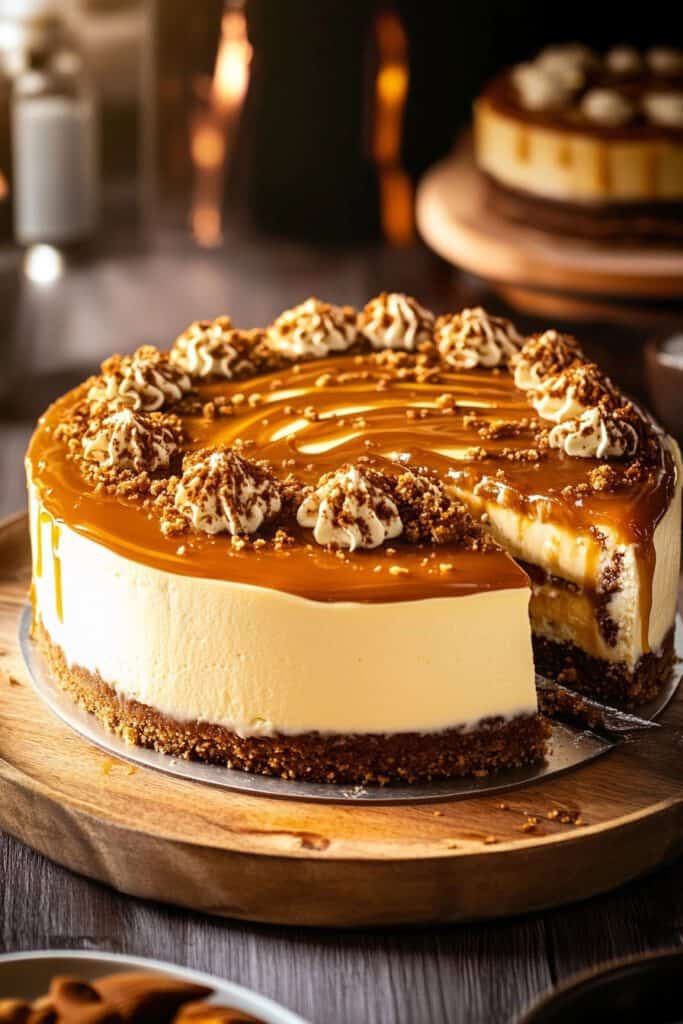
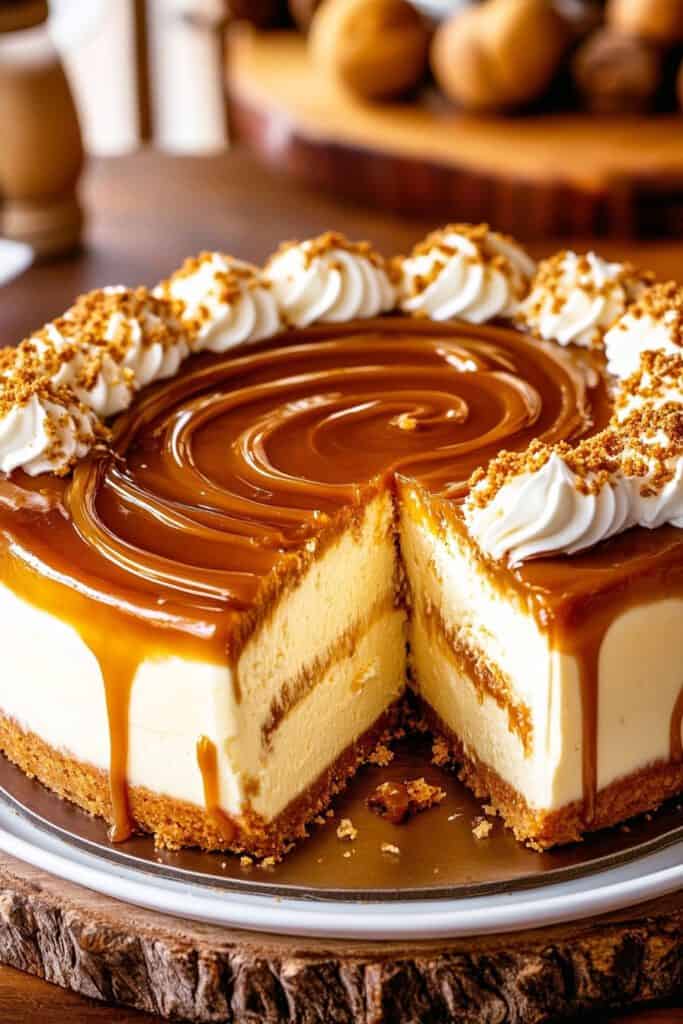
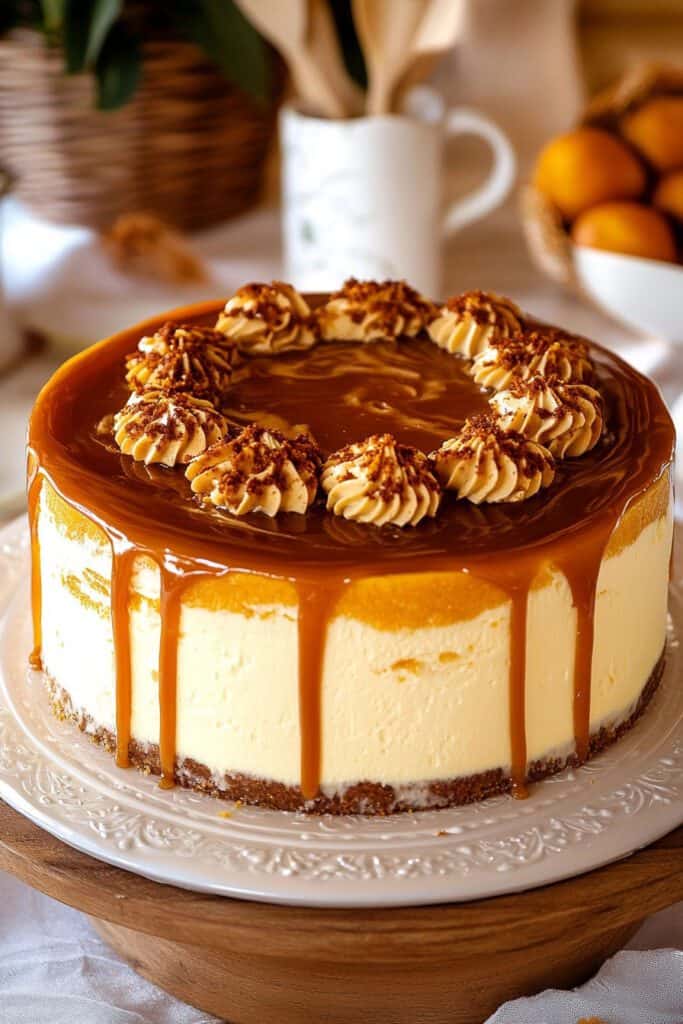
The creamy texture, coupled with a buttery graham cracker crust, and topped off with an extra swirl of dulce de leche, makes this cheesecake a crowd-pleaser. Plus, the added crunch of crispearls or graham cracker crumbs gives a fun contrast to the smooth, velvety filling. Whether you’re making it for a family event, a special dessert after dinner, or just a “treat-yourself” moment, this recipe will surely impress.
Let’s dive into the ingredients you’ll need to create this indulgent masterpiece!
Ingredients You’ll Need
Graham Cracker Crust:
- 1 1/2 cups graham cracker crumbs (180 grams) or digestive biscuits (crushed finely)
- 1/4 cup brown sugar (55 grams)
- 1/4 tsp cinnamon powder
- 6 tbsp unsalted butter, melted (85 grams)
Creamy Cheesecake Batter:
- 907 grams (4 packs) of cream cheese, softened
- 1 cup brown sugar (220 grams)
- 1/4 cup granulated sugar (50 grams)
- 1/2 cup sour cream (120 grams)
- 4 large eggs (room temp)
- 1 tbsp vanilla extract
- 1/2 tsp salt
- 1 cup dulce de leche
- 1/2 tsp cinnamon powder
Topping (Optional):
- 2/3 cup dulce de leche, for drizzling on top
- Crispearls and graham cracker crumbs for decoration (optional)
Required Kitchen Tools:
- Springform Pan (9 inches): Essential for cheesecakes, it ensures easy removal.
- Mixing Bowls: For mixing the crust and the batter separately.
- Electric Mixer: A hand or stand mixer will do, ensuring a smooth cheesecake texture.
- Spatula: For even spreading of the crust and the batter.
- Parchment Paper: To line the bottom of the springform pan, making it easier to remove the cheesecake.
- Water Bath (Optional but recommended): A water bath helps prevent cracks while baking.
Step-by-Step Preparation
Preparing the Graham Cracker Crust
The base of any great cheesecake starts with a delicious, buttery crust. Here’s how to achieve that perfect crunch with just the right sweetness!
- Preheat the Oven:
Before starting, preheat your oven to 350°F (175°C). This will ensure that your crust bakes evenly. - Make the Crust Mixture:
In a medium bowl, combine 1 1/2 cups of graham cracker crumbs, 1/4 cup brown sugar, and 1/4 teaspoon of cinnamon powder. Mix the dry ingredients together. Then, add in the 6 tablespoons of melted butter and stir everything until you get a sandy, moist texture. The mixture should hold together when you press it between your fingers. - Press into Pan:
Line the bottom of your 9-inch springform pan with parchment paper. Pour the mixture into the pan and press it firmly into an even layer using the back of a spoon or the bottom of a flat measuring cup. Make sure the crust climbs slightly up the sides of the pan for that classic cheesecake look. - Bake the Crust:
Bake the graham cracker crust for 8-10 minutes, or until golden and fragrant. Remove it from the oven and let it cool while you prepare the cheesecake filling. Meanwhile, reduce the oven temperature to 325°F (160°C) for the cheesecake batter.
Making the Cheesecake Batter:
After the crust has been prebaked and is cooling, it’s time to get started on the star of the show—the cheesecake filling . Here’s how to get that smooth and luscious texture:
- Beat the Cream Cheese:
In a large mixing bowl, add your 907 grams of softened cream cheese. Using an electric hand mixer or stand mixer, beat the cream cheese at medium speed until it’s completely smooth and creamy. This step is key to avoiding lumps in your batter! - Add Sugars Slowly:
Gradually add in the 1 cup of brown sugar and 1/4 cup of granulated sugar, beating continuously until the sugars are fully incorporated. This helps sweeten the cheesecake while the bright flavor of brown sugar pairs beautifully with the dulce de leche. - Incorporate Sour Cream, Eggs, and Vanilla:
Next, add the 1/2 cup of sour cream, 1 tablespoon vanilla extract, and 1/2 teaspoon salt. Mix to combine. Now, add the eggs—one at a time —mixing well after each addition to ensure a smooth and even batter. - Add Dulce de Leche and Cinnamon:
Once the eggs are incorporated, gently fold in 1 cup of rich dulce de leche and 1/2 teaspoon of cinnamon powder. Be careful not to overmix—you want to keep the texture light and fluffy while the dulce de leche creates that signature caramel sweetness.
At this point, your batter should be smooth and silky with a golden tint from the dulce de leche. It’s time to pour the mixture on top of your cooled crust and get that cheesecake baking.
Baking the Cheesecake
The key to a creamy, crack-free cheesecake is low-and-slow baking. A water bath is highly recommended for this recipe to maintain moisture in the oven and prevent cracks from forming on the top of your cheesecake.
Preparing a Water Bath (Optional, but helpful!)
- Wrap the Pan:
Before pouring the cheesecake batter into the pan, securely wrap the bottom and sides of the springform pan with two layers of aluminum foil to prevent any water from seeping into the crust during the water bath. - Pour the Batter into the Pan:
Once the crust has cooled, pour the cheesecake batter over it, spreading it evenly with a spatula. Be gentle to avoid introducing any air bubbles. If you do see a few bubbles on the surface, you can lightly tap the pan on the counter to release them. - Create the Water Bath:
Place the aluminum foil-wrapped springform pan into a larger roasting pan. Carefully pour boiling water into the larger pan, just enough to reach halfway up the side of the springform pan. This will provide steam during the baking process, ensuring a smooth and creamy texture.
Baking the Cheesecake
- Bake Low and Slow:
Bake the cheesecake in your preheated oven at 325°F (160°C) for 60-70 minutes . The cheesecake should still have a slight jiggle in the center when you gently shake the pan. That’s how you know it’s done! Don’t worry—this jiggle will firm up as it cools, resulting in a perfectly creamy texture. - Cool Gradually:
Once the cheesecake is done, turn off the oven and crack the oven door open slightly. Allow the cheesecake to cool inside the oven for 1 hour . This gradual cooling process helps prevent any sudden temperature changes that might cause cracks on the surface of the cheesecake. - Remove & Chill:
After cooling in the oven, take out the cheesecake and let it rest at room temperature for another 30 minutes. Then, transfer it to the refrigerator and chill for at least 4-6 hours (or preferably, overnight). This chilling process will allow the cheesecake to firm up and the flavors to meld beautifully.
Adding the Dulce de Leche Topping
Now that your cheesecake has chilled and set, it’s time to take it to the next level with that indulgent dulce de leche topping! This step will add an extra layer of caramel flavor and make your cheesecake visually stunning.
Preparing and Adding the Topping
- Warm Up the Dulce de Leche for Easy Spreading:
Take 2/3 cup of dulce de leche and warm it slightly in the microwave for about 10-15 seconds. You want it to be pourable but not too hot. Make sure to stir it well to smooth out any lumps. - Drizzle or Spread:
You have two options—either drizzle the dulce de leche in a pretty pattern on top of your cheesecake, or if you love that rich caramel layer, you can spread it evenly over the entire surface. To get creative, you can make swirl patterns using a toothpick or a fork for an elegant touch.
Optional: Add Crunch with Crispearls or Graham Cracker Crumbs
- Garnish with Crispearls or Crumbs:
To give your cheesecake an appealing texture contrast, sprinkle crispearls (small round chocolate-covered crunchy bits) or extra graham cracker crumbs on top. This not only adds a fun crunch but also makes the presentation more exciting.
Serving the Cheesecake: Final Touches
Your dulce de leche cheesecake is now looking amazing, but here are some extra tips when it comes to serving:
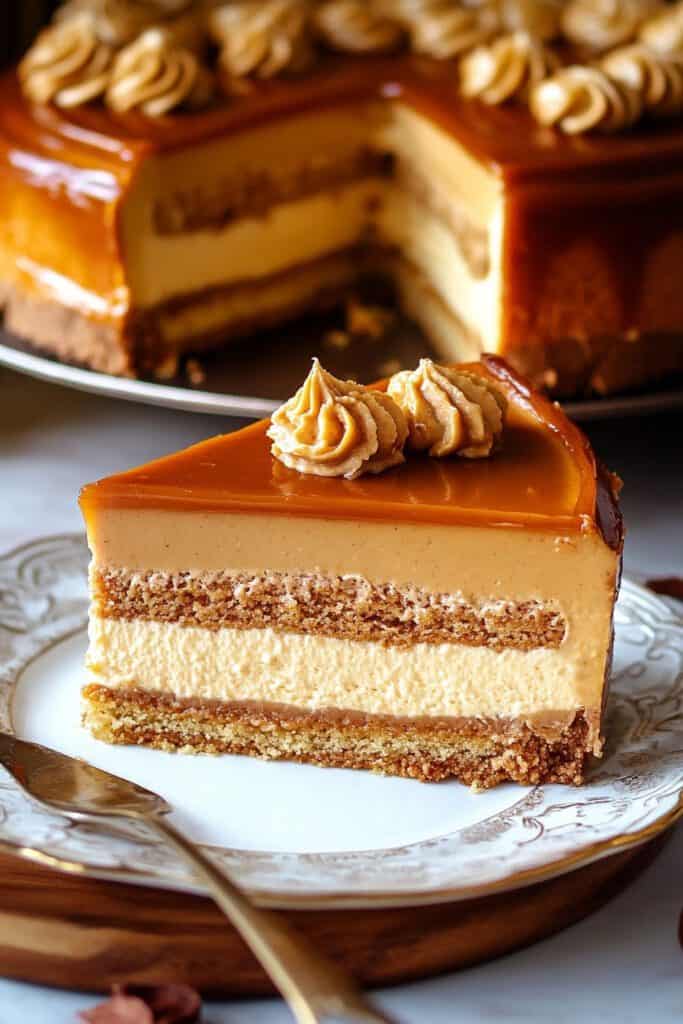
- Use a Warm Knife for Clean Cuts:
To slice your cheesecake with precision, run a sharp knife under hot water and wipe it with a towel between each cut. This will give you smooth, clean slices every time. - Plate Each Slice with Finesse:
Serve each slice with some extra dulce de leche drizzle on the plate for a classy touch. You could even serve it with a light dusting of powdered sugar or a dollop of whipped cream if you like! - Optional Pairings:
This cheesecake pairs beautifully with a hot cup of coffee or espresso. You can also serve it alongside fresh berries, such as raspberries or strawberries, to add a fruity contrast to the richness of the caramel and cheese.
Storing and Enjoying Later
If, by chance, you don’t eat all the cheesecake in one sitting (which might be tough considering how delicious this is), here’s how to store it:
Storing Your Cheesecake
- Refrigerator:
Store any leftover cheesecake in the fridge in an airtight container for up to 5 days . This will help it stay fresh and maintain its creamy texture. - Freezing (Optional):
Want to save some for later? You can freeze the cheesecake! Slice it into individual pieces, wrap each slice tightly in plastic wrap, and then place them in a freezer-safe bag or container. You can freeze the cheesecake for up to 3 months . When you’re ready to enjoy, simply thaw it overnight in the fridge, and it’s as good as new!
Conclusion
This dulce de leche cheesecake is the ultimate combination of creamy, rich, and caramel-sweet flavors that will make it an instant favorite in your dessert repertoire. The combination of graham cracker crust, smooth cheesecake filling, and dulce de leche topping is sophisticated yet irresistibly comforting.
Whether it’s for a special occasion or just a sweet treat to indulge in, this cheesecake is sure to impress! Plus, with the extra tips for slicing, serving, and storing, you’re all set to make this dessert a picture-perfect success each and every time.
So, now it’s your turn! Give it a go and enjoy each heavenly bite of bliss.
Happy Baking! 😊