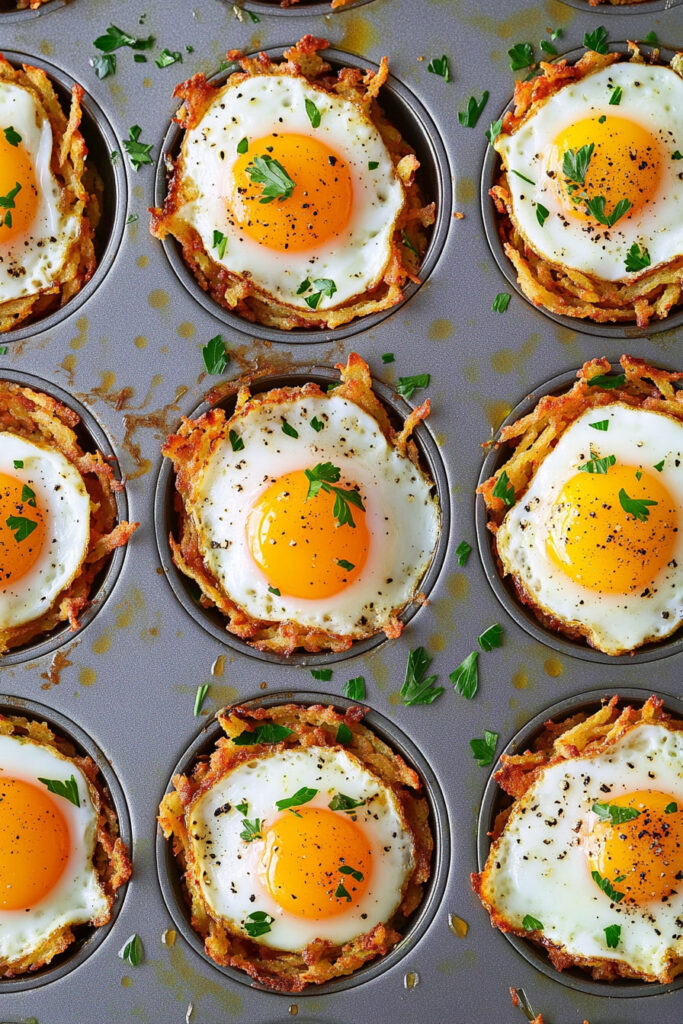
What’s better than starting your morning with crispy hash browns, gooey cheese, and perfectly baked eggs? Nothing. That’s where Cheesy Hash Brown Cups with Baked Eggs come in—a breakfast that’s easy to make and impossible not to love. Think of it as a classic diner breakfast—but in a bite-sized, fancy-yet-simple package.
Whether you’re hosting brunch, prepping for the week, or just craving something comforting, this recipe is here to make mornings a whole lot tastier. The best part? You don’t have to be a pro in the kitchen to pull it off.

Recipe Highlights
- Time Needed:
- 40 minutes total
- 10 minutes prep
- 25 minutes for hash browns
- 12-15 minutes for eggs
- Makes: 12 cups—great for families or meal prep
- Skill Level: Easy (yes, even for beginners)
- Tools You’ll Need:
- Muffin tin
- Mixing bowl
- Measuring cup or spoon
- Nonstick spray or butter
- Whisk or fork
Pro Tip: You can even bake the hash brown “nests” ahead of time and store them in the fridge. When you’re ready, just crack in the eggs, bake, and enjoy.

Ingredients You’ll Need
Here’s the rundown:
- Hash browns: 1 (20-oz) package. Make sure they’re thawed if frozen.
- Cheese: 2/3 cup shredded cheddar. Sharp cheddar’s a winner, but feel free to mix it up with pepper jack or mozzarella.
- Butter: 5 tablespoons, melted. Makes the hash browns crispy and flavorful.
- Eggs: 12 large, at room temp for even cooking.
- Chives: For garnish. Totally optional but adds color and flavor.
- Salt and pepper: To taste.
Optional Tweaks:
- Swap cheddar with Parmesan or a dairy-free cheese.
- Use olive oil instead of butter for a lighter version.
- Add diced veggies like bell peppers or mushrooms for some extra nutrients.
Step-by-Step Instructions

Start by preheating your oven to 400°F (200°C). While the oven heats up, prepare a 12-cup muffin tin by thoroughly greasing it with nonstick cooking spray or melted butter. This step is essential to ensure your hash brown cups release easily after baking.
Now, move on to the hash brown mixture. In a medium-sized bowl, combine the refrigerated hash browns, shredded cheddar cheese, and melted butter. Add a sprinkle of salt and pepper to season. Mix until the ingredients come together and feel slightly sticky—this will help the hash browns hold their shape in the muffin tin.
Once your mixture is ready, divide it evenly among the muffin cups. Use your fingers or the back of a measuring cup to press the hash browns firmly into each cup, creating a nest-like shape. Don’t worry if they look overfilled; the hash browns will shrink as they bake. Place the muffin tin into the oven and bake for about 25 minutes, or until the edges are golden brown and crisp. Once baked, take the tin out and gently press the centers of each nest with a spoon or measuring cup to make room for the eggs.
Next, crack one egg into each hash brown nest, being careful not to break the yolks unless you prefer scrambled eggs. Add a pinch of salt and pepper to season the eggs. Return the muffin tin to the oven and bake for an additional 12–15 minutes. The cooking time will depend on your preference: around 12 minutes for runny yolks and closer to 15 minutes if you prefer firmer yolks. For even cooking, consider rotating the pan halfway through this final baking step.
Once the eggs are set to your liking, remove the tin from the oven and let the cups cool for at least 10 minutes. This cooling period is important—it helps the cups firm up, making them easier to remove without breaking apart. To release the cups, carefully run a knife around the edges of each one and lift them out. Garnish with freshly chopped chives for an extra pop of color and mild oniony flavor before serving.
Make it Your Own
Want to switch things up? Here are some ideas:
- Spice it up: Add diced jalapeños or red pepper flakes for some heat.
- Go gourmet: Sprinkle some Parmesan on top or drizzle with a bit of truffle oil.
- Seasonal twist: Add fresh summer herbs like basil or roasted winter veggies like sweet potatoes.
Storing & Reheating
Got leftovers? No problem. Here’s how to keep them fresh:
- Fridge: Store in an airtight container for up to 4 days.
- Freezer: Wrap each cup individually in plastic wrap, toss them into a freezer bag, and freeze for up to 2 months.
When ready to eat:
- Reheat in the oven: 10 minutes at 350°F to keep them crispy.
- Microwave: About 1 minute, though the edges might lose some crunch.

Why You’ll Love This Recipe
These Cheesy Hash Brown Cups are more than just your average breakfast. They’re versatile, customizable, and perfect for everything—quick weekday meals, fancy brunches, or even just because. And the combo of crispy hash browns, melty cheese, and baked eggs? It’s just unbeatable.
So, give them a try this week. Who knows—they might just become your new favorite way to start the day!
PrintCheesy Hash Brown Cups with Baked Eggs
These cheesy hash brown cups are the ultimate breakfast treat! Crispy hash brown nests filled with perfectly baked eggs and topped with fresh chives make for a delicious, crowd-pleasing dish. Perfect for brunch, meal prep, or a grab-and-go breakfast.
- Prep Time: 10 minutes
- Cook Time: 40 minutes
- Total Time: 50 minutes
- Yield: 12 cups 1x
- Category: Breakfast/Brunch
- Cuisine: American
Ingredients
- 1 (20-oz.) package refrigerated hash browns (thawed if frozen)
- 2/3 cup shredded cheddar cheese
- 5 tablespoons unsalted butter, melted
- 12 large eggs
- Salt and pepper, to taste
- Chopped fresh chives, for garnish
Instructions
- Preheat and Prep: Preheat your oven to 400°F (200°C). Grease a 12-cup muffin tin with nonstick spray or melted butter.
- Mix Ingredients: In a medium bowl, combine the hash browns, cheddar cheese, and melted butter. Season lightly with salt and pepper.
- Form Nests: Divide the mixture evenly into the muffin tin cups, pressing it firmly into the bottoms and up the sides to create nests.
- Bake Hash Browns: Bake for 25 minutes or until golden brown and crisp around the edges. Remove from the oven and use a spoon or measuring cup to press down the centers of each nest.
- Add Eggs: Crack one egg into each nest. Sprinkle with salt and pepper to taste.
- Bake Again: Return to the oven and bake for an additional 12–15 minutes, depending on how you like your eggs (12 minutes for runny yolks; 15 for firmer yolks).
- Cool and Serve: Let the cups cool in the tin for at least 10 minutes before carefully running a knife around the edges to release them. Garnish with chopped chives before serving.
Notes
- Serving Suggestions:
- Pair with avocado slices, toast, or fresh fruit for a complete breakfast spread.
- Tips & Tricks:
- Press hash browns firmly to ensure crispy nests.
- Rotate the pan halfway through baking for even cooking.
- Let cups cool before removing to prevent breaking.
- Storage & Reheating:
- Store in an airtight container in the fridge for up to 4 days.
- Reheat in a 350°F oven for 10 minutes or microwave on medium power for 1 minute.
- To freeze, wrap cooled cups individually in plastic wrap and store in a freezer-safe bag for up to 2 months. Reheat from frozen at 375°F for about 20 minutes.

