
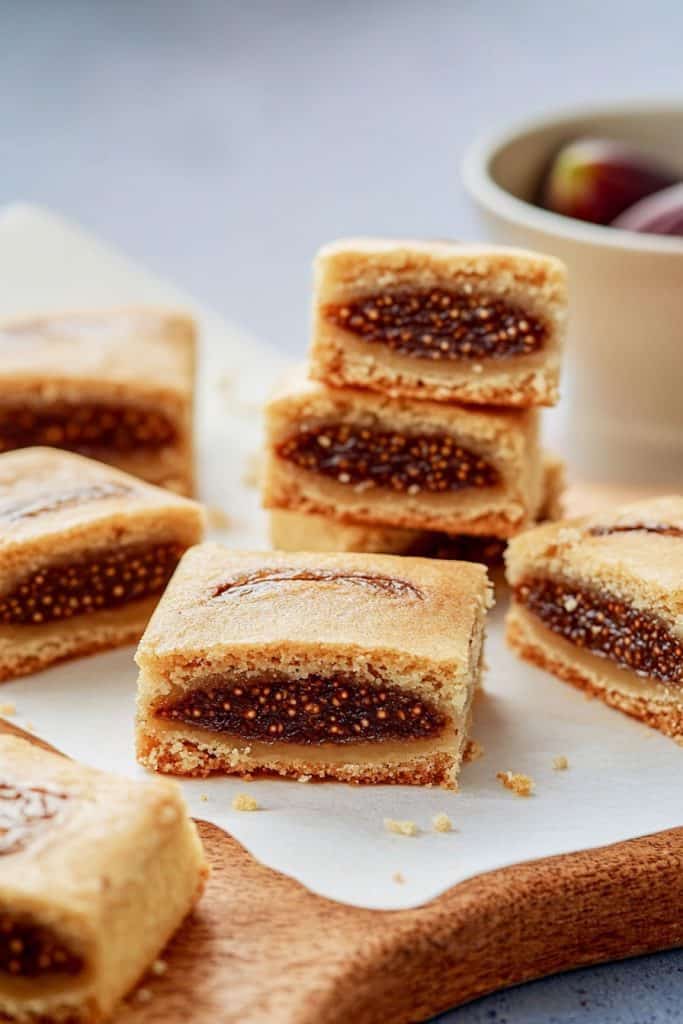
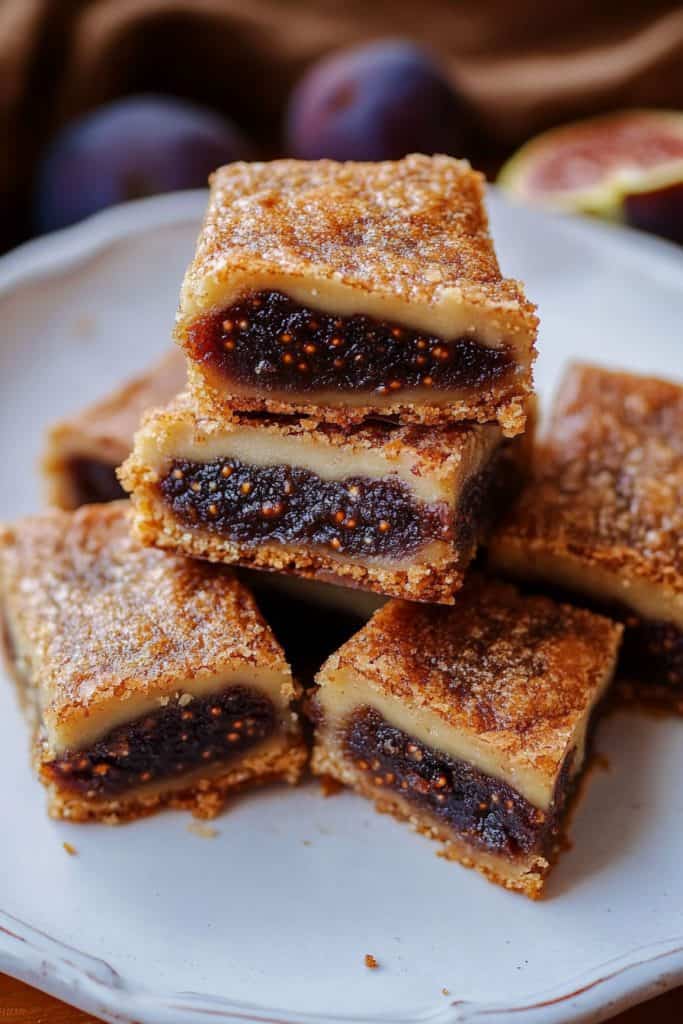
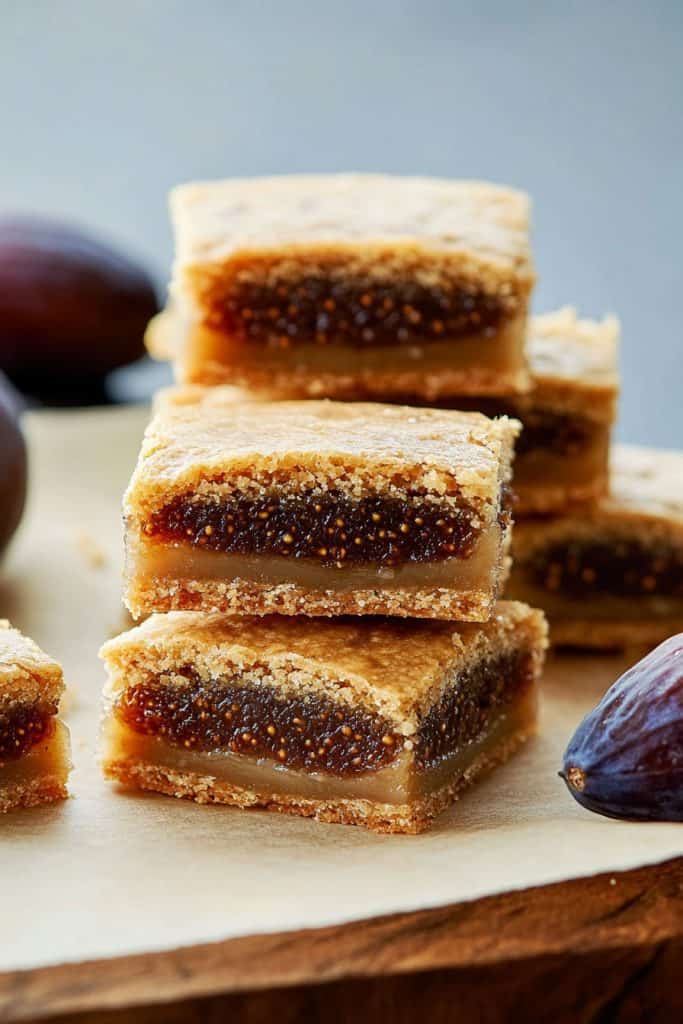
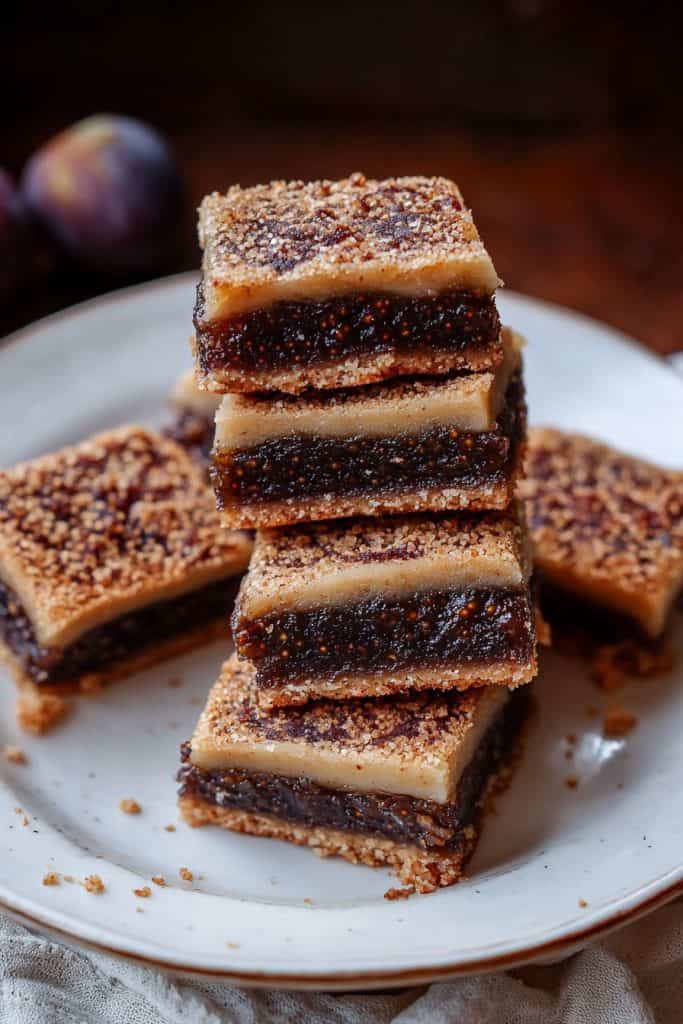
There’s something incredibly nostalgic about biting into a homemade fig bar. These delightful treats, with their rich, jammy filling and tender crust, transport me straight back to my childhood. Fig bars have been around for centuries, dating back to ancient Egypt, where figs were cherished for their natural sweetness and nutritional benefits.
Making fig bars at home lets you control the quality of ingredients and customize the flavors to your liking. Plus, they’re surprisingly easy to whip up! Whether you’re looking for a wholesome snack to pack in lunchboxes or a sweet treat to enjoy with your afternoon tea, homemade fig bars hit the spot every time. Let’s dive into creating these delicious bars that are sure to become a household favorite.

Recipe Overview
Yields: 20 serving(s)
Prep Time: 20 mins
Total Time: 2 hrs 25 mins
Ingredients
Here are the ingredients you’ll need to make delicious homemade fig bars. Gather these before you start for a smooth baking experience.
For the dough
- 1/2 cup oat flour (60 g.)
- 1/2 cup whole wheat flour (68 g.)
- 1/4 cup almond flour (33 g.)
- 1/4 tsp. ground cinnamon
- Pinch ground nutmeg (optional)
- 1/4 tsp. baking soda
- 1/4 tsp. kosher salt
- 1/4 cup packed brown sugar
- 1 Tbsp. honey
- 1/2 tsp. freshly grated ginger (optional)
- 1 tsp. orange zest
- 1 large egg
- 2 Tbsp. butter, melted
- 2 Tbsp. coconut oil
For the filling
- 8 oz. dried figs, stems removed and halved
- 4 oz. Medjool dates, pitted and halved (about 6)
- Juice of 1 orange
- 1/4 cup water
- 1/2 Tbsp. butter
- 1 Tbsp. rum (optional)
- 1 tsp. pure vanilla extract (optional)
- 1/2 tsp. orange or lemon zest
Equipment
Having the right equipment will make your fig bar creation process smooth and efficient. Let me guide you through the essential tools needed to bake these delightful treats successfully:
- Mixing Bowls: You will need at least two mixing bowls; one for the dry ingredients and one for the wet ingredients.
- Measuring Cups and Spoons: Accurate measurements are essential. Make sure you have a full set of measuring cups and spoons.
- Food Processor or Blender: This will help in creating the smooth, figgy filling. A food processor is more efficient for this recipe.
- Spatula: A rubber spatula or offset spatula is perfect for scraping down the sides of bowls and spreading the filling evenly.
- Baking Sheet: You’ll need one or two baking sheets lined with parchment paper for baking the individual bars.
- Rolling Pin: This is necessary for rolling out the dough between parchment paper to achieve a uniform thickness.
- Oven: A pre-heated oven is crucial for even baking. Ensure your oven is properly pre-heated to the required temperature before you start.
- Cooling Rack: Using a cooling rack ensures that your fig bars cool down evenly and quickly, preventing sogginess.
By gathering these essential tools, you are setting yourself up for a seamless and enjoyable fig bar baking experience.
Directions
Follow these steps to create delicious homemade fig bars. Each stage is important for achieving that perfect balance of a tender outer layer and luscious fig filling.
Step 1
Make the dough: In a large bowl, stir together flours, cinnamon, nutmeg, baking soda, and kosher salt until well combined. In a medium bowl, whisk together sugar, honey, ginger, orange zest, egg, butter, and oil until smooth. Pour wet ingredients into flour mixture and fold until a cohesive dough forms.
Step 2
Halve dough and place each half between two pieces of parchment paper. Using a rolling pin, roll each dough into a 15”-x-5” rectangle, about ⅛”-thick. Leave dough between parchment, layer on a baking sheet and refrigerate, 1 hour.
Step 3
Meanwhile, make the filling: In a medium pot over medium heat, combine figs, dates, orange juice, water, butter, and rum (if using). Bring to a boil and cook, stirring occasionally, until liquid is syrupy and mostly absorbed, 4 to 5 minutes. Let cool completely.
Step 4
Transfer fig mixture to a food processor, add vanilla and zests, then process until smooth.
Step 5
Working with one sheet of dough at a time, peel off top layer of parchment. Using an offset spatula or spoon, spread half the fig filling in a 2”-wide strip down the length of the dough. Use bottom layer of parchment to help bring naked edges of dough to meet over and enclose the filling, pressing down the seam to seal. Gently press cookies into a 2”-wide bar.
Step 6
Repeat with remaining dough and filling. Transfer both bars to the freezer until firm, at least 15 minutes and up to overnight.
Step 7
Preheat oven to 350°F (175°C). Line a baking sheet with parchment paper.
Step 8
Remove cookie bars from the freezer. Using a sharp knife, cut each bar into ten 1½” pieces and place on prepared sheet, about 1” apart.
Step 9
Bake until bottoms are deeply golden and tops look dry, 13 to 15 minutes.
Step 10
Let cool completely. Fig bars will keep, in an airtight container at room temperature, up to 3 days, or longer if refrigerated or frozen.
Substitutions and Variations
Making homemade fig bars allows for plenty of substitutions and variations to suit your dietary needs and flavor preferences. Here’s how you can customize your fig bars based on the recipe above:
- Gluten-Free Option: While this recipe uses oat and whole wheat flour, you could experiment with a gluten-free all-purpose blend designed for baking, potentially adjusting liquid or binding agents as needed. Ensure your oat flour is certified gluten-free if required.
- Vegan Fig Bars: For a vegan version, replace the butter with an equal amount of coconut oil or a vegan margarine (note: coconut oil is already used). Use a flaxseed egg (1 tablespoon ground flaxseed mixed with 3 tablespoons water, let sit for 5 minutes) as a substitute for the regular egg, and omit the butter in the filling or use a vegan alternative.
- Sugar Alternatives: The brown sugar and honey provide moisture and flavor. Substituting might alter the texture and taste. You could try coconut sugar for brown sugar, but liquid sweeteners may require adjusting other ingredients.
- Different Fillings: While this recipe uses figs and dates, you could experiment with other dried fruits like apricots or raisins for part of the filling, adjusting liquid if needed.
- Adding Nuts and Spices: For added texture, finely chopped nuts like walnuts or pecans could potentially be folded into the filling after processing. The recipe already includes cinnamon and optional nutmeg/ginger, but you could adjust amounts or add spices like cardamom.
- Flavored Glaze: Enhance your fig bars with a glaze. Mix powdered sugar with a bit of milk or juice (like orange) and drizzle over the cooled bars.
- Chocolate Fig Bars: For a decadent twist, consider adding mini chocolate chips into the filling after processing or drizzle melted chocolate over the cooled bars.
Tips for Making Homemade Fig Bars
- Choosing Quality Figs & Dates: When making fig bars, selecting soft and plump dried figs and Medjool dates is crucial for a moist and flavorful filling. If your figs seem dry, you might briefly soak them in warm water.
- Measuring Ingredients Accurately: Accurate measurement, especially of flours, is essential for the right dough texture. Using a kitchen scale for grams (as provided) offers the best precision.
- Preparing the Fig Filling: Processing the cooled fig and date mixture until smooth ensures a jammy consistency. Adjust processing time to reach your desired smoothness.
- Chilling the Dough: Chilling the dough between parchment paper is a key step. It makes the dough firm, easier to handle, and helps prevent spreading during baking. Don’t skip the refrigeration or freezing times.
- Even Rolling and Assembly: Rolling the dough to a consistent ⅛” thickness ensures even baking. Spreading the filling evenly and carefully folding the dough using the parchment paper helps create well-formed bars.
- Baking Time and Temperature: Bake at 350°F (175°C) as directed. Keep an eye on them towards the end of the baking time. Look for deeply golden bottoms and dry-looking tops as indicators they’re done. Overbaking can result in dry bars.
- Cooling Completely Before Storing: Patience pays off. Let the fig bars cool completely on a wire rack before storing. This prevents sogginess and ensures they firm up properly.
- Storing for Freshness: To keep the fig bars fresh, follow the storage instructions below. Proper storage preserves their texture and flavor.
Storage Instructions
To keep your homemade fig bars fresh and delicious, follow these storage instructions.
- Storing at Room Temperature:
- Cool Completely: Allow your fig bars to cool completely on a wire rack before storage.
- Airtight Container: Place the cooled fig bars in an airtight container. Layering with parchment paper between bars can prevent sticking.
- Cool, Dry Place: Store the container in a cool, dry place. They will keep well for up to 3 days.
- Refrigeration:
- Airtight Container: Place cooled bars in an airtight container, perhaps layered with parchment.
- Refrigerate: Store in the refrigerator for longer freshness, up to one week.
- Freezing:
- Initial Freeze: Arrange the cooled fig bars in a single layer on a baking sheet lined with parchment paper. Freeze for about 1-2 hours until firm.
- Wrap and Store: Once frozen, transfer the bars to a freezer-safe container or a heavy-duty resealable bag, placing parchment between layers if needed.
- Storage Duration: Freeze for up to 3 months. Thaw in the refrigerator or at room temperature before enjoying.
Conclusion
Creating homemade fig bars is a rewarding experience that combines nostalgia with the joy of customization. By following the detailed steps and tips provided, you’ll master the art of making these delicious treats using this specific recipe. Remember, the key to maintaining their freshness and flavor lies in proper storage practices. Whether you store them at room temperature, refrigerate, or freeze, your fig bars will stay delicious for longer. Happy baking!
PrintHomemade Fig Bars

Whip up these delightful homemade fig bars! Featuring a tender, wholesome crust made with oat, whole wheat, and almond flours, and a rich, naturally sweet fig and date filling. They’re a perfect nostalgic treat or wholesome snack.
- Prep Time: 20 mins
- Cook Time: 13-15 mins
- Total Time: 2 hrs 25 mins (includes chilling/freezing)
- Yield: 20 bars 1x
- Category: Snack / Dessert
- Cuisine: American / Homemade
Ingredients
For the Dough:
- 1/2 cup (60 g) oat flour
- 1/2 cup (68 g) whole wheat flour
- 1/4 cup (33 g) almond flour
- 1/4 tsp ground cinnamon
- Pinch ground nutmeg (optional)
- 1/4 tsp baking soda
- 1/4 tsp kosher salt
- 1/4 cup packed brown sugar
- 1 Tbsp honey
- 1/2 tsp freshly grated ginger (optional)
- 1 tsp orange zest
- 1 large egg
- 2 Tbsp butter, melted
- 2 Tbsp coconut oil
For the Filling:
- 8 oz dried figs, stems removed & halved
- 4 oz Medjool dates, pitted & halved (about 6)
- Juice of 1 orange
- 1/4 cup water
- 1/2 Tbsp butter
- 1 Tbsp rum (optional)
- 1 tsp pure vanilla extract (optional)
- 1/2 tsp orange or lemon zest
Instructions
- Make Dough: Whisk flours, cinnamon, nutmeg, baking soda, and salt in a large bowl. In a separate medium bowl, whisk brown sugar, honey, ginger, orange zest, egg, melted butter, and coconut oil until smooth. Pour wet ingredients into dry and fold gently until a dough forms.
- Roll & Chill: Divide dough in half. Place each half between two sheets of parchment paper. Roll each into a 15”x5” rectangle (about ⅛” thick). Layer the parchment-sandwiched dough onto a baking sheet and refrigerate for 1 hour.
- Make Filling: Combine figs, dates, orange juice, water, butter, and rum (if using) in a medium pot over medium heat. Bring to a boil, then simmer, stirring occasionally, until liquid is syrupy (4-5 mins). Let cool completely.
- Process Filling: Transfer cooled fig mixture to a food processor. Add vanilla and zests. Process until smooth.
- Assemble Bars: Working one dough rectangle at a time, remove the top parchment. Spread half the fig filling in a 2-inch wide strip down the center. Use the bottom parchment paper to help fold the bare dough edges over the filling, meeting in the middle. Press the seam gently to seal. Gently press the log into a neat 2″-wide bar.
- Repeat & Freeze: Repeat assembly with the second dough rectangle and remaining filling. Place both assembled bars (still on parchment is fine) onto a baking sheet and freeze until firm, at least 15 minutes (or up to overnight).
- Preheat & Prep: Preheat oven to 350°F (175°C). Line a separate baking sheet with fresh parchment paper.
- Cut Bars: Remove chilled bars from the freezer. Using a sharp knife, cut each bar crosswise into ten 1½” pieces. Place pieces about 1” apart on the prepared baking sheet.
- Bake: Bake for 13-15 minutes, until the bottoms are deeply golden brown and the tops look dry.
- Cool: Let the fig bars cool completely on the baking sheet or transfer carefully to a wire rack.
Notes
- Serving Suggestions: Perfect alongside a cup of coffee or tea, packed in lunchboxes, or as a lightly sweet dessert.
- Tips & Tricks: Use soft, pliable dried fruit for the best filling. Chilling/freezing the dough logs is key for clean cuts and preventing spread. Don’t overbake! Cool completely before storing to maintain texture.
- Storage: Store completely cooled bars in an airtight container at room temperature for up to 3 days. For longer storage, refrigerate for up to 1 week or freeze for up to 3 months (layer with parchment paper to prevent sticking). Thaw before enjoying.