
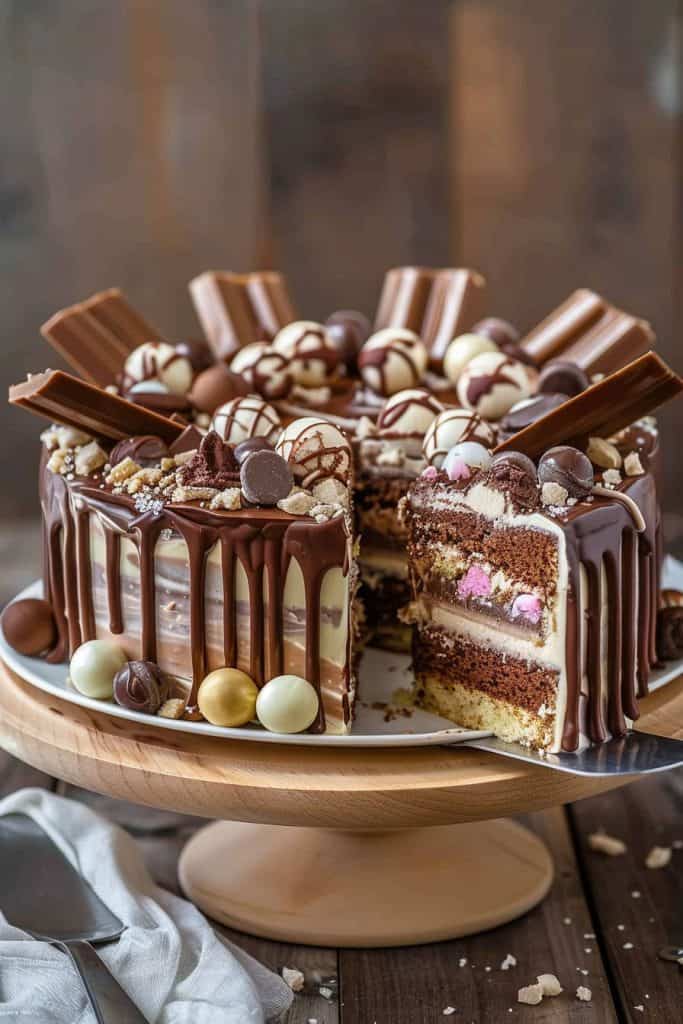
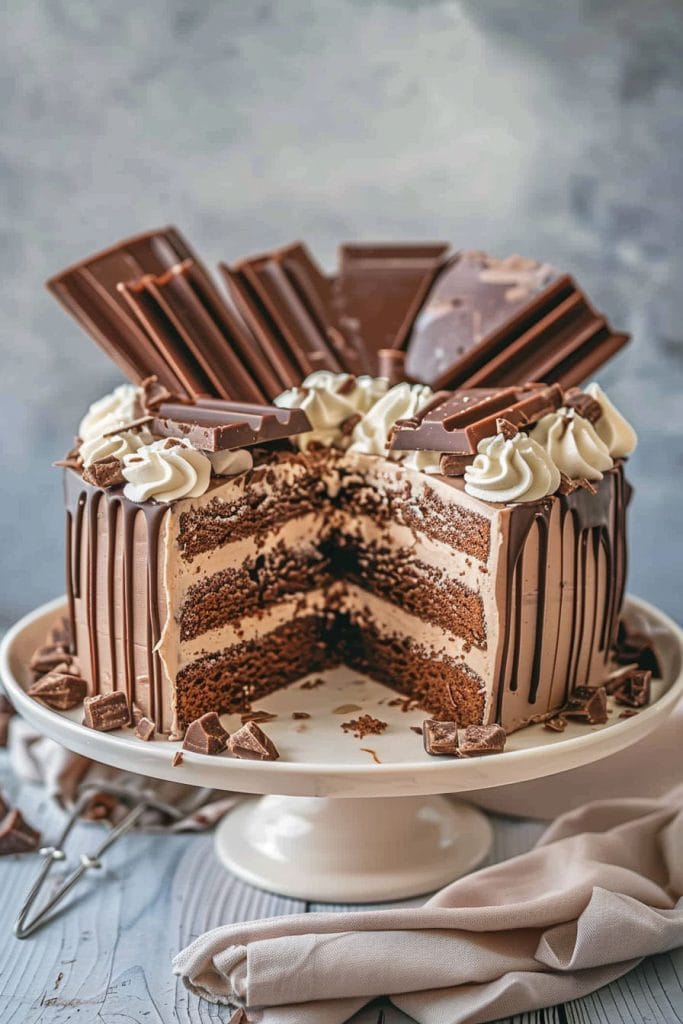
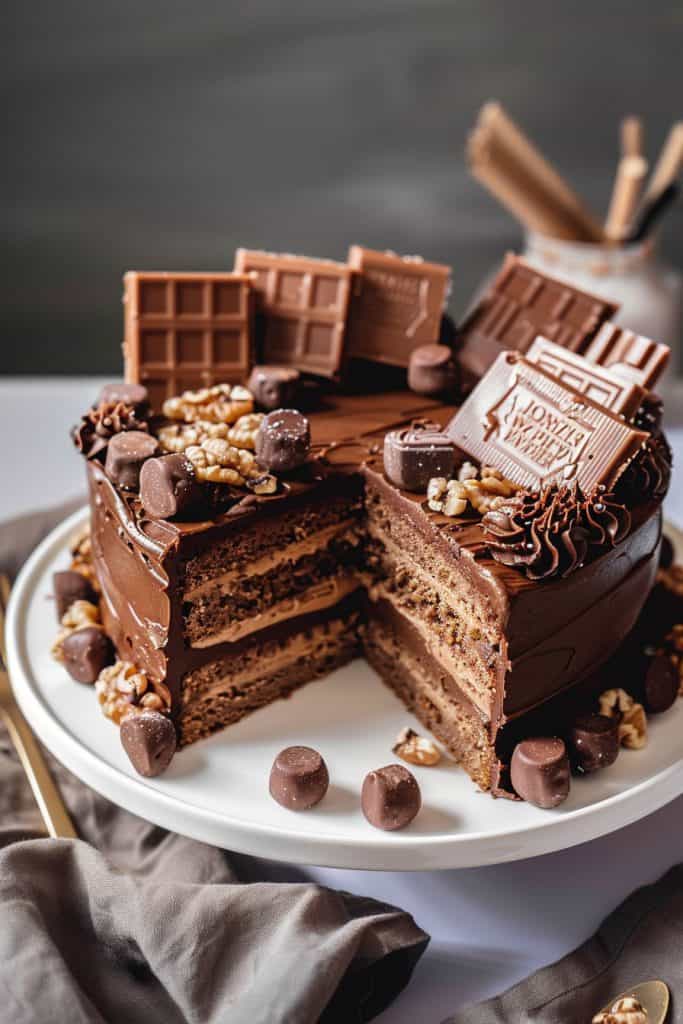
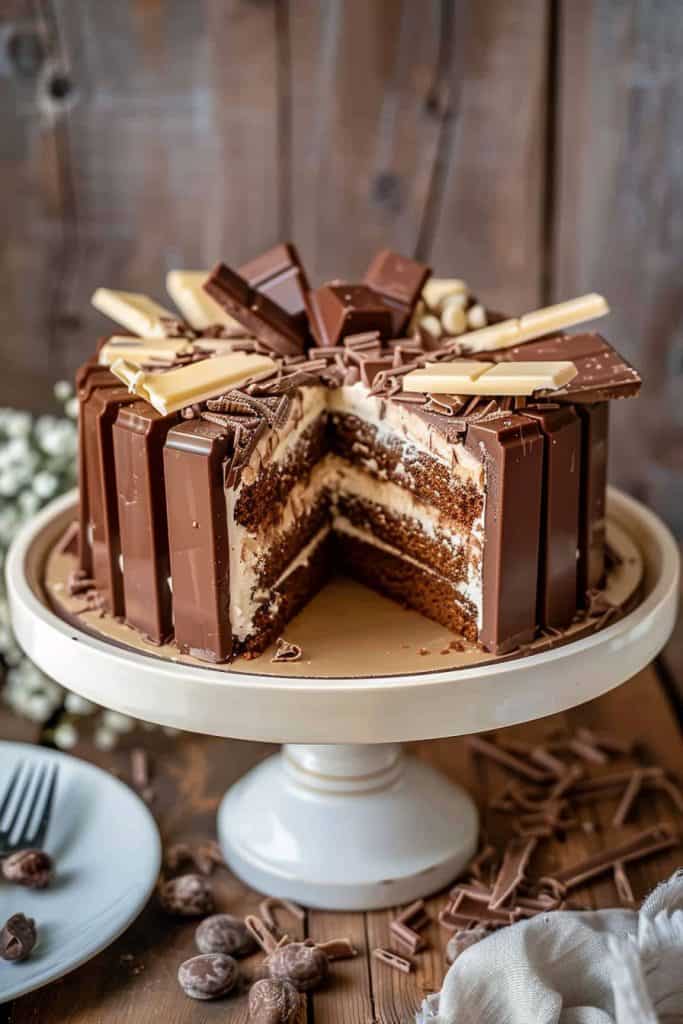
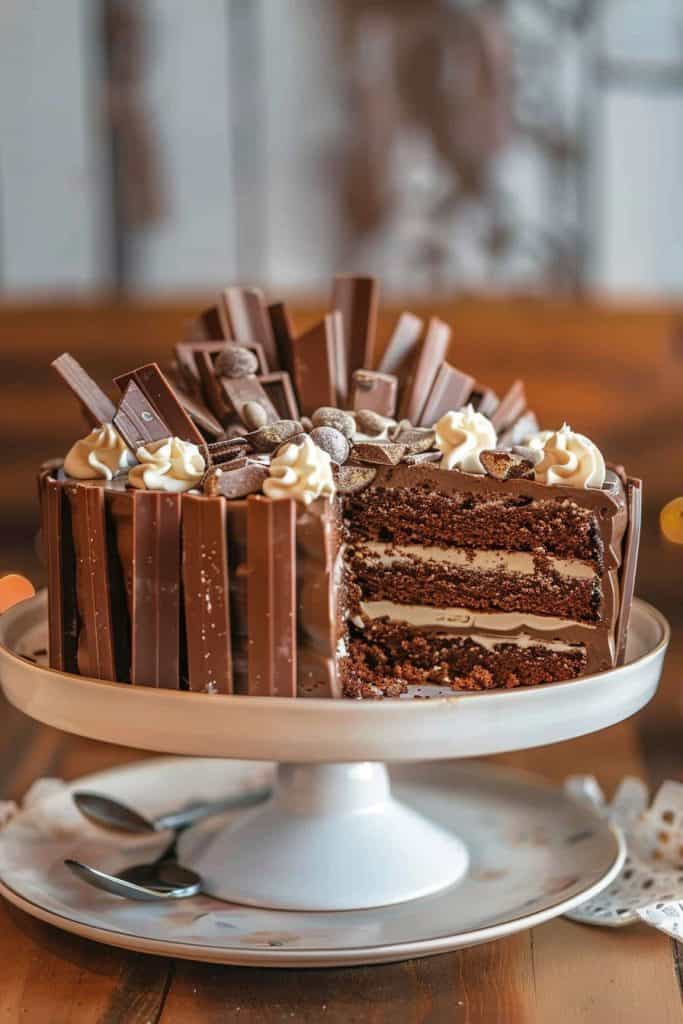
Who can resist the allure of a cake that combines the best of both worlds: rich, moist chocolate cake and the irresistible crunch of your favorite candy bars? Chocolate candy bar cakes are the ultimate indulgence, perfect for satisfying those intense sweet tooth cravings. Whether you’re celebrating a special occasion or just treating yourself, this cake promises to be a showstopper.

Ingredients
Here’s a comprehensive list of everything you need to create this delectable chocolate candy bar cake. Make sure to gather all your ingredients before you start to ensure a seamless baking adventure.
For the Cake Layers
- 2 cups all-purpose flour
- 2 cups granulated sugar
- 3/4 cup unsweetened cocoa powder
- 2 teaspoons baking powder
- 1.5 teaspoons baking soda
- 1 teaspoon salt
- 1 cup whole milk
- 1/2 cup vegetable oil
- 2 large eggs, room temperature
- 2 teaspoons vanilla extract
- 1 cup boiling water
For the Frosting
- 1 cup unsalted butter, softened
- 3.5 cups powdered sugar
- 1/2 cup unsweetened cocoa powder
- 1/2 cup heavy cream
- 2 teaspoons vanilla extract
- Pinch of salt
- 1.5 cups assorted chocolate candy bars, chopped (Snickers, Kit Kat, Twix, etc.)
- Extra candy bar pieces, for garnish (optional)
- Chocolate shavings or sprinkles (optional)
- Fresh berries or mint leaves (optional for contrast)
Tools and Equipment
You will need the right tools and equipment to achieve the best results for your chocolate candy bar cake. Gather the following items to streamline your baking process:
- Mixing Bowls: At least two large mixing bowls for wet and dry ingredients.
- Measuring Cups and Spoons: Essential for accurate measurements of all ingredients.
- Electric Mixer: A stand mixer is preferred, but a hand mixer will also work to blend batters smoothly.
- Rubber Spatula: Ideal for scraping down the sides of mixing bowls and folding in ingredients gently.
- Whisk: Helpful for combining dry ingredients and ensuring a light, airy batter.
- 8-inch Cake Pans: Two 8-inch round cake pans, greased and lined with parchment paper for easy removal.
- Cooling Racks: For cooling the cake layers evenly and preventing sogginess.
- Offset Spatula: Perfect for spreading frosting evenly over the cake layers and achieving a smooth finish.
- Serrated Knife: For leveling cake layers if needed. This is also useful for chopping candy bars if not in pre-cut form.
- Baking Spray or Parchment Paper: To prevent cakes from sticking to the pans.
- Cake Turntable: Optional but highly useful for frosting cakes evenly and smoothly.
- Pastry Bag and Tips: If you want to add decorative frosting touches or create intricate designs with the frosting.
- Kitchen Scale: Useful for weighing ingredients accurately, ensuring consistency in your cake layers.
Having these tools at hand will make your baking experience smoother and more efficient, helping you create a delectable chocolate candy bar cake from start to finish.
Directions
Follow these step-by-step instructions to create your delicious chocolate candy bar cake.
For the Cake
- Preheat the Oven
Preheat your oven to 350°F (175°C). Prepare two 9-inch round cake pans by greasing them with baking spray or lining them with parchment paper. - Mix Dry Ingredients
In a large mixing bowl, combine 2 cups of all-purpose flour with 2 cups of granulated sugar, 1 cup of cocoa powder, 1 and 1/2 teaspoons of baking powder, 1 and 1/2 teaspoons of baking soda, and 1 teaspoon of salt. Whisk the ingredients together until well mixed. - Add Wet Ingredients
Add 2 large eggs, 1 cup of whole milk, 1/2 cup of vegetable oil, and 2 teaspoons of vanilla extract to the dry mix. Use an electric mixer on medium speed to blend the ingredients until well combined. - Incorporate Boiling Water
Carefully add 1 cup of boiling water to the batter. Mix on low speed until the batter is smooth and liquid. This will result in a thin batter. - Bake the Cake
Divide the batter evenly between the prepared pans. Bake for 30-35 minutes or until a toothpick inserted in the center comes out clean. - Cool the Cake
Let the cakes cool in the pans for 10 minutes. Then, transfer them to a cooling rack to cool completely.
For the Frosting
- Cream Butter
In a large mixing bowl, beat 1 cup of unsalted butter (softened to room temperature) on medium speed until creamy. - Add Cocoa Powder
Gradually add 2/3 cup of cocoa powder and beat until well blended. - Incorporate Sugar and Milk
Alternate adding 4 cups of powdered sugar and 1/2 cup of whole milk to the mixture. Beat on low speed until the ingredients are combined, then increase to medium speed for 2 minutes. If needed, add more milk to achieve a spreadable consistency. - Blend in Vanilla Extract
Add 2 teaspoons of vanilla extract to the frosting and beat until fully incorporated and creamy.
Assembling the Cake
- Level the Cakes
Once the cakes have cooled completely, use a serrated knife to level the tops if necessary. - Apply Frosting
Place the first cake layer on a cake turntable. Spread a generous amount of frosting over the top using an offset spatula. Add chunks or shavings of your favorite candy bars on top of the frosting. - Add Second Layer
Place the second cake layer on top. Spread a thin layer of frosting over the entire cake to create a crumb coat. Refrigerate the cake for 30 minutes to set. - Final Frosting Layer
Apply the remaining frosting evenly over the cake, ensuring a smooth and even finish. - Candy Bar Pieces
Break your favorite candy bars into small pieces or shave them finely. Decorate the top and sides of the cake with these pieces, pressing them gently into the frosting. - Optional Garnishes
Enhance the cake’s presentation with optional garnishes like chocolate shavings, sprinkles, fresh berries, or mint leaves.
Tips and Tricks
When making a chocolate candy bar cake, attention to detail can elevate your dessert from good to extraordinary. Here are some tips and tricks I’ve learned to perfect this indulgent treat.
Choosing The Right Candy Bars
- Variety: Use a mix of your favorite candy bars to enhance the flavor and texture. Think of combinations like Snickers for crunch and caramel, or Reese’s for a peanut butter kick.
- Size: Chop candy bars into uniform pieces to ensure even distribution and a balanced bite in every slice.
Cake Preparation
- Room Temperature Ingredients: Ensure that eggs and butter are at room temperature. This step makes it easier to achieve a smooth batter.
- Dry Ingredient Sifting: Sift the flour, cocoa powder, and baking powder to prevent lumps and achieve a more airy and light texture.
Baking Tips
- Preheating: Always preheat your oven for at least 10-15 minutes before you start baking. This ensures the cake bakes evenly.
- Even Layers: Use a kitchen scale to divide the batter evenly between cake pans. This guarantees uniform layers.
Frosting And Assembly
- Crumb Coat: Apply a thin layer of frosting over the entire cake to lock in crumbs before adding the final coat. This step makes for a smoother finish.
- Chill Time: After applying the crumb coat, chill the cake for at least 30 minutes. It helps the frosting set and makes the final frosting application easier.
Decoration
- Candy Bar Placement: Place chopped candy bars on top of the cake just before serving to prevent them from becoming soggy.
- Extra Garnishes: For an added touch, sprinkle chocolate shavings or drizzle melted chocolate over the cake.
- Refrigerate: Store your cake in the refrigerator if you are not going to serve it immediately. It keeps the frosting firm and the candy bar pieces crunchy.
- Cover Properly: Use an airtight container to cover the cake. It helps maintain the cake’s moisture and flavor for longer.
By incorporating these tips and tricks, you’ll bring out the best in your chocolate candy bar cake, ensuring it’s a stunning, delicious centerpiece for any occasion.
Nutrition Information
Understanding the nutritional content of your chocolate candy bar cake can help you make informed decisions. Below, I’ve broken down the nutrition information per serving of this delectable treat.
Nutritional Breakdown Per Serving
| Nutrient | Amount |
|---|---|
| Calories | 450 |
| Total Fat | 22g |
| Saturated Fat | 12g |
| Trans Fat | 0g |
| Cholesterol | 70mg |
| Sodium | 300mg |
| Total Carbohydrates | 60g |
| Dietary Fiber | 3g |
| Sugars | 45g |
| Protein | 5g |
Key Nutritional Points
- Calories: Each serving packs a substantial 450 calories. This makes it a rich dessert suited for special occasions.
- Total Fat: With 22 grams of total fat, mindful portion sizes are key. The saturated fat content sits at 12 grams.
- Cholesterol & Sodium: The cake has 70 milligrams of cholesterol and 300 milligrams of sodium per serving.
- Carbohydrates: Total carbohydrates reach 60 grams with 45 grams of sugars.
- Protein: You’ll get about 5 grams of protein in each serving.
- Reduce Sugar: For a lower sugar option, consider using a sugar substitute or reducing the amount of candy bars used.
- Healthy Fat Alternatives: Swap out some butter for healthier fat options like avocado or yogurt.
- Lower Sodium: Opt for unsalted butter and check that your candy bars aren’t high in sodium.
This overview helps you enjoy this luscious dessert while being aware of its nutritional footprint.
How to Store
Storing your chocolate candy bar cake properly is essential to maintaining its texture and flavor. Follow these simple steps to ensure your cake stays fresh and delicious.
Immediate Storage
- Cooling Completely: Before storing, let the cake cool completely on a wire rack. Storing a warm cake can lead to condensation, which makes the cake soggy.
- Tightly Wrapped: Once cooled, wrap the cake tightly in plastic wrap. This barrier prevents air from drying out the cake and helps lock in moisture.
- Use an Airtight Container: Place the wrapped cake in an airtight container. This extra layer of protection is especially useful if you plan to store the cake for a few days.
Refrigerating
- Short-Term Storage: For storage up to one week, refrigerate the wrapped cake. Be sure to keep it in an airtight container to prevent absorption of any fridge odors.
- Bring to Room Temperature: Before serving, bring the cake to room temperature for the best texture and flavor. Remove from the refrigerator at least 30 minutes prior to serving.
- Long-Term Storage: If you need to store the cake for more than a week, freezing is a wonderful option.
- Double Wrapping: Wrap the cake in a layer of plastic wrap followed by a layer of aluminum foil. This double wrap method prevents freezer burn while maintaining freshness.
- Label and Date: Clearly label and date the cake before placing it in the freezer. This helps you keep track of its storage time.
- Freezing Duration: The cake can be frozen for up to 3 months without losing its quality.
- Thawing Properly: To thaw, transfer the cake to the refrigerator for 24 hours. Once thawed, bring it to room temperature before serving.
Taking these steps ensures your chocolate candy bar cake remains as delightful as when it was freshly baked, ready to impress your guests or provide a tasty treat whenever you desire.
Conclusion
Creating a chocolate candy bar cake is a delightful way to combine rich chocolate flavors with the crunch of your favorite candy bars. This indulgent dessert is perfect for any occasion and offers endless customization options. By following the tips and tricks provided, you can ensure your cake turns out perfectly every time.
Remember to choose the right candy bars, prepare your ingredients properly, and take care with baking and assembly. With the right techniques and tools, you can create a stunning and delicious cake that will impress everyone. Enjoy your baking journey and savor every bite of your homemade chocolate candy bar cake!