
Craving a delightful twist on classic cheesecake? Dive into the luscious world of this Cannoli Cheesecake recipe! This Italian-inspired treat combines the creamy goodness of mascarpone and ricotta with a hint of mini chocolate chips for a truly indulgent experience. Light, fluffy, and bursting with flavor, this Cannoli Cheesecake is a showstopper that will leave your taste buds singing.
My son swears this Cannoli Cheesecake surpasses even the famed Cheesecake Factory creations! Whether it’s the best he’s ever had is up for debate, but one thing’s for sure – it’s a winner. Perfect for any occasion, this Cannoli Cheesecake is a breeze to whip up and offers a taste of Italy in every bite. Embrace the essence of a traditional cannoli in this delectable dessert.
Ingredients
Creating a delectable Cannoli Cheesecake is a delightful experience with these essential ingredients.
Prep: 1 Hr.
Bake: 1 Hr.
Yield: 8 Servings
Graham Cracker Crust:
- 1 1/2 cups graham cracker crumbs (170 grams)
- 2 tbsp brown sugar (25 grams)
- 1/4 tsp cinnamon powder
- 6 tbsp unsalted butter, melted (85 grams)
Cannoli Cheesecake:
- 1 1/4 cup cream cheese, softened (283 grams)
- 1 14 oz. can Eagle Brand® Sweetened Condensed Milk (396 grams)
- 1 1/4 cup ricotta cheese (283 grams)
- 4 large eggs, room temperature
- 1 tbsp vanilla extract
- 1/4 tsp cinnamon powder
Ricotta Whipped Cream:
- 1/2 cup heavy cream (120 ml)
- 1/4 cup ricotta (56 grams)
- 1/3 cup powdered sugar (41 grams)
Toppings:
- 1/4 cup mini chocolate chips
- 1/4 cup chopped pistachios
- 8 mini cannoli
Required Tools and Equipment
To create the perfect Cannoli Cheesecake, you’ll need some essential tools and equipment to help you through the process. Here are the items you should have on hand before you start:
- Mixing Bowls: Prepare at least two mixing bowls to combine the different components of the cheesecake filling. Having multiple bowls will make it easier to mix the ingredients thoroughly without any lumps.
- Hand Mixer or Stand Mixer: A hand mixer or stand mixer will be your best friend when it comes to achieving a smooth and creamy texture for the cheesecake filling. Ensure your mixer is in good working condition before you begin.
- Springform Pan: You’ll need a 9-inch springform pan to bake your Cannoli Cheesecake. The springform design allows you to easily release the cake without damaging its structure. Make sure to grease the sides of the pan before pouring in the filling.
- Food Processor or Ziploc Bag: For crushing the graham crackers to make the crust, you can use a food processor or a Ziploc bag with a rolling pin. The goal is to achieve fine crumbs for the perfect crust consistency.
- Measuring Cups and Spoons: Accurate measurements are key to a successful cheesecake. Have measuring cups and spoons on hand to ensure that you add the right amounts of each ingredient.
- Rubber Spatula: A rubber spatula is essential for scraping down the sides of the mixing bowl and ensuring that all ingredients are well incorporated. It helps maintain the consistency of the cheesecake filling.
- Whisk: A whisk attachment on your mixer (or a handheld one) is handy for blending ingredients thoroughly and creating a smooth mixture.
- Large Roasting Pan (for Water Bath): To prevent cracking, you’ll need a pan larger than your springform pan to create a water bath during baking.
- Aluminum Foil: To wrap the bottom of the springform pan for the water bath.
Having these tools and equipment ready will streamline the Cannoli Cheesecake preparation process and ensure that your dessert turns out perfect every time.

Preparation Steps
Making the Crust
- Place the graham cracker crumbs, brown sugar, and cinnamon powder in a bowl and mix.
- Add the melted butter and mix to combine.
- Press the crust firmly onto the bottom of a 9” springform pan.
- Grease the sides of the pan with oil spray or butter. Set aside.
Preparing the Cheesecake Filling
- Beat the cream cheese for about 2 minutes with a mixer at medium speed, until creamy and fluffy. Scrape the bottom of the bowl.
- Add the Eagle Brand® Sweetened Condensed Milk and ricotta cheese, and mix until combined. Scrape the bottom of the bowl again.
- Add the eggs, one at a time, mixing one egg completely before adding the next one. Scrape the bottom of the bowl between additions.
- Add the cinnamon and vanilla extract and mix briefly to combine.
Preparing the Ricotta Whipped Cream
- Add the heavy whipping cream, ricotta, and powdered sugar to the bowl of an electric mixer.
- Beat over medium-high speed for a couple of minutes until stiff peaks form.
- Place the cream in a piping bag (a tip like 6B works well for decoration).
Baking Instructions
Baking the Cheesecake
- Preheat the oven to 300°F (150°C).
- Pour the cheesecake batter into the prepared pan over the crust.
- Wrap the bottom exterior of the springform pan securely with aluminum foil. Place the wrapped pan inside a larger pan with tall sides (like a roasting pan).
- Carefully pour hot water into the larger pan until it reaches about halfway up the sides of the springform pan, creating a water bath. This helps prevent cracking.
- Bake the cheesecake in the preheated oven for approximately one hour. The edges should look set, but the center will still be slightly jiggly.
- Turn the oven off, crack open the oven door, and leave the cheesecake inside for 1 hour to cool down gradually.
- Remove the cheesecake from the oven and the water bath. Let it cool completely at room temperature.
- Place the cheesecake in the refrigerator to chill overnight, or for at least 6 hours, until fully set.
Decorating and Serving
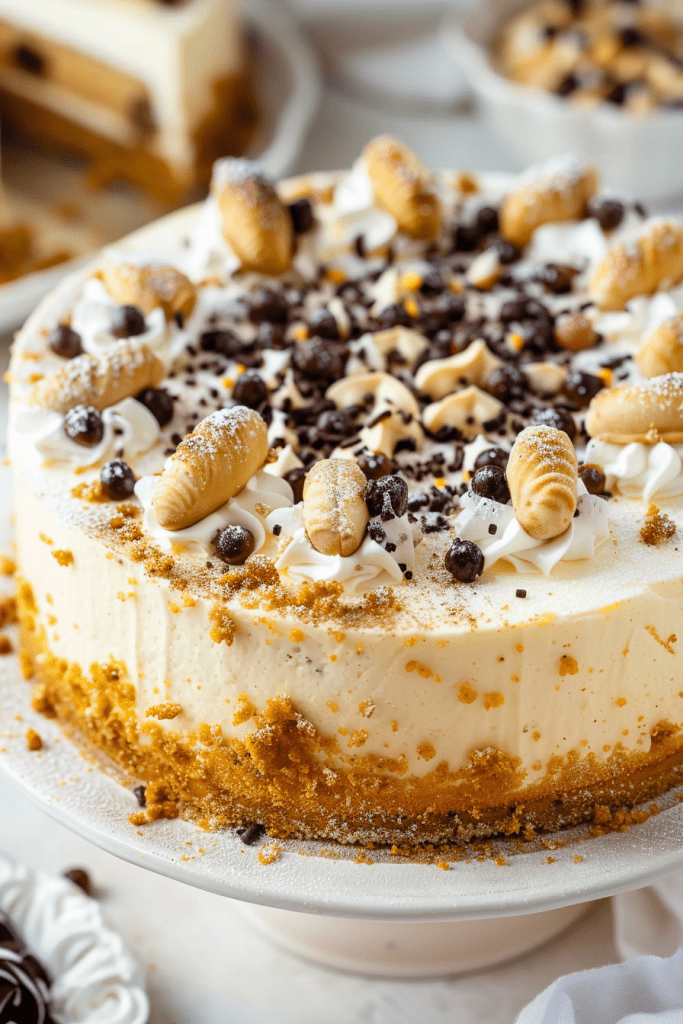
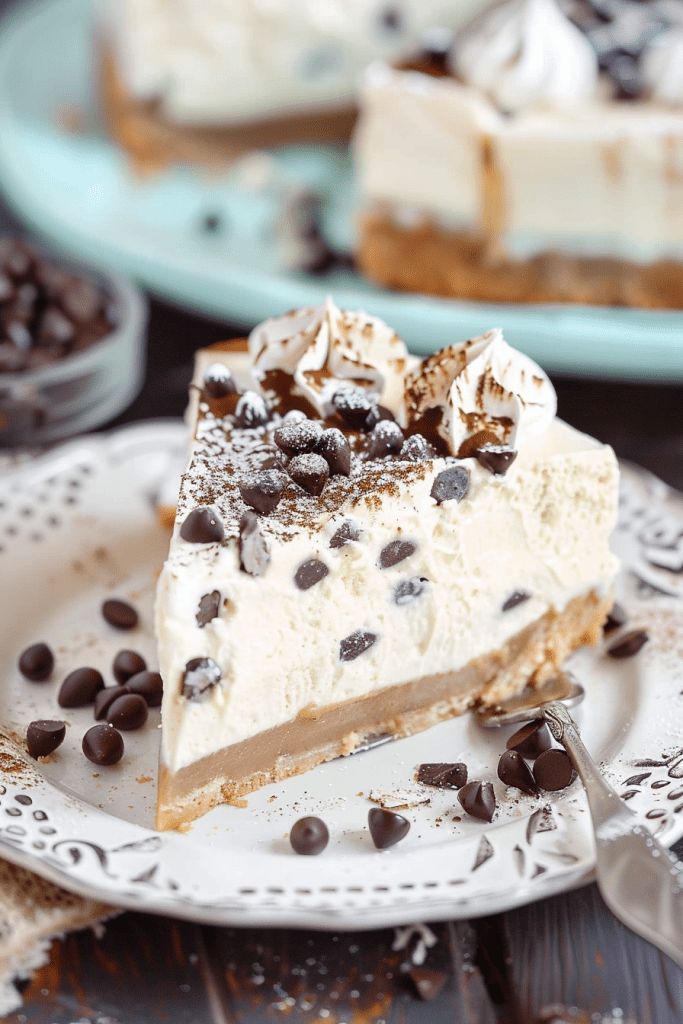
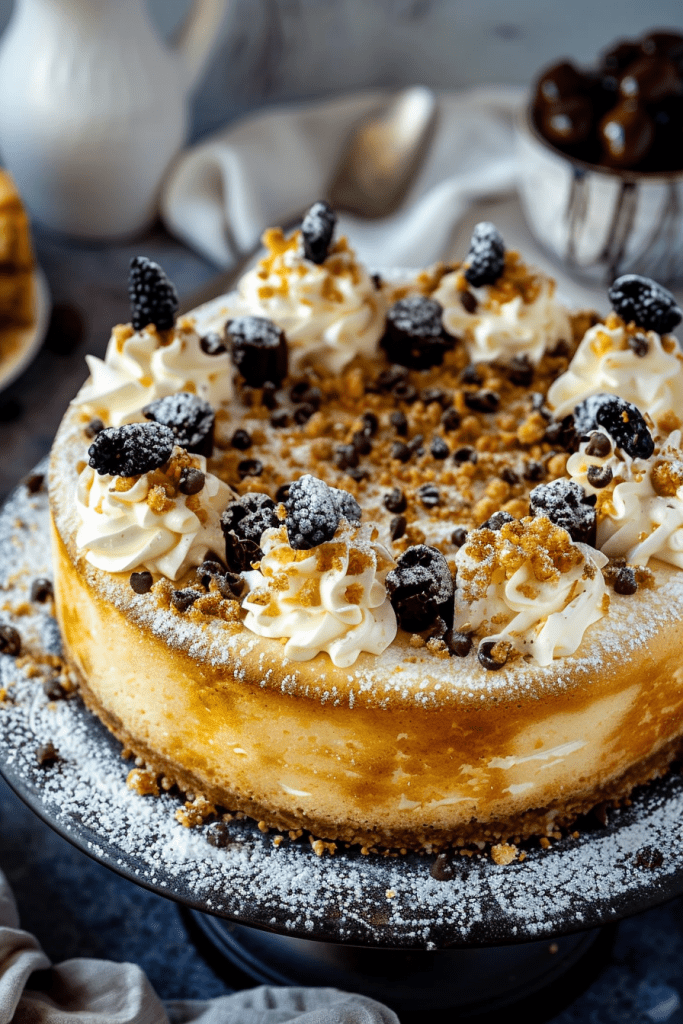
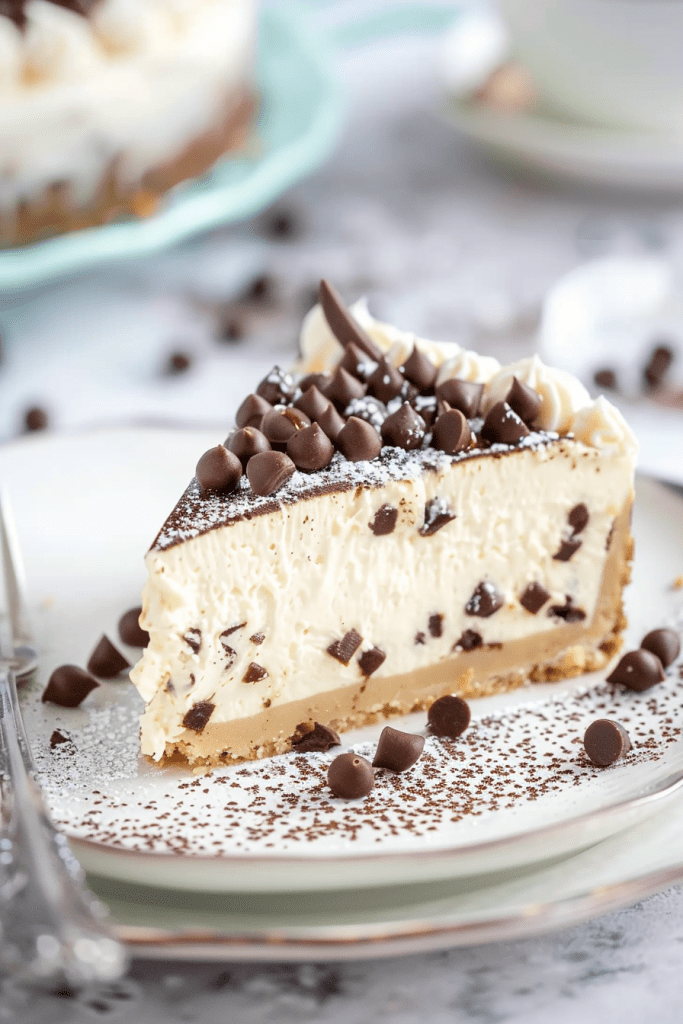
When it comes to decorating and serving your Cannoli Cheesecake, you have the opportunity to get creative and make it visually appealing and delicious. Adding the right toppings and serving it beautifully can elevate the overall experience for you and your guests.
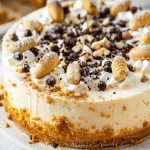
Adding Toppings
- Ricotta Whipped Cream: Pipe the prepared ricotta whipped cream decoratively on top of the chilled cheesecake.
- Mini Chocolate Chips: Sprinkling mini chocolate chips over the cheesecake adds a pop of chocolate flavor and classic cannoli texture.
- Chopped Pistachios: Add chopped pistachios for a touch of crunchiness, color, and a subtle nutty flavor that pairs well with the creamy cheesecake.
- Mini Cannoli: Place mini cannoli around the edges or on top for the ultimate cannoli presentation.
Serving Suggestions
- Slice Carefully: When serving your Cannoli Cheesecake, use a sharp knife, dipped in hot water and wiped clean between slices, to ensure clean cuts without disturbing the layers.
- Top with Goodies: Arrange your toppings like the piped ricotta cream, chopped pistachios, and mini chocolate chips artfully on top. Add the mini cannoli just before serving.
- Sauce Drizzles: A final touch of elegance can be achieved by drizzling chocolate sauce on the serving plates before placing the slices, creating a decorative and appetizing presentation.
By following these suggestions for adding toppings and serving your Cannoli Cheesecake, you can present a visually stunning and scrumptious dessert that will impress your guests and leave them wanting more.
Make-Ahead Tips
I always like to plan ahead when making desserts like Cannoli Cheesecake to ensure everything turns out perfectly. Here are some make-ahead tips to help you prepare in advance for a stress-free baking experience:
- Prepare the Crust in Advance: You can make the graham cracker crust ahead of time, press it into the pan, cover it, and store it in the refrigerator until you are ready to make the filling.
- Pre-Mix Dry Ingredients: You can combine the dry ingredients for the crust ahead of time.
- Chill the Cheesecake Overnight: For the best texture and flavor, letting the baked cheesecake chill in the refrigerator overnight is essential. This allows the flavors to meld together and for the cheesecake to set properly, resulting in a delicious and creamy dessert. The Ricotta Whipped Cream should be made just before serving for best results.
Conclusion
Creating a delicious Cannoli Cheesecake is a delightful culinary adventure that combines the rich flavors of Italy with a creamy cheesecake experience. From the buttery crust to the luscious filling, topped with your favorite embellishments, this dessert is sure to impress. By following the steps outlined in this article, you can master the art of making a Cannoli Cheesecake that will tantalize your taste buds and wow your guests.
Remember to utilize the recommended tools and techniques, like the water bath, for a flawless result every time. With make-ahead tips in mind, you can effortlessly prepare this decadent treat in advance, ensuring a stress-free dessert option for any occasion. Embrace the magic of Cannoli Cheesecake and enjoy the sweet rewards of your culinary prowess.
PrintCannoli Cheesecake Recipe
Taste Italy in every bite! This luscious Cannoli Cheesecake blends creamy ricotta and cream cheese with the sweet, delightful flavors of a classic cannoli, complete with mini chocolate chips and pistachios. It’s a truly unforgettable dessert, perfect for impressing guests or treating yourself.
- Prep Time: 1 Hour
- Cook Time: 1 Hour (+ 1 Hr oven cooling)
- Total Time: Approx. 2 Hours (+ cooling & 6+ hrs chilling)
- Yield: 8 1x
- Category: Dessert
- Cuisine: Italian-American
Ingredients
For the Graham Cracker Crust:
- 1 1/2 cups (170g) graham cracker crumbs
- 2 tbsp (25g) brown sugar
- 1/4 tsp cinnamon powder
- 6 tbsp (85g) unsalted butter, melted
For the Cannoli Cheesecake Filling:
- 1 1/4 cups (283g) cream cheese, softened
- 1 can (14 oz / 396g) Eagle Brand® Sweetened Condensed Milk
- 1 1/4 cups (283g) ricotta cheese
- 4 large eggs, room temperature
- 1 tbsp vanilla extract
- 1/4 tsp cinnamon powder
For the Ricotta Whipped Cream:
- 1/2 cup (120ml) heavy cream, cold
- 1/4 cup (56g) ricotta cheese
- 1/3 cup (41g) powdered sugar
For Topping:
- 1/4 cup mini chocolate chips
- 1/4 cup chopped pistachios
- 8 mini cannoli (optional, for garnish)
Instructions
Make the Crust:
- Combine graham cracker crumbs, brown sugar, and cinnamon in a bowl. Stir in melted butter until evenly moistened.
- Press the mixture firmly onto the bottom of a 9-inch springform pan. Grease the sides of the pan. Set aside.
Make the Cheesecake Filling & Bake:
- Preheat oven to 300°F (150°C).
- In a large bowl, beat softened cream cheese with an electric mixer on medium speed until creamy (about 2 mins). Scrape down the bowl.
- Add sweetened condensed milk and ricotta cheese; mix until just combined. Scrape the bowl.
- Add eggs one at a time, mixing lightly after each addition until just incorporated. Scrape the bowl between additions.
- Stir in vanilla extract and cinnamon powder.
- Pour batter into the prepared crust.
- Prepare Water Bath: Wrap the outside bottom of the springform pan securely with heavy-duty aluminum foil. Place the wrapped pan inside a larger roasting pan. Carefully pour hot water into the larger pan until it reaches about halfway up the sides of the springform pan.
- Bake for approximately 1 hour, until the edges are set but the center still has a slight jiggle.
- Turn the oven off, prop the oven door open slightly, and leave the cheesecake inside for 1 hour to cool gradually.
- Remove cheesecake from the water bath and oven. Let it cool completely on a wire rack at room temperature.
- Cover loosely and refrigerate for at least 6 hours, preferably overnight, until fully chilled and set.
Make the Ricotta Whipped Cream:
- Just before serving, beat the cold heavy cream, ricotta, and powdered sugar in a chilled bowl with an electric mixer on medium-high speed until stiff peaks form.
- Transfer cream to a piping bag fitted with a decorative tip (like a 6B).
Decorate & Serve:
- Carefully release the sides of the springform pan.
- Pipe the ricotta whipped cream onto the chilled cheesecake.
- Sprinkle generously with mini chocolate chips and chopped pistachios.
- Garnish with mini cannoli, if desired. Slice and serve chilled.
Notes
- Serving Suggestions: Drizzle individual slices with chocolate sauce for extra flair!
- Tips & Tricks:
- Ensure cream cheese and eggs are at room temperature for a smoother, lump-free batter.
- Don’t overmix the batter once the eggs are added – this helps prevent cracking.
- The water bath is key! It ensures gentle, even heat and prevents cracks.
- Gradual cooling (in the oven, then room temp) also helps prevent cracks and ensures the perfect texture.
- Storage: Store leftover cheesecake covered in the refrigerator for up to 3-4 days. The ricotta whipped cream is best added just before serving. Freezing is possible (undecorated), but the texture may change slightly upon thawing.