
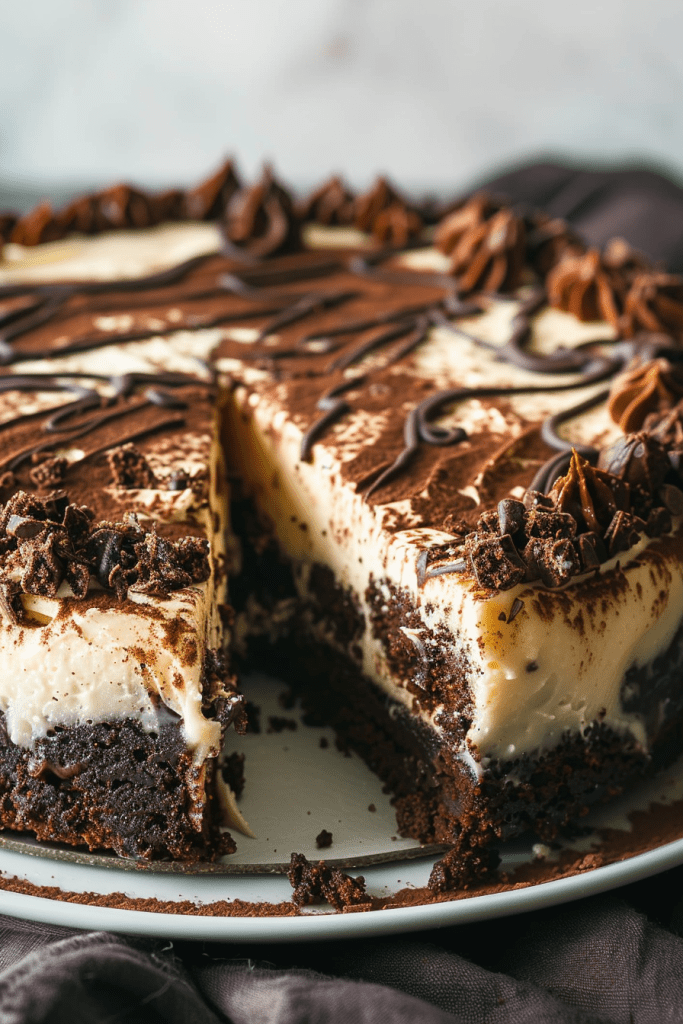
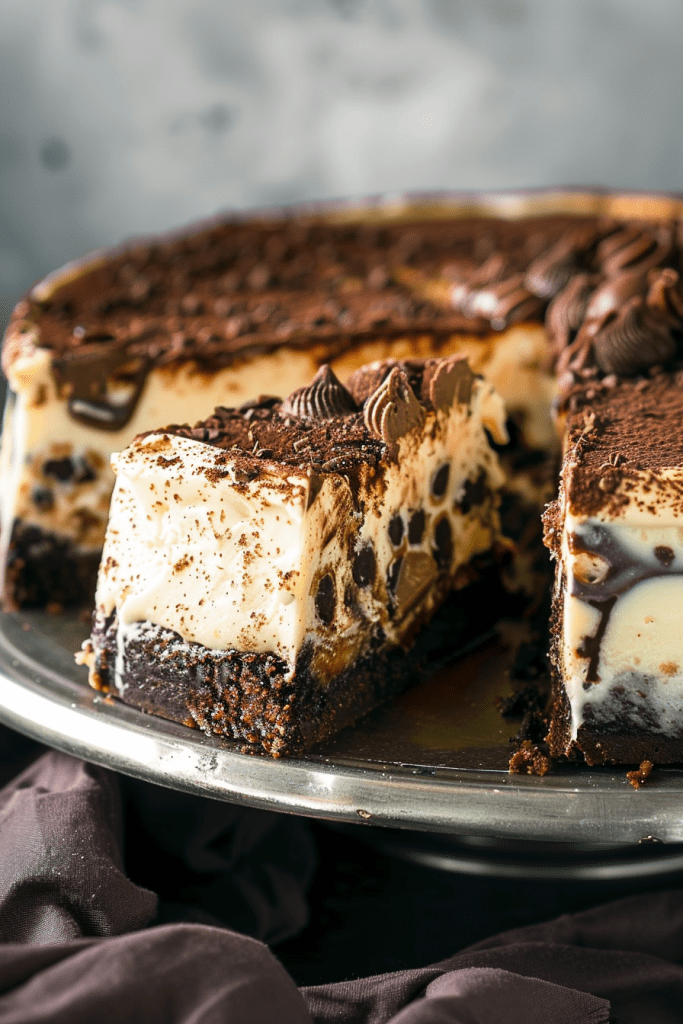
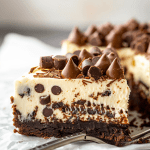
If you’re a dessert enthusiast like me, you’re always on the lookout for the next indulgent treat to satisfy your sweet tooth. Enter the Brownie Bottom Cookie Dough Cheesecake-a triple-layered masterpiece that combines the rich, fudgy goodness of brownies, the creamy delight of cheesecake, and the nostalgic charm of cookie dough. This dessert is perfect for any occasion, whether you’re hosting a dinner party or simply treating yourself to something special.
Ingredients
Creating this delicious dessert involves three distinct layers, each contributing to the overall flavor and texture. Let’s break down what you’ll need for each layer:
Brownie Layer
- 1 stick unsalted butter at room temperature (1/2 cup)
- 3/4 cup semi-sweet chocolate chips
- 1 cup granulated sugar
- 2 eggs
- 1/4 cup milk
- 1 cup all-purpose flour
Cheesecake Layer
- 18 oz cream cheese (two 8oz bricks and 1/4 of another 8oz brick), softened to room temperature
- 3/4 cup granulated sugar
- 3 eggs, room temperature
- 1 tsp vanilla extract
- 1/2 cup sour cream or Greek yogurt
Cookie Dough Layer
- 1 stick unsalted butter at room temperature (1/2 cup)
- 1/2 cup granulated sugar
- 1/2 cup brown sugar
- 1/2 cup sweetened condensed milk
- 3/4 tsp vanilla extract
- 1 cup all-purpose flour
- 1/2 tsp salt
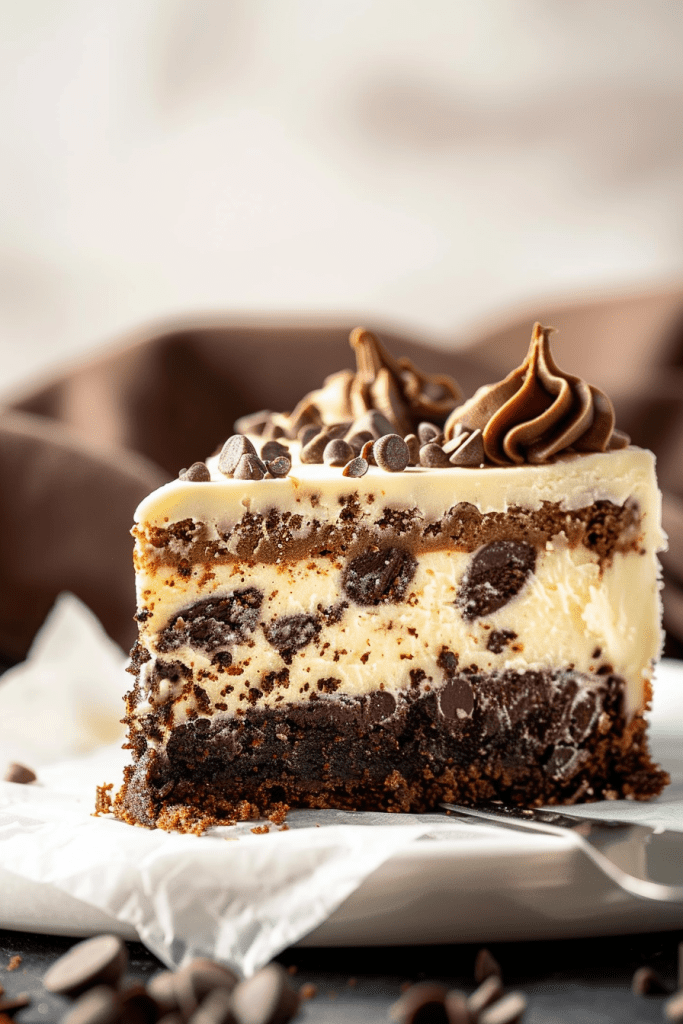
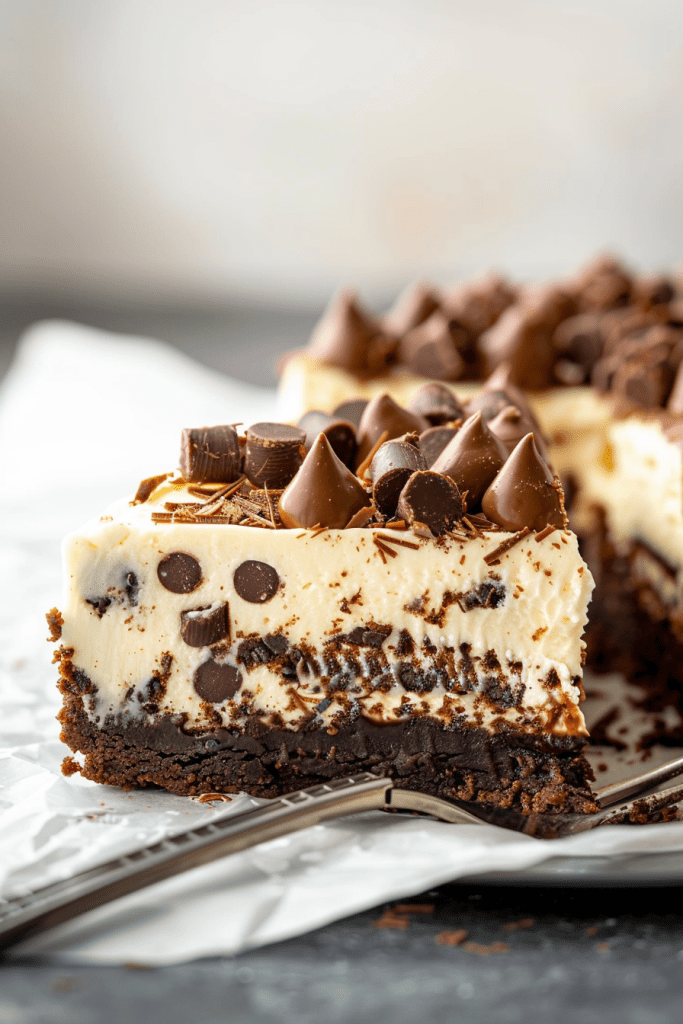
- 1 cup mini chocolate chips
Chocolate Drizzle
- 1 tsp vegetable oil
- 1/3 cup milk chocolate chips
Instructions for Perfection
Creating this dessert requires a bit of patience and precision, but the end result is well worth it. Follow these steps to achieve cheesecake perfection:
Brownie Layer Preparation
- Preheat your oven to 350°F (175°C). Make sure your oven rack is positioned in the center for even baking.
- Line the bottom of a 9-inch springform pan with parchment paper. Cut a circle of parchment paper to fit snugly, ensuring easy removal of the brownie base later. Spray the paper and sides of the pan generously with cooking spray. I use baking spray, but you could use regular spray and lightly dust with flour instead to prevent any sticking.
- In a small saucepan, melt the butter and semi-sweet chocolate chips over low heat, stirring often, until smooth. Keep the heat low to prevent scorching and ensure a silky, even mixture.
- Turn off the heat and whisk in the granulated sugar. Setting the mixture aside to cool for 5–10 minutes, stirring occasionally, allows the sugar to dissolve more evenly and prevents it from cooking the eggs in the next step.
- To a mixing bowl, add the melted chocolate mixture, milk, and eggs, whisking quickly so the residual heat doesn’t cook the eggs. This step is crucial to maintaining the right texture for your brownie base.
- Use a wooden spoon to gently stir in the all-purpose flour until just combined. Avoid overmixing, which can lead to a tough brownie. Pour the batter into the prepared pan in an even layer.
- Bake for about 25 minutes until set. The edges should be firm, and the center should have a slight sheen.
Cheesecake Layer Preparation
- Remove the brownie pan from the oven and set aside to cool slightly while you prepare the cheesecake layer.
- Reduce oven temperature to 325°F (160°C). This lower temperature is essential for achieving a creamy, crack-free cheesecake.
- Using a stand mixer (or hand mixer), beat together the softened cream cheese, granulated sugar, eggs, vanilla extract, and sour cream until the mixture is smooth and completely homogenous. Take care not to mix too quickly or for too long, as this can incorporate air bubbles that lead to cracks during baking.
- Pour the cheesecake batter gently over the slightly cooled brownie layer in the pan, ensuring an even distribution.
- Bake for about 50 minutes until the center is slightly jiggly but not liquid, or when an instant-read thermometer inserted into the center reads 150°F (65°C). Keep a close eye on it, as baking times can vary.
- Turn off the oven, open the door slightly, and allow the cheesecake to cool at room temperature on a wire rack for 30 minutes to 1 hour. This gradual cooling helps prevent cracking by reducing the temperature shock.
- Place the pan in the refrigerator for a minimum of 4 hours, or ideally overnight, to chill completely and firm up to that amazing cheesecake consistency. This step is crucial for both texture and flavor development.
Cookie Dough Layer Preparation
- In a stand mixer (or hand mixer), cream together the softened butter and both granulated and brown sugars on medium-high speed until light and fluffy. This usually takes about 3-5 minutes.
- Beat in the sweetened condensed milk and vanilla extract until well combined, scraping down the sides of the bowl as needed to ensure even mixing.
- Beat in the salt and all-purpose flour until just combined, being careful not to overmix. Overmixing can develop the gluten in the flour, resulting in a tougher cookie dough. Gently fold in the mini chocolate chips.
- Use an offset spatula to gently spread the cookie dough over the top of the cooled cheesecake in an even layer. This is easiest when the springform pan ring has been undone and the cheesecake is free from the sides of the pan.
- If spreading is difficult because the cookie dough is too firm, gently press pieces together to “spackle” the cookie dough onto the cheesecake, creating a cohesive layer.
Finishing Touches
- Microwave the milk chocolate chips and vegetable oil in a microwave-safe bowl in 30-second bursts, stirring after each, until nearly melted. The addition of vegetable oil helps to keep the chocolate smooth and pourable.
- Stir the mixture until all lumps are melted and the chocolate is smooth and glossy.
- Drizzle the melted chocolate artfully over the top of the cheesecake using a spoon or a piping bag for added precision.
Serving Tips
- To slice, use a long, thin, sharp knife. Dip the knife blade into very hot water, shake off any excess water, and make a clean cut. Between each slice, wipe the knife blade clean with a paper towel to remove any crumbs, and dip the knife back into hot water before making the next cut. This ensures neat, professional-looking slices.
- Serve slices on dessert plates with a dollop of freshly whipped cream or a scoop of vanilla ice cream for extra indulgence.
- Garnish with a sprinkle of mini chocolate chips or fresh berries for a pop of color and a burst of fresh flavor that complements the richness of the cheesecake.
Storage and Make-Ahead Tips
This cheesecake is not only delicious but also convenient as it can be made ahead of time:
- Refrigeration: Store in an airtight container in the refrigerator for up to five days to let the flavors meld beautifully.
- Freezing: Freeze individual slices wrapped in plastic wrap and aluminum foil for up to two months. Thaw overnight in the refrigerator before serving.
Variations and Customizations
The beauty of this dessert lies in its versatility:
- Add chopped nuts like pecans or walnuts to the brownie layer for added crunch.
- Experiment with flavored extracts such as almond or coffee in the cheesecake layer for a unique twist.
- Substitute all-purpose flour with gluten-free flour blends to accommodate dietary restrictions.
Conclusion
The Brownie Bottom Cookie Dough Cheesecake is more than just a dessert; it’s an experience that combines rich flavors and textures into a single, unforgettable treat. Whether you’re a seasoned baker or just starting out, this recipe offers a delightful challenge with a rewarding payoff. From its fudgy brownie base to its creamy cheesecake center and irresistible cookie dough topping, every bite is a testament to indulgence.
By following these detailed instructions and tips, you can recreate this decadent dessert in your own kitchen, impressing friends and family alike. Remember, baking is both an art and a science-so embrace creativity while adhering to the fundamentals.
Enjoy your culinary creation, and don’t forget to share it with those you love!
PrintBrownie Bottom Cookie Dough Cheesecake
Get ready for dessert nirvana! This showstopper features a rich, fudgy brownie base, a luxuriously creamy cheesecake middle, and a dreamy, safe-to-eat cookie dough topping. It’s the ultimate triple-layer treat that’ll have everyone asking for seconds!
- Prep Time: 15 minutes
- Cook Time: 1 hour 15 minutes
- Total Time: 1 hour 30 minutes (plus chilling time)
- Yield: 8 slices 1x
- Category: Dessert
- Cuisine: American
Ingredients
For the Brownie Layer:
- 1 stick (1/2 cup) unsalted butter, room temperature
- 3/4 cup semi-sweet chocolate chips
- 1 cup granulated sugar
- 2 large eggs
- 1/4 cup milk
- 1 cup all-purpose flour
For the Cheesecake Layer:
- 18 oz cream cheese (two 8oz bricks + 1/4 of another), softened to room temperature
- 3/4 cup granulated sugar
- 3 large eggs, room temperature
- 1 tsp vanilla extract
- 1/2 cup sour cream or Greek yogurt
For the Cookie Dough Layer:
- 1 stick (1/2 cup) unsalted butter, room temperature
- 1/2 cup granulated sugar
- 1/2 cup brown sugar
- 1/2 cup sweetened condensed milk
- 3/4 tsp vanilla extract
- 1 cup all-purpose flour
- 1/2 tsp salt
- 1 cup mini chocolate chips
For the Chocolate Drizzle (Optional but Recommended!):
- 1/3 cup milk chocolate chips
- 1 tsp vegetable oil
Instructions
Craft the Brownie Layer:
- Preheat & Prep: Fire up your oven to 350°F (175°C). Line the bottom of a 9-inch springform pan with parchment paper, then spray the paper and pan sides with cooking spray.
- Melt & Mix: In a small saucepan, gently melt the butter and chocolate chips over low heat until smooth. Remove from heat, whisk in the sugar, and let it cool for 5-10 minutes, stirring a few times.
- Combine: Whisk the eggs and milk into the cooled chocolate mixture quickly. Gently stir in the flour until just combined (don’t overdo it!).
- Bake: Pour the batter into your prepared pan, spread evenly, and bake for 25 minutes. Let it cool a bit while you whip up the next layer.
Create the Creamy Cheesecake Layer:
- Adjust Oven: Lower the oven temperature to 325°F (160°C).
- Beat Smooth: In a mixer, beat the softened cream cheese, sugar, eggs, vanilla, and sour cream (or Greek yogurt) until just smooth. Try not to mix too fast to avoid air bubbles.
- Layer & Bake: Gently pour the cheesecake batter over the brownie layer. Bake for 50 minutes, or until the center is just slightly jiggly (an instant-read thermometer should read 150°F/65°C).
- Cool Down: Turn off the oven and let the cheesecake cool inside with the oven door slightly ajar for about 30 minutes to an hour. Then, move it to a wire rack to cool completely before chilling in the refrigerator for at least 4 hours, or ideally overnight, to set perfectly.
Whip Up the Cookie Dough Topping:
- Cream: In your mixer, cream the room temperature butter with both granulated and brown sugars on medium-high speed until light and fluffy.
- Mix Ins: Beat in the sweetened condensed milk and vanilla extract. Then, mix in the salt and flour until just combined. Finally, stir in those yummy mini chocolate chips.
- Top It Off: Gently spread the cookie dough over the chilled cheesecake. An offset spatula works great, or you can press small pieces together to cover the surface. This is easiest if you’ve released the springform ring.
Add the Finishing Drizzle:
- Melt Chocolate: Microwave the milk chocolate chips and vegetable oil in 30-second intervals, stirring each time, until smooth and luscious.
- Drizzle Away: Drizzle the melted chocolate over your masterpiece.
Notes
- Serving Suggestions: A slice of this heaven pairs beautifully with a dollop of whipped cream, a scoop of vanilla ice cream, or a few fresh berries for a pop of color!
- Tips & Tricks:
- Room Temp is Your Friend: For the smoothest cheesecake, make sure your cream cheese and eggs are at room temperature.
- Slicing Like a Pro: Use a long, thin knife dipped in hot water (wipe clean between cuts) for those perfect, clean slices.
- No Springform? No Problem! A regular 9-inch cake pan lined with parchment paper (with some overhang for lifting) can work in a pinch.
- Safe to Eat! This cookie dough is eggless, thanks to the sweetened condensed milk, making it perfectly safe and delicious raw.
- Storage Savvy:
- Fridge: Keep your cheesecake covered in the refrigerator for up to 5 days. The flavors actually get even better!
- Freezer: For longer storage, wrap individual slices tightly in plastic wrap and then foil. They’ll keep well in the freezer for up to 2 months. Thaw overnight in the fridge before enjoying.
Enjoy every decadent bite!