
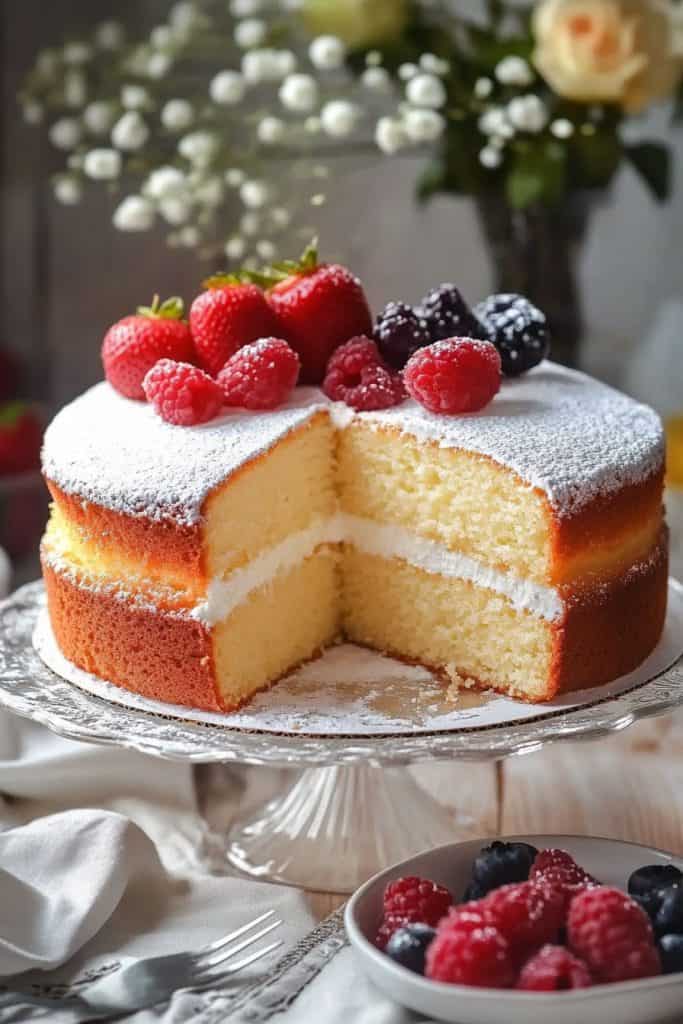
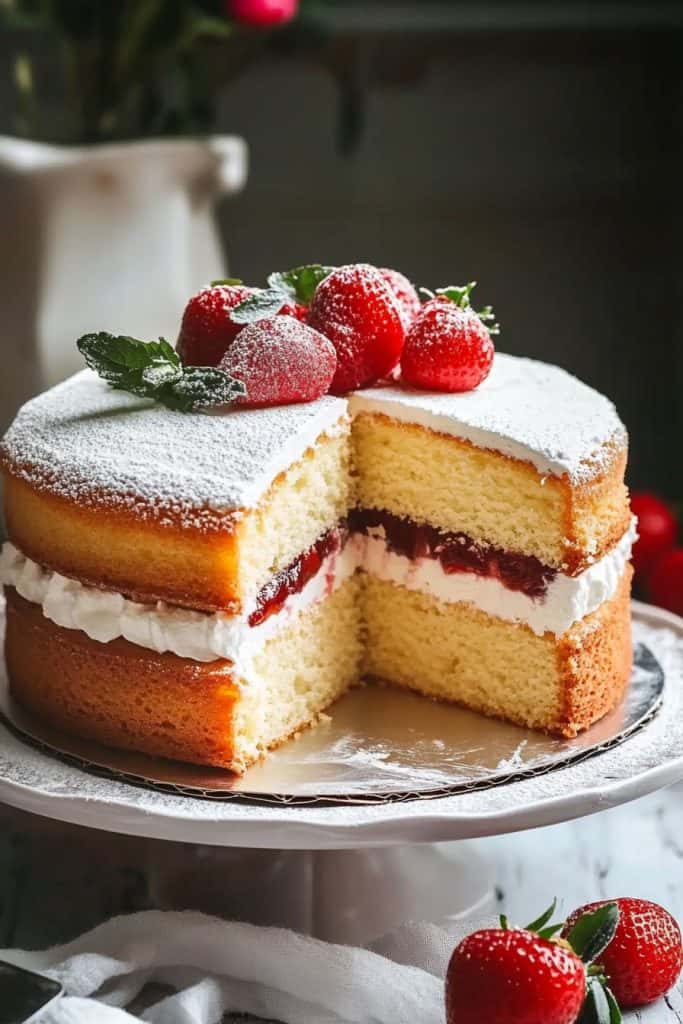
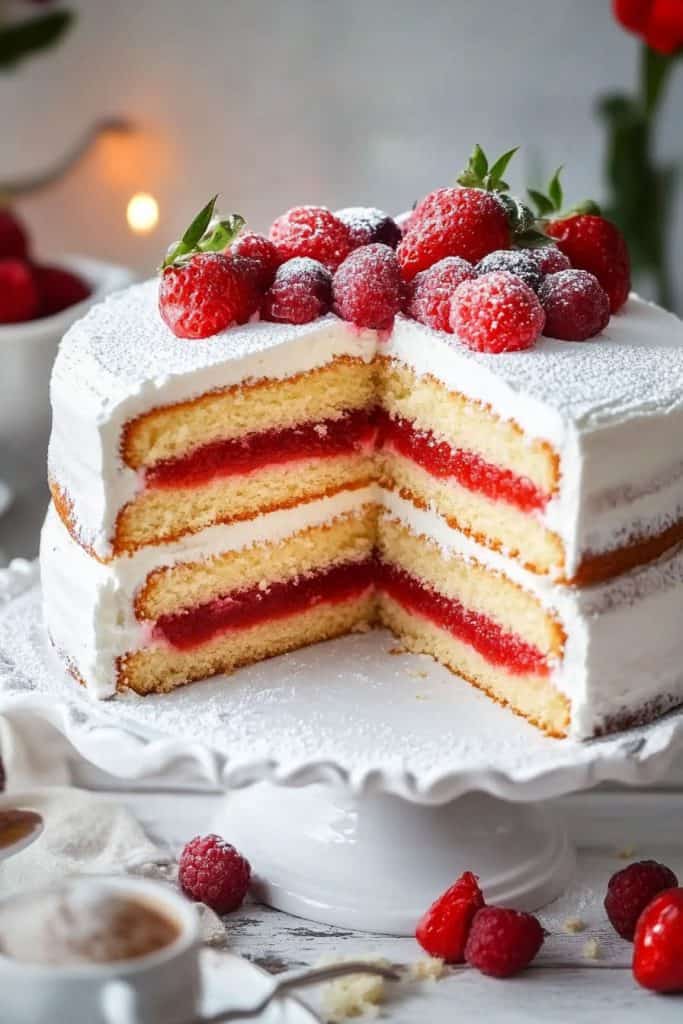
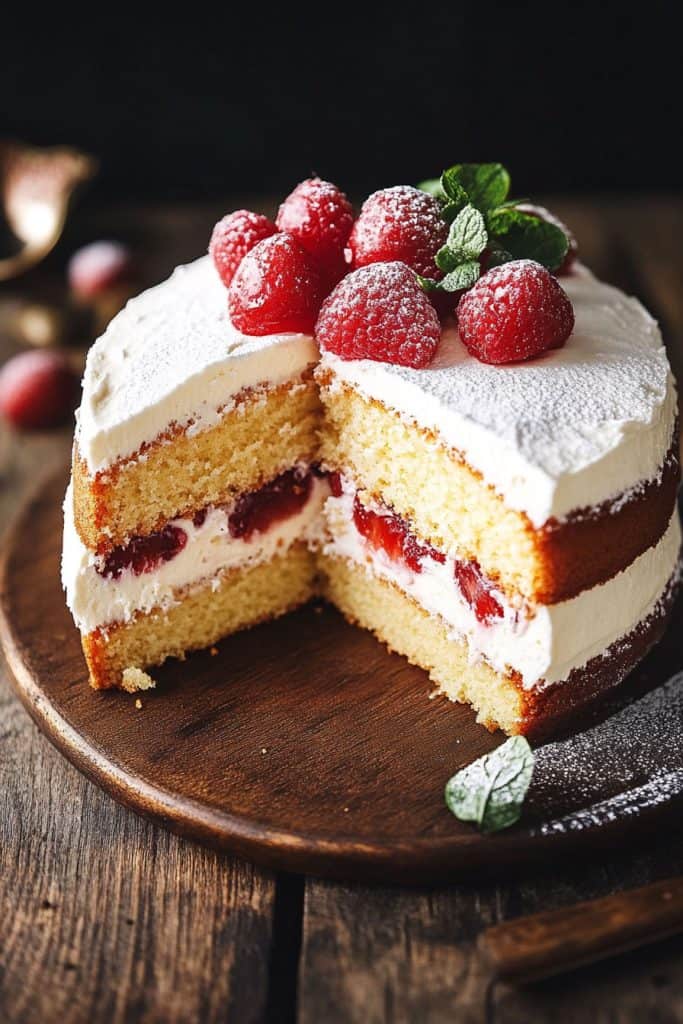
The British Victoria Sponge Cake is a timeless classic that never fails to impress. Named after Queen Victoria, who was known to enjoy a slice with her afternoon tea, this cake embodies simplicity and elegance. Its light, airy texture paired with a luscious layer of jam and whipped cream makes it a favorite for any occasion.
I love how straightforward this cake is to make, yet it always turns out stunning. With just a few basic ingredients, you can create a dessert that’s both beautiful and delicious. Whether you’re a seasoned baker or a complete novice, the Victoria Sponge Cake is a delightful recipe to have in your repertoire.

Ingredients
To create a delicious British Victoria Sponge Cake, gather the following ingredients. These will ensure your cake is light, fluffy, and flavorful.
For the Cake
- 1 cup (225g) unsalted butter, softened
- 1 cup (225g) granulated sugar
- 4 large eggs, room temperature
- 1 teaspoon vanilla extract
- 2 cups (225g) all-purpose flour
- 2 teaspoons baking powder
- 1/4 teaspoon salt
- 2 tablespoons milk
For the Filling
- 1/2 cup (150g) strawberry jam or raspberry jam
- 1 cup (240ml) heavy cream, whipped
- 2 tablespoons powdered sugar, for dusting
- Fresh strawberries or raspberries
- Mint leaves
By using these specific ingredients, you can recreate the iconic British Victoria Sponge Cake in your own kitchen with ease.
Tools and Equipment
Creating the perfect Victoria Sponge Cake requires the right tools and equipment. Here is a detailed list of what you’ll need:
Tools
- Mixing Bowls: You’ll need at least two large bowls. One for your dry ingredients and another for wet ingredients.
- Stand Mixer or Hand Mixer: This is crucial for creaming the butter and sugar together until light and fluffy.
- Measuring Cups and Spoons: Accurate measurements are key to baking success.
- Sifter: Essential for ensuring your flour and baking powder are lump-free, giving you a light and airy sponge.
- Rubber Spatula: Helps in folding the ingredients together without deflating the batter.
- Offset Spatula: Useful for spreading the jam evenly on the cake layers.
- Piping Bag and Star Nozzle: Optional, for adding decorative whipped cream touches.
- 8-Inch Round Cake Pans: Two pans are needed to create the classic two-layer cake.
- Wire Cooling Rack: Allows the cakes to cool completely and evenly without becoming soggy.
- Paring Knife: For slicing fresh strawberries or raspberries for garnish.
- Cake Stand or Serving Platter: Adds a touch of elegance when presenting your finished cake.
Having these tools and equipment ready will streamline your baking process and help you achieve that perfect Victoria Sponge.
Directions
Follow these steps to create an impeccable British Victoria Sponge Cake that’s sure to impress.
Prep
- Preheat Oven: Preheat your oven to 350°F (175°C).
- Grease Pans: Grease two 8-inch round cake pans with butter and dust with flour. Line the bottoms with parchment paper for easy release.
- Gather Ingredients: Measure and have all your ingredients ready and at room temperature.
Make the Cake
- Cream Butter and Sugar: In a large mixing bowl, beat 1 cup of unsalted butter and 1 cup of granulated sugar using a hand mixer or stand mixer on medium speed until light and fluffy, approximately 3-4 minutes.
- Add Eggs and Vanilla: Add 4 large eggs, one at a time, beating well after each addition. Mix in 1 teaspoon of vanilla extract.
- Combine Dry Ingredients: In a separate bowl, sift together 2 cups of all-purpose flour, 2 teaspoons of baking powder, and 1/4 teaspoon of salt.
- Incorporate Dry and Wet Ingredients: Gradually add the dry ingredients to the butter mixture, alternating with 1/4 cup of milk, beginning and ending with the dry ingredients. Mix until just combined.
- Divide Batter: Evenly divide the batter between the prepared pans, smoothing the tops with a rubber spatula.
- Bake: Bake in the preheated oven for 25-30 minutes, or until a toothpick inserted into the center comes out clean.
- Cool: Allow cakes to cool in the pans for 10 minutes, then transfer to a wire cooling rack to cool completely.
Make the Filling
- Prepare Whipped Cream: In a chilled mixing bowl, whip 1 cup of heavy cream and 2 tablespoons of powdered sugar until soft peaks form. Be careful not to overwhip.
- Prepare Jam: Warm 1/2 cup of raspberry or strawberry jam slightly in the microwave for easier spreading. Ensure the jam is smooth and free of lumps.
- Layer One Cake: Place one of the cakes on your cake stand or serving platter.
- Spread Jam: Evenly spread the warmed jam over the top of the cake.
- Add Whipped Cream: Pipe or spread the whipped cream over the jam layer.
- Top with Second Cake: Place the second cake on top, gently pressing down.
- Dust with Powdered Sugar: Lightly dust the top of the cake with powdered sugar.
- Decorate with Berries and Mint: Garnish with fresh strawberries or raspberries and mint leaves for a beautiful finish.
Tips for Success
Use Room Temperature Ingredients
For the perfect British Victoria Sponge Cake, always use room temperature ingredients. Butter, eggs, and milk combine more smoothly when they are at room temperature, resulting in a better texture. Take your ingredients out of the fridge at least 30 minutes before you begin baking.
Precise Measuring
Accurate measurements are essential. Use a kitchen scale for precise flour and sugar measurements. A little too much or too little can affect the cake’s texture.
Creaming Butter and Sugar
When mixing butter and sugar, beat them until they’re light and fluffy. This process can take about 3 to 5 minutes. This step is crucial for incorporating air into the batter, which gives the cake its light texture.
Sifting Dry Ingredients
Always sift your dry ingredients – flour, baking powder, and salt. This ensures there are no lumps and combines everything evenly. It also adds extra air to the batter, making the cake lighter.
Gentle Hand with Flour
After adding the flour mix to the wet ingredients, gently fold it in using a spatula. Over-mixing can develop gluten, making the cake dense rather than light and airy.
Proper Oven Temperature
Ensure your oven is preheated to the right temperature. An oven thermometer can help verify this. Avoid opening the oven door frequently while baking as this can cause the cake to deflate.
Cooling Completely
Allow the cake layers to cool completely before adding the jam and whipped cream. If the cake is even slightly warm, it can cause the filling to melt and slide off.
Use High-Quality Jam and Fresh Cream
Select high-quality jam for the filling – preferably homemade or a good brand. Freshly whipped cream adds an airy, luxurious texture compared to store-bought varieties.
Even Cake Layers
For even cake layers, level the tops of your cakes with a serrated knife once they have cooled. This ensures your cake stacks beautifully and doesn’t lean to one side.
Dust with Powdered Sugar
For an elegant touch, dust the top of your assembled cake with powdered sugar using a fine sieve. This gives the sponge an attractive finish and enhances its visual appeal.
Follow these tips for a delightful and perfect British Victoria Sponge Cake. Each step helps achieve the ideal texture, flavor, and appearance.
Storage Instructions
Storing your British Victoria Sponge Cake correctly is crucial to maintain its fresh and delightful texture. Here’s how I recommend you do it:
Room Temperature Storage
- Cover with Plastic Wrap or Foil: Once the cake has completely cooled, wrap it tightly with plastic wrap or aluminum foil to keep out air and moisture.
- Place in an Airtight Container: Alternatively, place the wrapped cake in an airtight container. This ensures the cake stays soft and moist.
- Shelf Life: Stored at room temperature, your Victoria Sponge Cake will stay fresh for up to 2 days.
Refrigeration
- Wrap Properly: If you need to store the cake for a longer period, wrapping it tightly in plastic wrap is key.
- Store in an Airtight Container: Place the wrapped cake in an airtight container to prevent it from absorbing any fridge odors.
- Extend Shelf Life: Refrigerated, the cake will remain fresh for up to 5 days.
- Room Temperature Before Serving: Bring the cake to room temperature before serving to enjoy its original soft texture and rich flavor.
Freezing
- Double Wrapping: For long-term storage, double wrap each cake layer in plastic wrap and then in aluminum foil for maximum protection.
- Use Freezer-Safe Bags: Place the wrapped layers into a freezer-safe bag to prevent freezer burn.
- Shelf Life: The cake will keep well in the freezer for up to 2 months.
- Thaw Properly: When ready to use, thaw the cake layers in the refrigerator overnight before bringing them to room temperature.
Handling Cream and Jam
- Store Separately: If you’ve used fresh cream and jam, it’s best to store these components separately.
- Cream Storage: Whipped cream should be kept in an airtight container and refrigerated for no more than 3 days.
- Jam Storage: Store any remaining jam in a sealed jar in the refrigerator for up to 2 weeks.
- Assembly: Assemble the cake with chilled components close to serving time for the best taste and texture.
- Avoid Direct Sunlight: Keep the cake away from direct sunlight even at room temperature.
- Check for Freshness: Always check for any off smells or signs of mold before consumption, especially if stored for several days.
Conclusion
Making a British Victoria Sponge Cake is a delightful experience that brings a touch of royal elegance to any occasion. By following the tips and techniques shared, you’ll be able to bake a cake that’s both delicious and beautiful. Remember to store it properly to maintain its texture and flavor. With high-quality ingredients and a bit of patience, you can create a dessert that’s sure to impress your family and friends. Happy baking!
PrintBritish Victoria Sponge Cake

The British Victoria Sponge Cake is a light, airy classic that’s perfect for afternoon tea or any special occasion. Named after Queen Victoria, this timeless dessert features layers of soft sponge filled with fruity jam and whipped cream, topped with a dusting of powdered sugar. Simple yet elegant, it’s a true crowd-pleaser!
- Prep Time: 20 minutes
- Cook Time: 25–30 minutes
- Total Time: 50 minutes
- Yield: 8–10 slices 1x
- Category: Dessert
- Cuisine: British
Ingredients
For the Cake:
- 1 cup (225g) unsalted butter, softened
- 1 cup (225g) granulated sugar
- 4 large eggs, room temperature
- 1 teaspoon vanilla extract
- 2 cups (225g) all-purpose flour
- 2 teaspoons baking powder
- 1/4 teaspoon salt
- 2 tablespoons milk
For the Filling:
- 1/2 cup (150g) strawberry or raspberry jam
- 1 cup (240ml) heavy cream, whipped with:
- 2 tablespoons powdered sugar
For Garnish:
- Powdered sugar for dusting
- Fresh strawberries or raspberries (optional)
- Mint leaves (optional)
Instructions
Step 1: Prepare the Cake Batter
- Preheat your oven to 350°F (175°C). Grease and line two 8-inch round cake pans with parchment paper.
- In a large bowl, cream together the softened butter and granulated sugar using an electric mixer until pale and fluffy (about 3–4 minutes).
- Beat in the eggs one at a time, mixing well after each addition. Stir in the vanilla extract.
- Sift together the flour, baking powder, and salt in a separate bowl. Gradually fold the dry ingredients into the wet mixture, alternating with milk. Mix until just combined—do not overmix.
Step 2: Bake the Cakes
- Divide the batter evenly between the prepared pans and smooth the tops with a spatula.
- Bake for 25–30 minutes, or until golden brown and a toothpick inserted into the center comes out clean.
- Let cakes cool in their pans for 10 minutes, then transfer to a wire rack to cool completely.
Step 3: Prepare the Filling
- Slightly warm the jam in the microwave for easier spreading and ensure it’s smooth.
- In a chilled bowl, whip heavy cream with powdered sugar until soft peaks form—be careful not to overwhip.
Step 4: Assemble the Cake
- Place one cake layer on a serving plate or cake stand. Spread an even layer of jam over the top.
- Pipe or spread whipped cream over the jam layer evenly.
- Place the second cake layer on top and gently press down to secure it. Dust with powdered sugar and garnish with fresh berries and mint leaves if desired.
Notes
Serving Suggestions:
- Serve slices with hot tea or coffee for an authentic British teatime experience.
- Add fresh berries on the side for extra flavor.
Tips & Tricks:
- Use room-temperature ingredients for smoother mixing and better texture.
- Avoid overmixing to keep your sponge light and airy.
- Weigh batter evenly between pans for uniform layers.
Storage & Reheating:
- Store assembled cake in an airtight container in the refrigerator for up to 2 days.
- For longer storage, freeze unassembled sponge layers wrapped tightly in plastic wrap for up to 2 months.
- Bring refrigerated slices to room temperature before serving to restore softness.