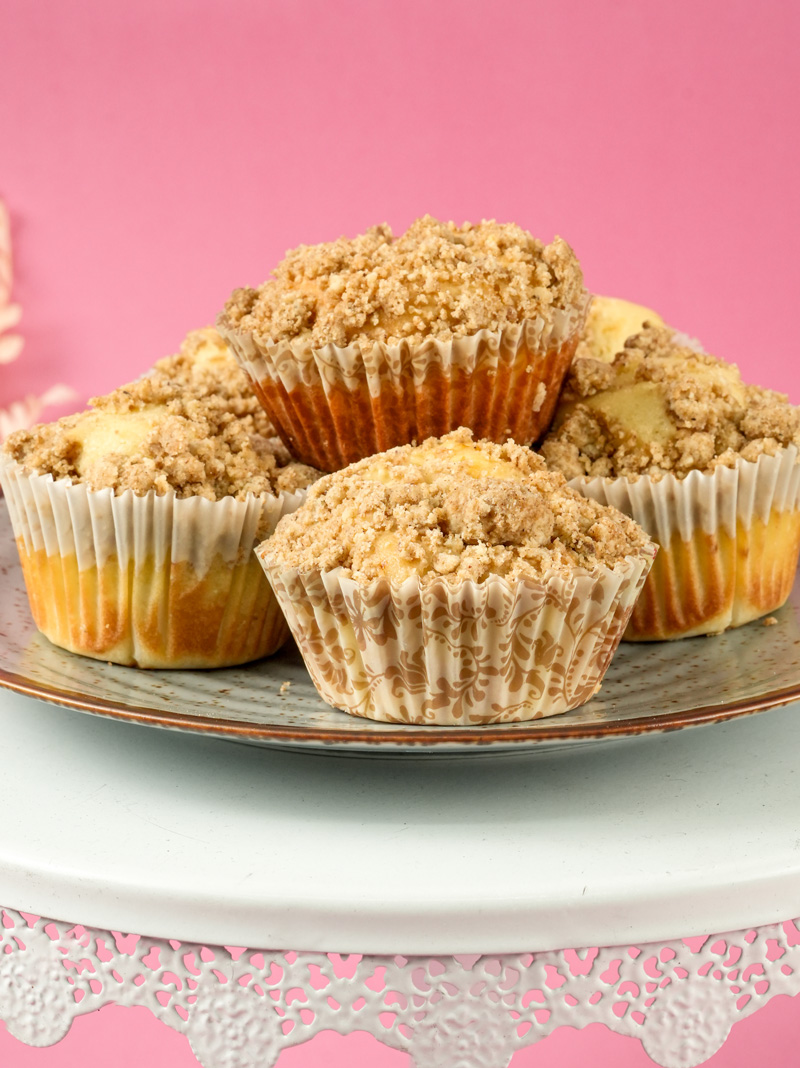
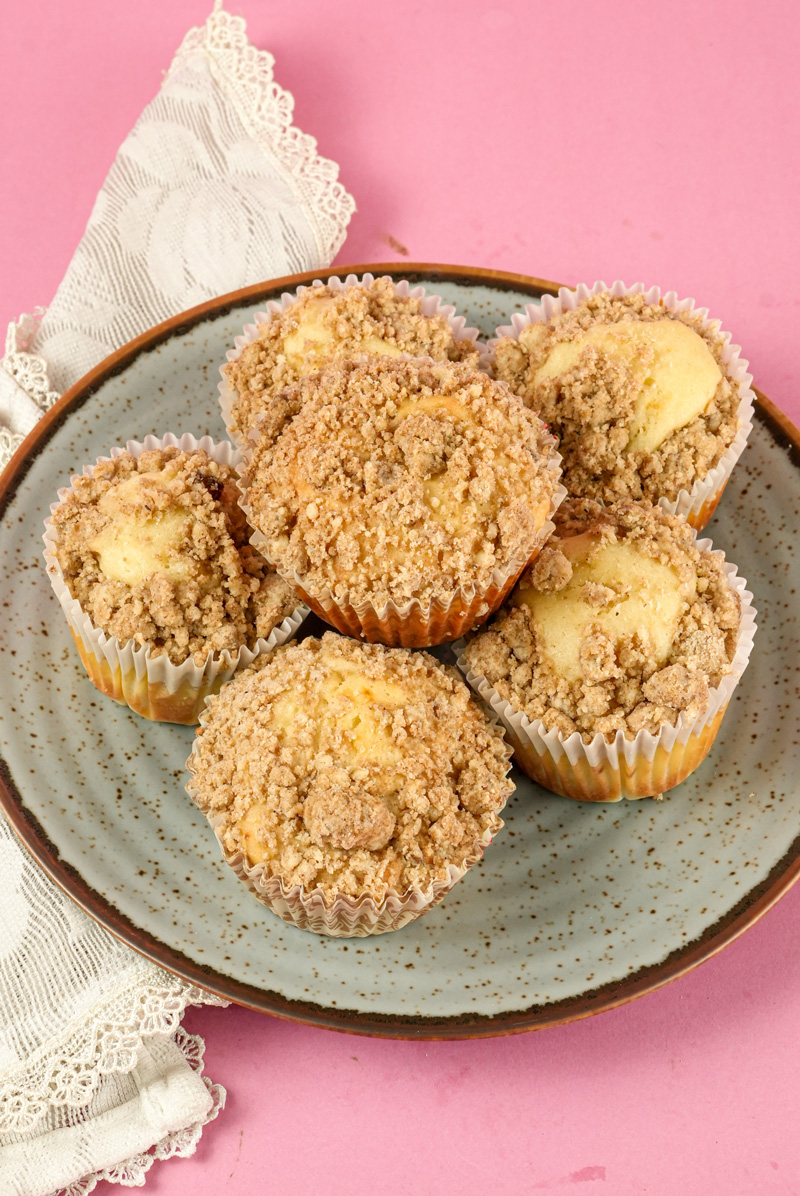
Hey everyone! I am so excited to share this recipe with you today. If you’re looking for a treat that’s all about comfort, warmth, and just a little bit of morning magic, then these Coffee Cake Muffins are IT.
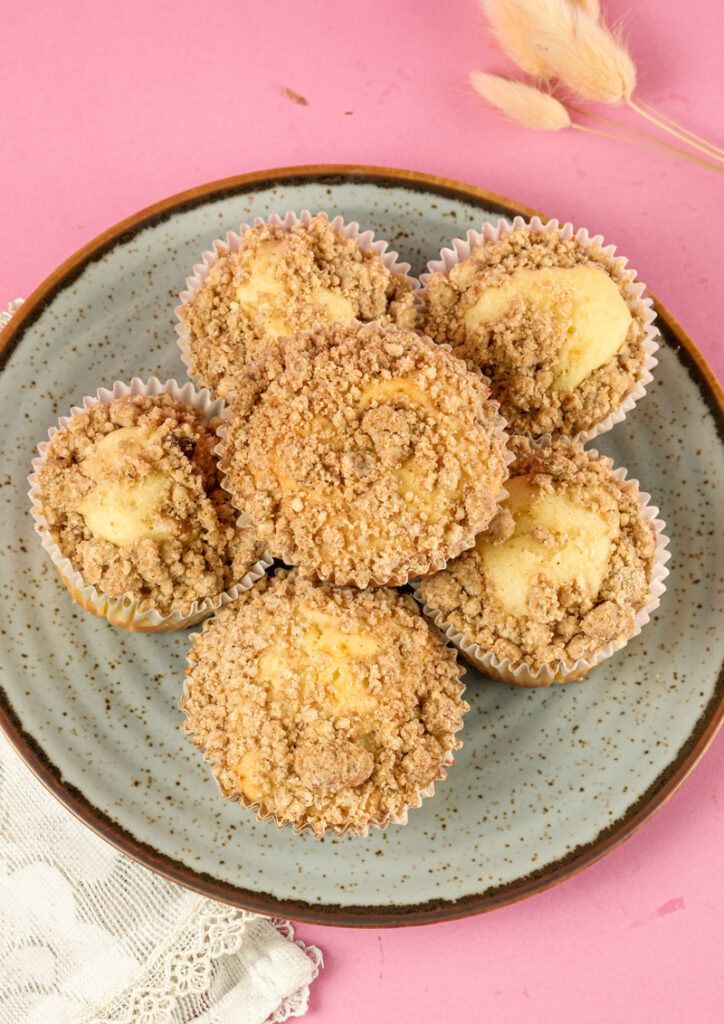
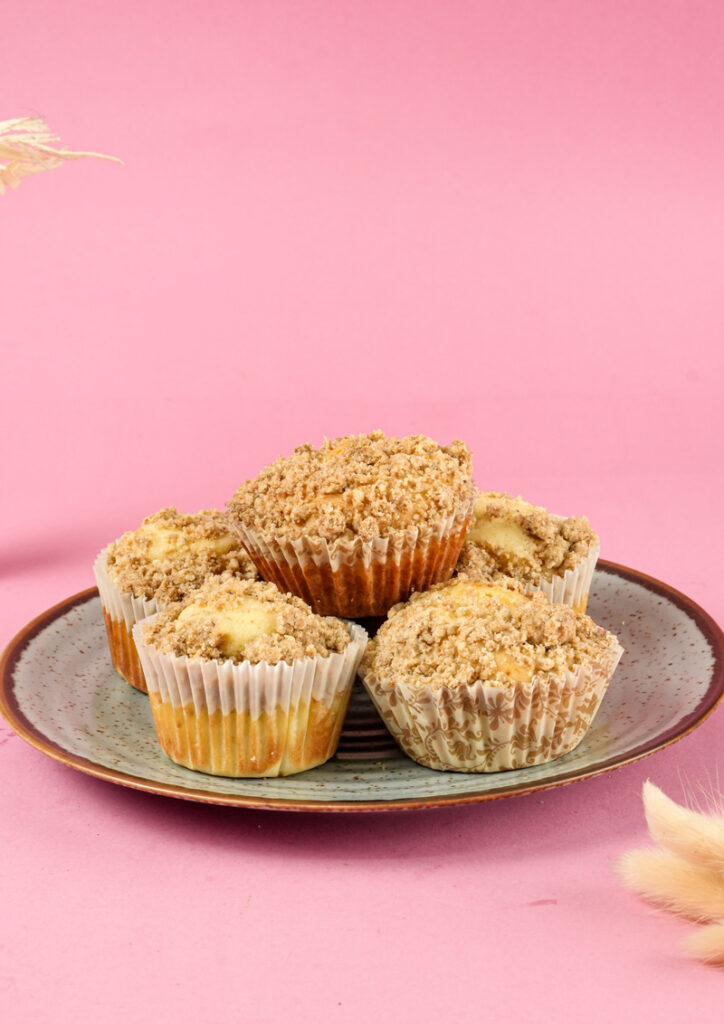
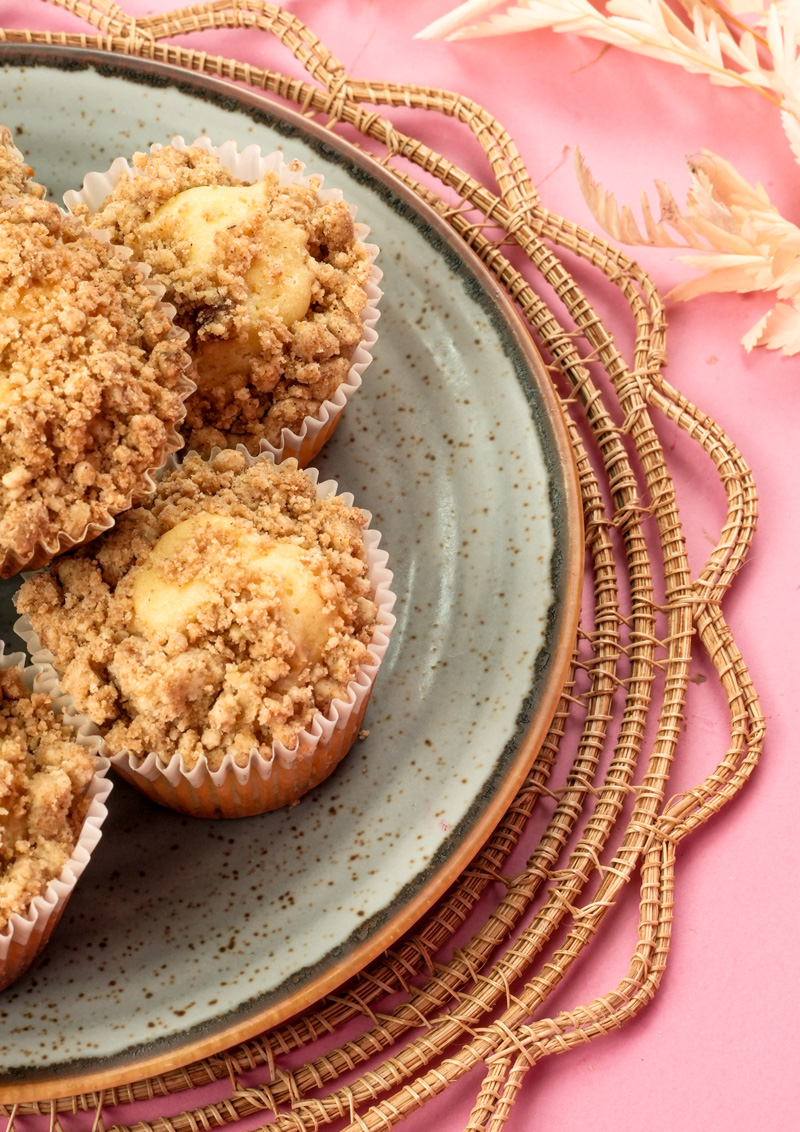
Seriously, just picture this: you bite into a soft, buttery muffin. Then, surprise! A sweet cinnamon-sugar ribbon is waiting inside. And the top? Oh, it’s piled high with a crunchy, crumbly streusel and a light drizzle of vanilla glaze. My mouth is watering just thinking about it! Yours too?
These aren’t your average muffins. Nope. They’re more like a little adventure for your taste buds. They’re perfect with your morning coffee (or tea, if that’s your thing!). They look great on a brunch table. And they make a pretty awesome afternoon snack. You know, for when you need a little pick-me-up.
The best parts of a classic coffee cake – that yummy crumb, that warm spice – it’s all packed into these neat little muffins. Super easy to share. Or not. Hey, I’m not judging!
Fun fact: “Coffee cake” usually doesn’t have any coffee in it! Weird, right? It got its name because people traditionally ate it with their coffee. It started out as something called Kaffeekuchen in Germany, and bakers all over Europe and America put their own spin on it. Now, it’s a total classic.
This recipe? It takes all that good stuff and turns it into what I think are truly super moist coffee cake muffins. We’re talking layers of flavor, layers of texture. You’ll definitely want more than one! I really wanted a muffin that had everything: soft cake, a clear cinnamon swirl, a really buttery crumb, and a simple sweet glaze to bring it all home.
Ready to bake? Let’s do this!
Recipe Overview
Before we jump into making these delicious things, here’s a quick rundown:
- Time Commitment: You’ll need about 25 minutes to get everything ready and 20 minutes for baking. So, total time is around 45 minutes. And trust me, your kitchen will smell amazing!
- How Many Muffins? This recipe makes 10 regular-sized muffins.
- Need More? Easy! Just double everything to make 20. Make sure you have two muffin tins, or bake them in two batches.
- Just a Few? You can also cut the recipe in half for 5 muffins. If you do this, you can use a smaller muffin tin or just fill every other cup in a standard one.
Here’s a quick guide if you’re halving it:
- How Hard Is It? I’d say this recipe is Easy to Medium. If you’re new to baking, don’t sweat it! The steps are pretty clear. The “medium” part is just keeping track of the different bits – batter, swirl, crumb, and glaze. But I’ll walk you right through it. If you’ve baked before, you’ll find this one a breeze.
- What You’ll Need (Kitchen Tools):
- Muffin pan (the standard 12-cup kind, we’ll use 10 spots)
- Cupcake liners (these make cleanup so much easier!)
- Mixing bowls (a big one for batter, a couple of small ones for the other goodies)
- Hand mixer (cordless is nice, but any electric one will do. A stand mixer works great too!)
- Cookie scoops (optional, but a large one for batter and a small one help make muffins all the same size. Spoons work too!)
- Whisk
- Spatula (for scraping the bowl – don’t leave any batter behind!)
- Measuring cups and spoons
- No mixer? No problem. You can mix the butter and sugar with a strong whisk and some muscle. Then use a wooden spoon for the rest. Cookie scoops are handy, but tablespoons are fine for dropping batter.
- Make Them Ahead? Yes! These are great for making ahead.
- Bake a batch on Sunday. Breakfast for the week? Done.
- You can make the crumb topping a day or two early. Just keep it in an airtight container in the fridge.
- The cinnamon sugar swirl can be mixed ahead too.
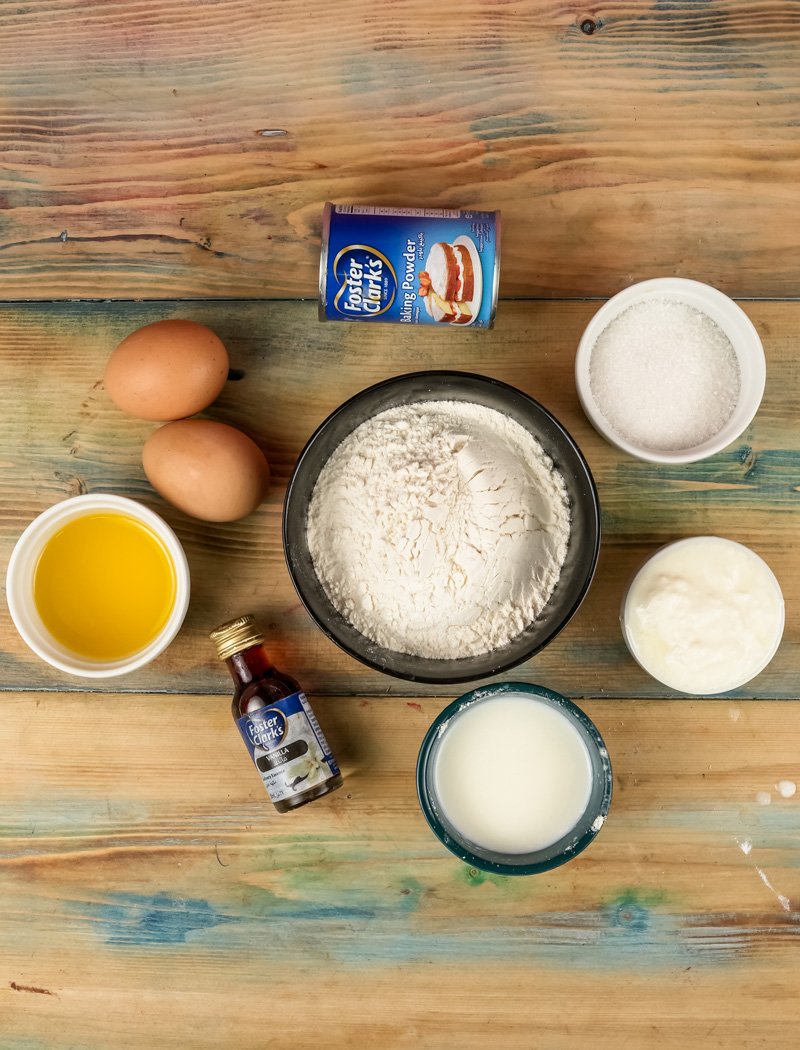
Ingredients: What You Need for These Goodies
Let’s chat about what goes into these amazing muffins. Good ingredients do make a difference, but honestly, this recipe is pretty forgiving!
For the Muffins themselves:
- ½ cup (113g) unsalted butter, melted: Melted butter helps make the muffins tender. I always melt mine and then let it cool down a bit so it doesn’t scramble the eggs! Good butter adds a nice rich taste.
- 1 cup (200g) granulated sugar: For sweetness and good texture.
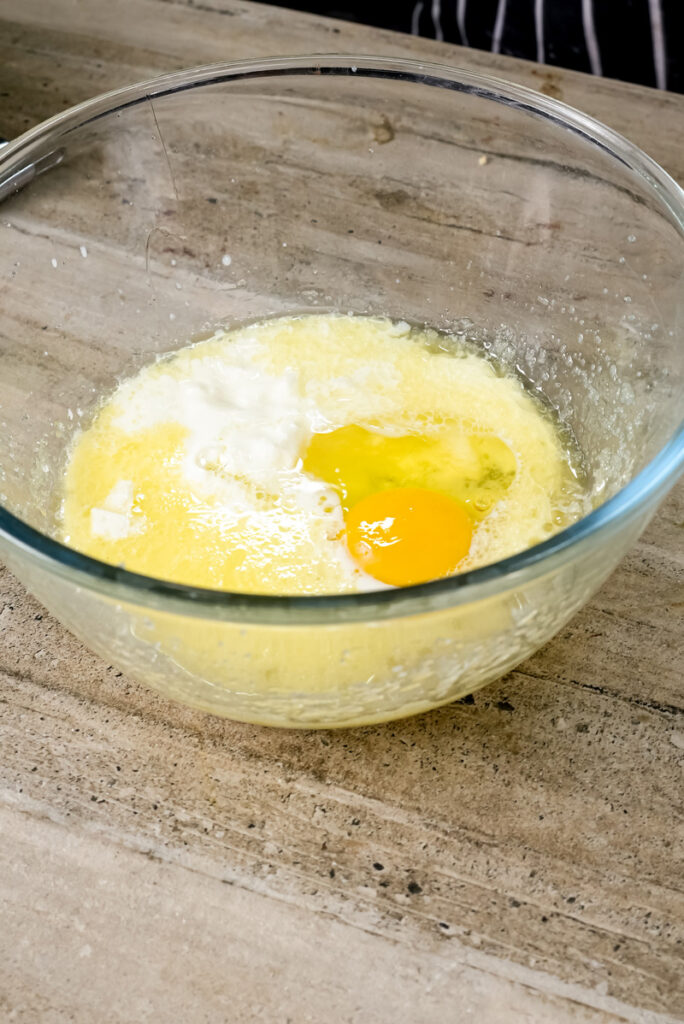
- 2 large eggs, at room temperature: Eggs mix in way better when they’re not cold. This helps make the muffins lighter. Forgot to take them out? Quick tip: put them in a bowl of warm (not hot!) water for 5-10 minutes.
- ½ cup (120g) sour cream: This is one of my secrets for super moist coffee cake muffins! It adds moisture and a little tang that cuts the sweetness just right. Full-fat stuff works best.
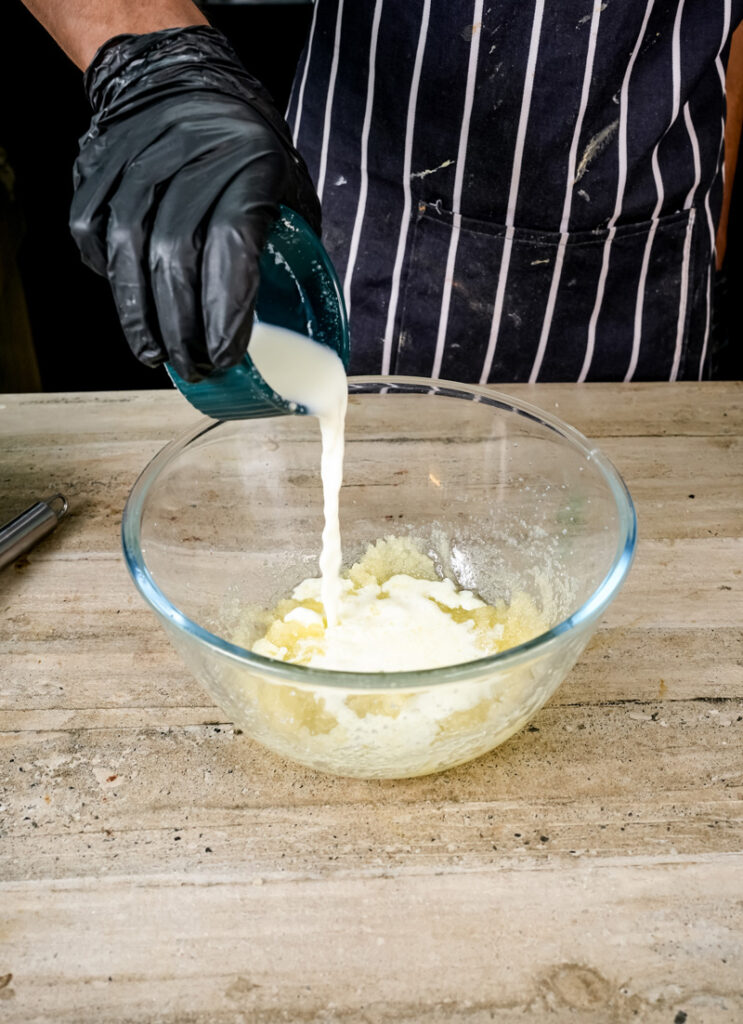
- ¼ cup (60ml) buttermilk: More moisture magic! If you don’t have buttermilk, here’s an easy trick: put ¼ tablespoon of lemon juice or white vinegar in a measuring cup. Then, add milk up to the ¼ cup line. Let it sit for 5-10 minutes. It’ll look a bit curdled – that’s perfect!
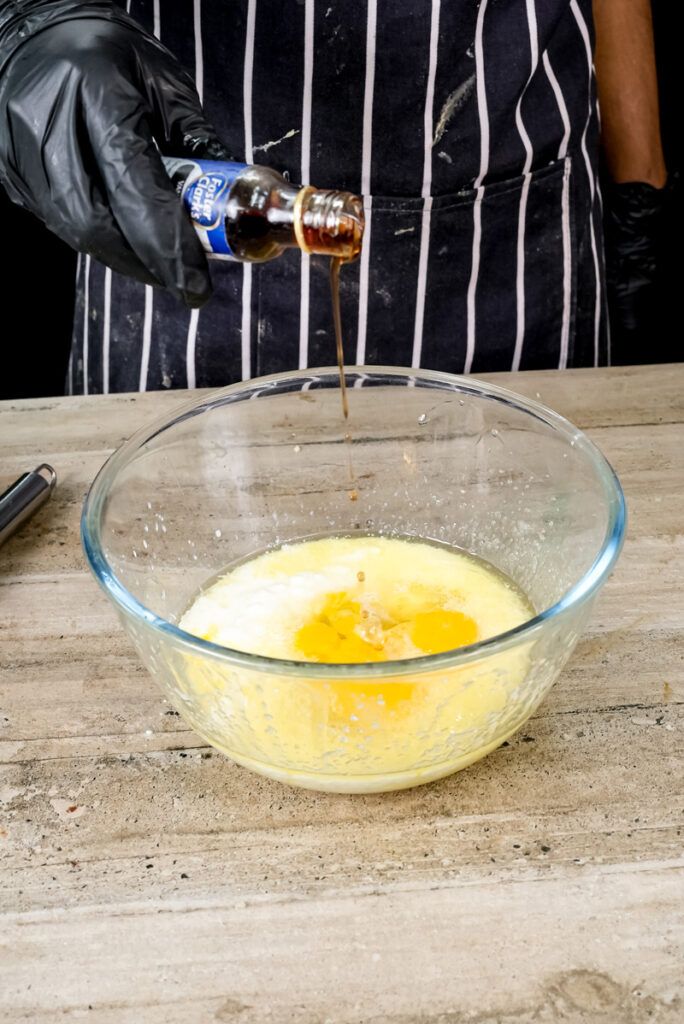
- 2 teaspoons vanilla extract: Use pure vanilla extract if you can. It really punches up the flavor.
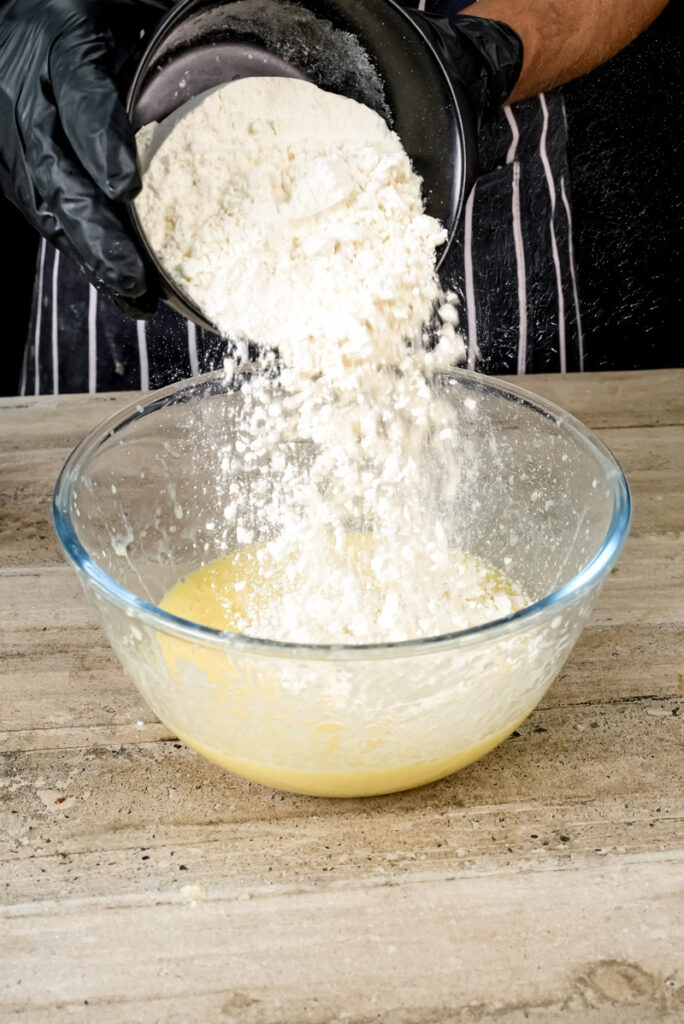
- 2 cups (240g) all-purpose flour: This is the main structure of our muffins. How you measure flour matters! Spoon it into your measuring cup and then level it off. Don’t just scoop it from the bag, or you’ll pack too much in.
- 1 Tablespoon baking powder: This makes our muffins rise nice and tall. Check that date on the can – fresh baking powder is key!
- ½ teaspoon salt: It balances all the flavors and makes the sweet stuff taste even better.
For that yummy Cinnamon Sugar Swirl inside:
- ½ cup (100g) brown sugar, packed: Light or dark brown sugar works. Dark brown sugar will give a deeper, more molasses-like taste. I usually use light.
- 2 teaspoons ground cinnamon: The star of the swirl! If your cinnamon smells amazing, your muffins will too.
- A pinch of salt: Just a tiny bit makes a difference.
For that amazing Buttery Crumb Topping:
- ⅓ cup (67g) brown sugar, packed: Again, light or dark is fine.
- ¾ cup (90g) all-purpose flour: This gives the crumbs their shape.
- 2 teaspoons ground cinnamon: Yep, more cinnamon!
- 6 Tablespoons (85g) unsalted butter, melted: This brings all the crumbly bits together.
And for the simple Vanilla Glaze on top:
- 1 ½ cups (180g) powdered sugar, sifted: Sifting gets rid of lumps. Smooth glaze, here we come!
- 1 teaspoon vanilla extract: For that sweet, yummy smell and taste.
- A pinch of salt: Even in the glaze! It just makes it taste better, not so overly sweet.
- 2–3 Tablespoons milk: Whole milk, 2%, or even cream. Start with 2 tablespoons and add a tiny bit more if you need it to get a good drizzle.
Step-by-Step Method: Let’s Bake These Together!
1. Get Ready: Oven On, Pans Prepped!
Okay, first things first. Let’s get our baking show on the road! Go ahead and turn your oven on to 425°F (220°C). Make sure it gets all the way to that temperature. Why so hot? It’s my little secret for getting those awesome, tall muffin tops!
While the oven’s heating up, grab your muffin tin. We’re making 10 muffins, so line 10 of the cups with paper liners. I like using fun, colorful ones! If you want to be extra sure nothing sticks, you can give the very top edge of the muffin tin (right around the liners) a quick spritz with baking spray. Just a light one. It’s a neat trick I learned.
Set your prepped tin aside. Getting all your stuff ready first – chefs call it “mise en place” – just makes baking way less hectic and more fun.
2. Mix the Wet Stuff: The Tasty Base for Our Muffins
Now, let’s make the main part of our muffins – the batter. This is where the deliciousness starts.
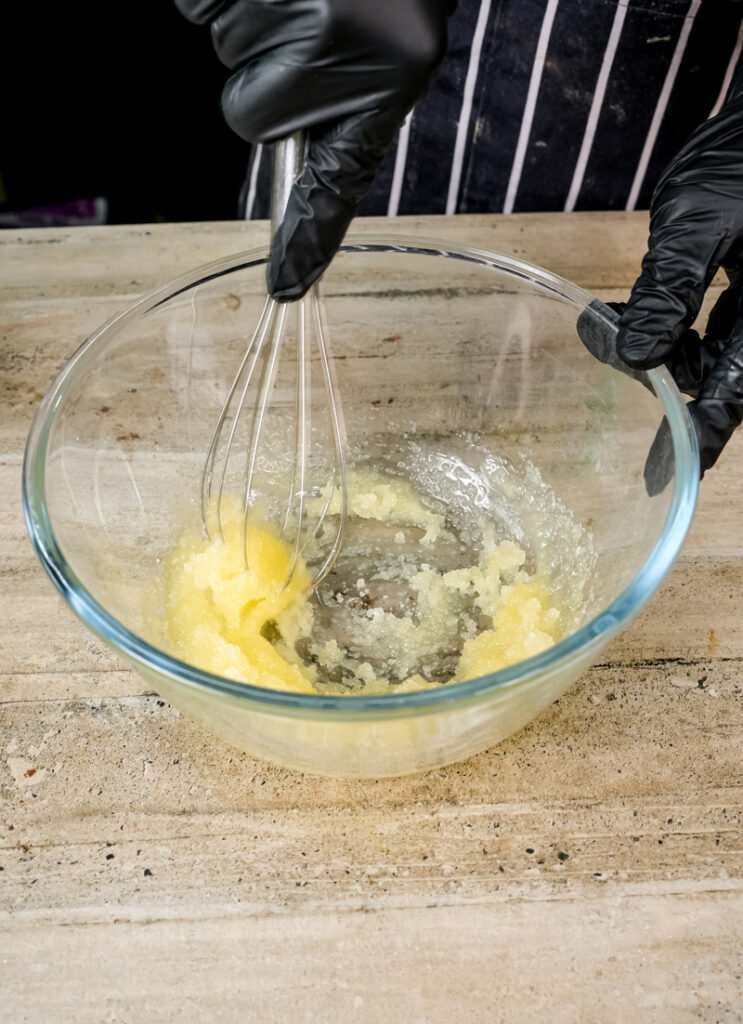
In your big mixing bowl, put your melted unsalted butter (make sure it’s cooled a bit!) and the granulated sugar. The butter shouldn’t be super hot, or it might cook the eggs. That’s a no-no. Use your hand mixer (or a stand mixer with the paddle) and beat the butter and sugar until they’re mixed well. It’ll look smooth and a bit shiny.
Next up: the room temperature eggs. Add them one at a time. This is important! Crack one in, mix on low or medium speed until it’s just blended in, then do the same with the second egg. We’re not trying to make it super airy here, just gently mixing them in. Don’t forget to scrape the sides of the bowl with your spatula. We want all that goodness in the batter!
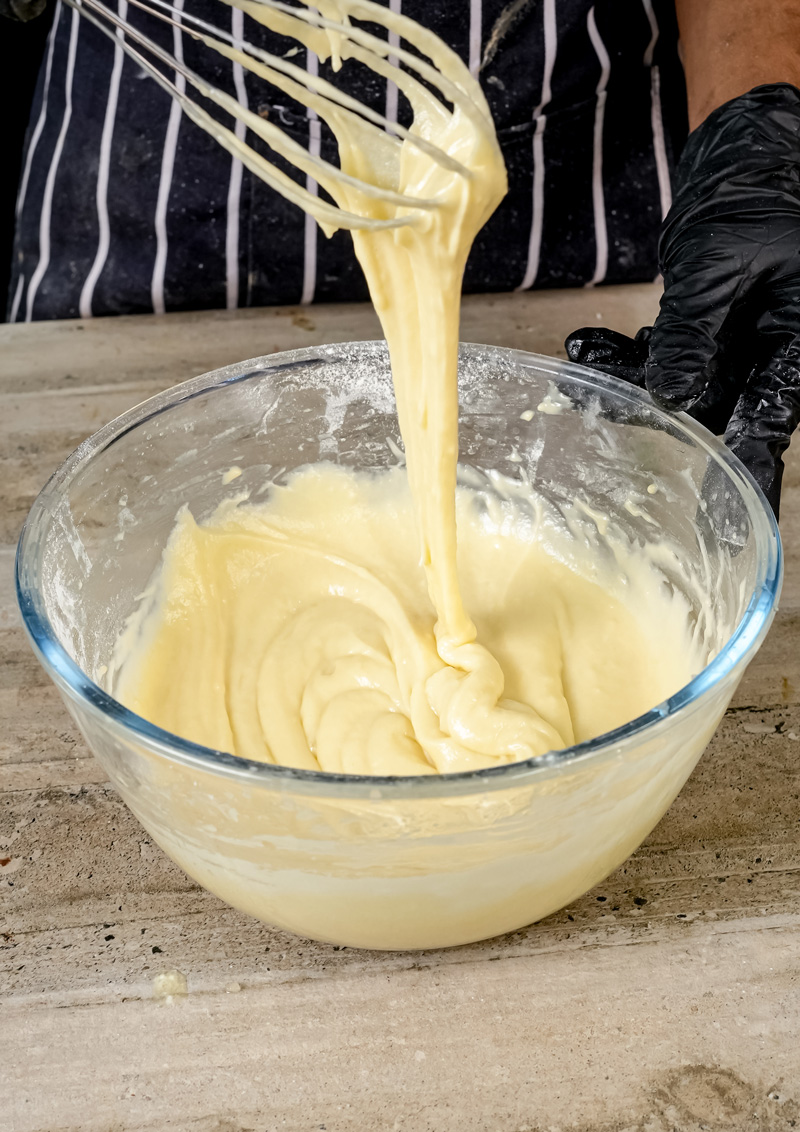
Now, gently mix in the sour cream, buttermilk, and that lovely vanilla extract. When you add these, especially the buttermilk, the mixture might look a bit lumpy or separated. Don’t worry! That’s totally normal. It happens because of the acid in the sour cream and buttermilk. It’ll all smooth out when we add the dry ingredients. It should be smelling pretty amazing by now – sweet, buttery, with a hint of vanilla. Mmm.

3. Add the Dry Stuff: Building the Muffin Batter
Alright, time to give our wet ingredients some body. In another medium bowl (or you can just add them straight in, but I like to whisk them separately first!), put your all-purpose flour, the super important baking powder (this makes them rise!), and the salt. Whisk these together really well. This step might seem small, but it helps spread the baking powder and salt evenly. That means every single one of your super moist coffee cake muffins will rise just right and taste perfect.
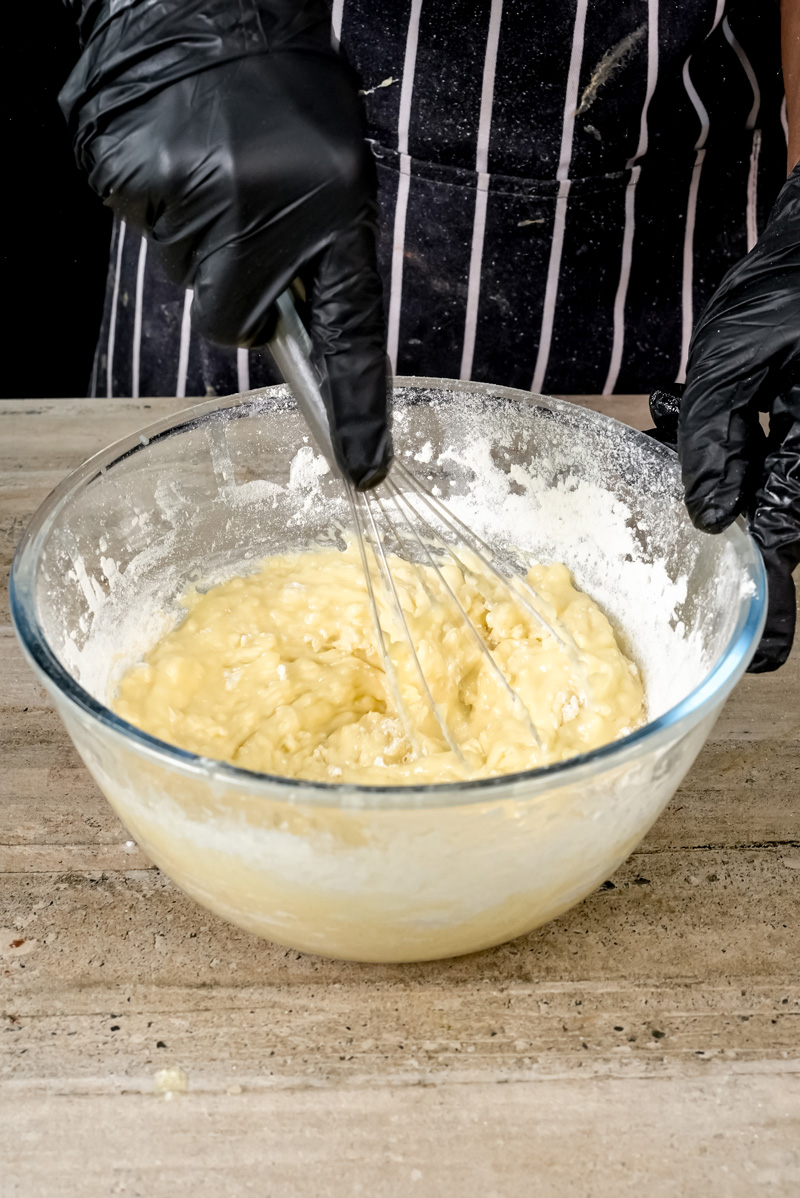
Now, gently add this flour mixture to your bowl of wet ingredients. Use your mixer on the lowest speed, or even better, switch to a spatula. Mix it all together until it just starts to come together. And I mean just!
Here’s a golden rule for tender muffins: DO NOT OVERMIX! If you mix too much, the muffins can get tough. We want light and tender, right? So, it’s totally okay if you still see a few streaks of flour or some small lumps. The batter will be pretty thick. Like, really thick. Once it’s just barely mixed, stop. Seriously. A slightly lumpy, undermixed batter is a happy batter. Set the bowl aside for a sec.
4. Make the Magic: That Amazing Cinnamon Swirl & Buttery Crumb Top
This is where we make the parts that take these muffins from “good” to “OH MY GOSH, these are incredible!” You’ll need two small bowls for this.
- For the Cinnamon Sugar Swirl (it’s SO good!): In one small bowl, mix together the ½ cup of packed brown sugar, those 2 wonderful teaspoons of ground cinnamon, and that little pinch of salt. Use a fork or a small whisk and stir it all up until it’s perfectly blended and smells like heaven. That warm smell of brown sugar and cinnamon? Pure comfort. Set this aside. Try not to eat it with a spoon. (I know, it’s hard!)
- For the Super Yummy Buttery Crumb Topping: In your second small bowl, whisk together the ⅓ cup of packed brown sugar, the ¾ cup of all-purpose flour, and another 2 teaspoons of that great ground cinnamon. Make sure they’re mixed well. Now, pour in your 6 Tablespoons of melted unsalted butter. Use a fork (or your fingers, if you like to get messy!) to mix the butter into the dry stuff. Keep mixing and squishing it until it starts to form nice little clumps. It should look like coarse, damp sand with some bigger, pebble-sized bits. You want different sizes of crumbs – that’s what makes it look so homemade and taste so good. This crumbly, buttery topping is almost ready to go. Set this bowl aside too. Warning: these crumbs are very snackable!
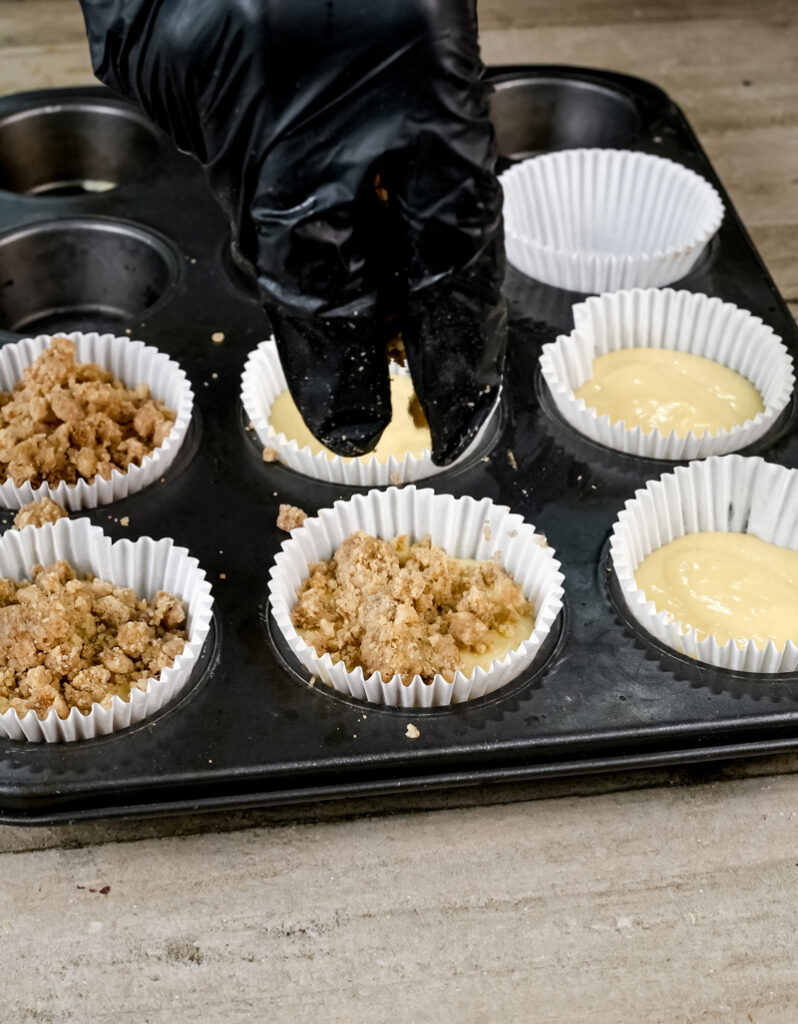
5. Put Them Together: Layering Up the Deliciousness
Time for the fun part – building our Coffee Cake Muffins! Grab your prepped muffin tin, your yummy batter, your cinnamon swirl, and your crumb topping. Let’s do this.
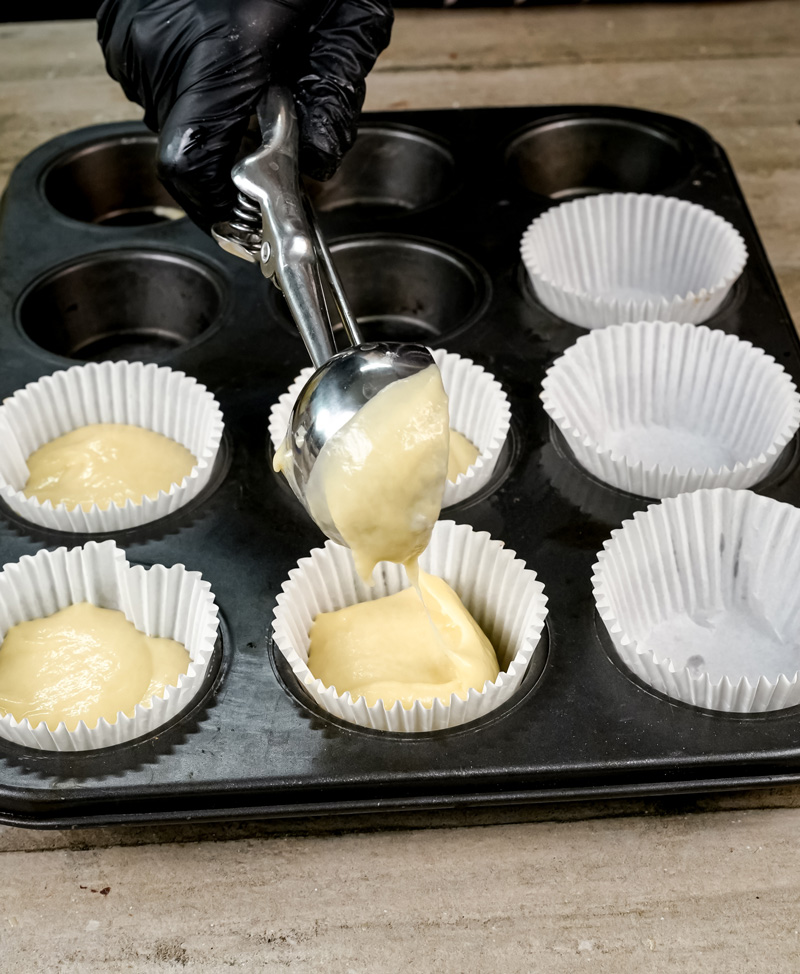
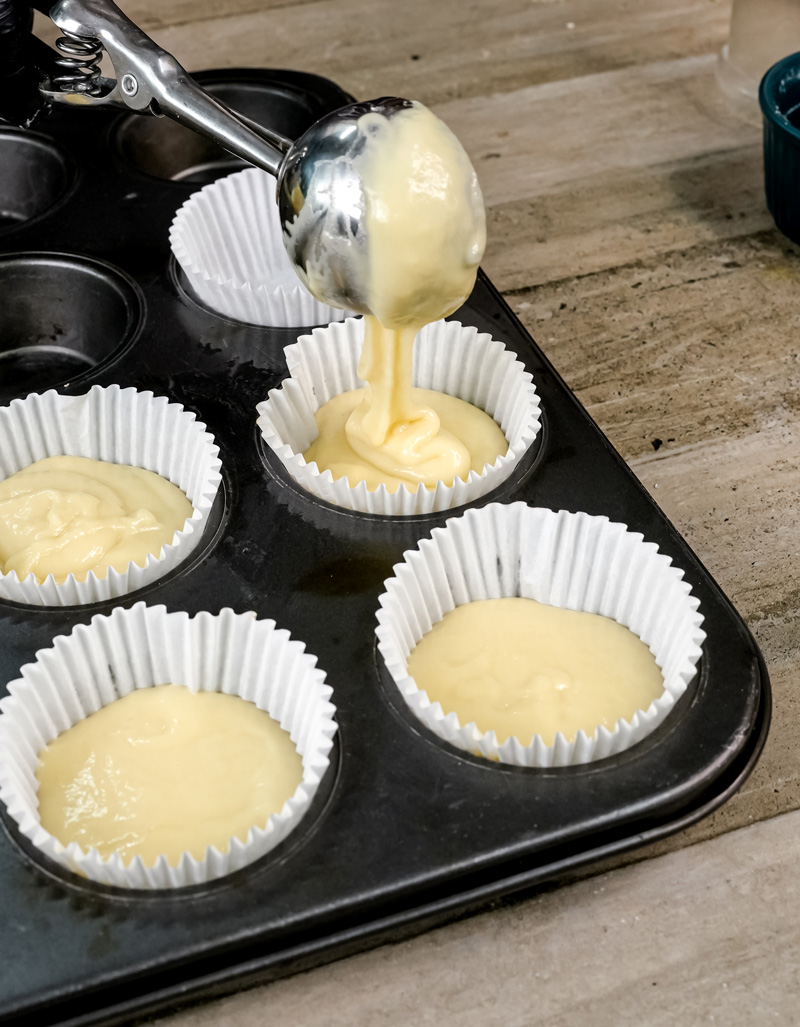
- Use a large spoon or, my favorite, a cookie scoop (a 2-Tablespoon size works great for even muffins) to drop batter into each of your 10 lined muffin cups. You want to fill them about halfway full. Try to get the same amount in each so they all bake evenly.
- Next, take your amazing cinnamon sugar swirl mixture. Sprinkle a good spoonful – about 1 to 1 ½ teaspoons, or just eyeball it for a nice, even layer – over the batter in each muffin cup. This is like the hidden treasure inside!
- Now, carefully put another scoop of muffin batter on top of that cinnamon sugar layer. Add about the same amount as the first layer, filling the muffin cups until they are about ¾ of the way full. The trick here is to gently spread this top layer of batter to mostly cover the cinnamon swirl. Don’t smush it down too hard. A small knife or the back of a spoon can help. Don’t worry if it’s not perfect; a little bit of cinnamon peeking out looks nice!
6. Top with Crumbs: The Best Part! (Well, Almost!)
This is when your muffins get their crunchy, delicious tops! Grab your bowl of buttery crumb topping. Don’t be shy! Spoon a big tablespoon (or even more!) over each muffin, covering the top layer of batter. Honestly, I believe you can never have too much crumb topping on a coffee cake muffin.
Once you’ve put all that crumbly goodness on, gently press it into the batter with your fingers or the back of a spoon. This little press helps the crumbs stick while baking, so they don’t all fall off when you pick up your awesome muffin. Your unbaked muffins should look totally irresistible now, piled high with crumbs.


7. Bake ‘Em Up: The Two-Temp Trick for Bakery-Style Muffins!
It’s oven time! I use a cool two-temperature baking method for these. I swear it helps get those nice high domes and perfect texture, just like you see in a bakery.
- Carefully put your muffin tin into your fully preheated 425°F (220°C) oven. Bake them at this hot temperature for exactly 5 minutes. This quick blast of heat makes the muffins puff up fast. Hello, muffin tops!
- Then – and this is important – WITHOUT opening the oven door (no peeking!), turn the oven temperature down to 375°F (190°C). Let the muffins keep baking for another 15 minutes at this lower temperature. This lets them cook all the way through without burning the tops.
Total baking time will be about 20 minutes. But remember, every oven is a little different. Your Coffee Cake Muffins are done when they’re a beautiful golden brown on top. When you gently press the top of a muffin, it should spring back.
Another good test? Stick a toothpick into the center of one (try to get the cakey part, not a pocket of cinnamon swirl, or it might look wet). The toothpick should come out clean, or with just a few moist crumbs sticking to it.
And the smell? Oh, your kitchen should smell incredible – warm butter, sweet sugar, rich spices. Pure happiness!
Once they look perfect, carefully take the muffin tin out of the oven. Okay, I know it’s hard, but don’t grab one yet! Let the muffins cool in the tin on a wire rack for at least 15 minutes. This is super important. They’re pretty delicate when they first come out, and this cooling time helps them firm up. That way, they won’t fall apart when you try to move them.
8. Glaze Time: The Sweet Finish!
While your gorgeous muffins are cooling down a bit, let’s whip up the simple vanilla glaze. This is the fancy touch that makes them extra special.
In a small bowl, mix your sifted powdered sugar (sifting is the secret to a smooth, non-lumpy glaze!), the teaspoon of vanilla extract, and that tiny pinch of salt that makes everything taste better.
Now, add 2 Tablespoons of milk and whisk it all together with a fork or a small whisk. Keep whisking until it’s perfectly smooth and just right for drizzling. If your glaze seems too thick, add a tiny bit more milk (like ½ teaspoon at a time) until it’s perfect. You want it thick enough to coat but thin enough to drizzle. Too thin? Add a little more sifted powdered sugar.
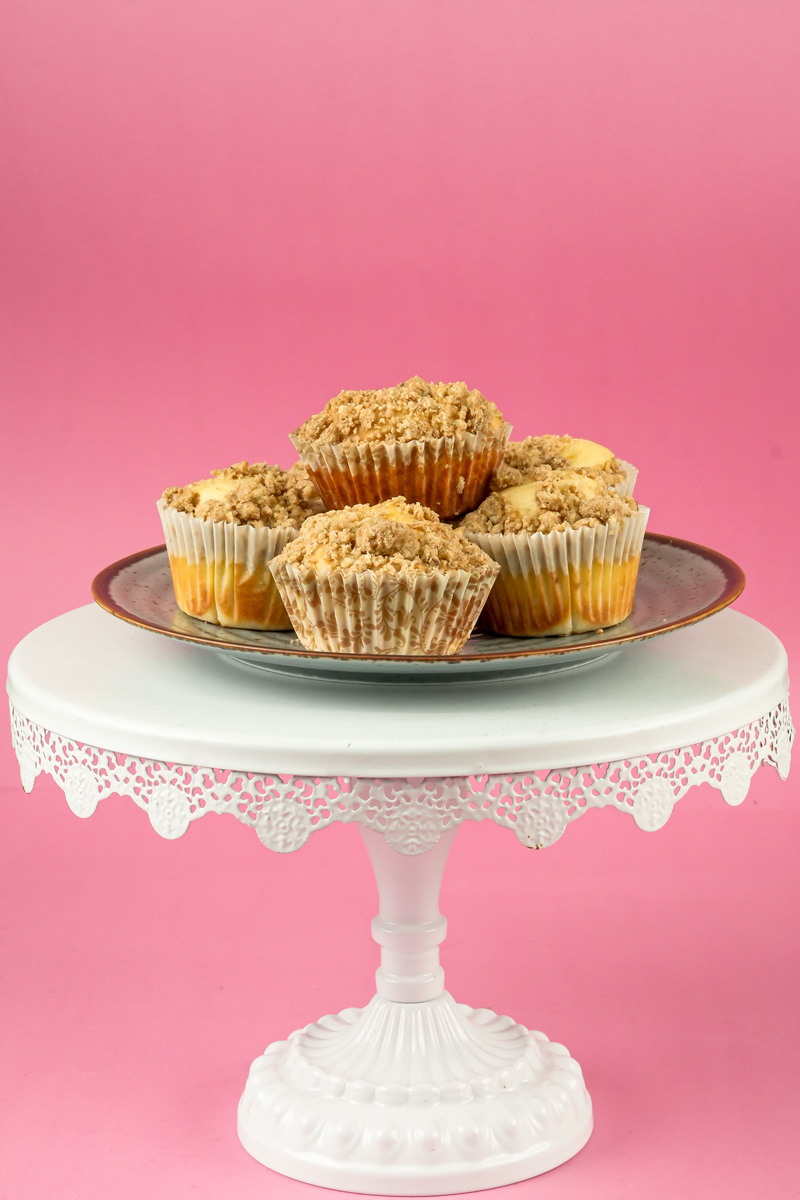
Once your muffins have cooled for those 15 minutes (they can still be warm, which is nice because the glaze melts in a little – yum!), it’s time to decorate. Use your whisk, a spoon, or even a piping bag if you’re feeling fancy, and drizzle that yummy glaze back and forth over the crumb topping on each muffin. Let the glaze set for a few minutes before you finally, finally dig in.
And that’s it! A batch of the most amazing, sweet-smelling, super moist Coffee Cake Muffins, made by YOU. Get ready for some compliments!
Want to Change Things Up? Make Them Your Own!
One of the best parts about baking is playing around with recipes. Am I right? Here are a few ideas if you want to put your own spin on these coffee cake muffins:
- Dietary Swaps:
- Gluten-Free? You can try swapping the all-purpose flour for a good 1-to-1 gluten-free baking flour (the kind that already has xanthan gum). The texture might be a little different, but they should still be tasty!
- Vegan? This one’s a bigger change. You’d need to use a flax egg (1 Tbsp ground flaxseed + 3 Tbsp water, let it sit for 5 mins) for each egg. Then use vegan butter, a plant-based sour cream (like thick coconut yogurt), and plant-based milk for both the buttermilk (add lemon juice like usual) and the glaze. They’ll taste different from the original, but you can make a pretty good vegan version.
- A Little “Healthier”? Okay, these are definitely a treat. But if you want to try a few tweaks:
- You could swap out up to half of the all-purpose flour with white whole wheat flour or whole wheat pastry flour. This adds a bit of fiber.
- You could try cutting back the granulated sugar in the muffin batter just a little. Keep in mind this can change the texture and moisture.
- Maybe try unsweetened applesauce for some of the butter or sour cream (like, replace ¼ cup of butter with applesauce). This will make them a bit more cake-like and not as rich.
- And hey, just eating one is always a good approach!
- Spice It Up (Or Down):
- Love cinnamon? Go ahead and add a little extra to the swirl or crumb. Why not?
- Want more spice? Try adding a pinch of nutmeg, cardamom, or allspice to the batter or crumb topping. About ¼ teaspoon of nutmeg with the cinnamon is nice.
- Fancy or Everyday:
- Everyday: Honestly, this recipe is pretty perfect just as it is for any day of the week!
- Make ‘Em Fancy:
- Add ½ cup of chopped pecans or walnuts to the crumb topping. Or fold them into the batter for a nice crunch. I love nuts in my muffins.
- Mix ½ cup of mini chocolate chips into the batter. Chocolate makes everything better, right?
- Instead of just cinnamon swirl, how about a cream cheese swirl? Beat 4 oz softened cream cheese with 2 Tbsp sugar and 1 egg yolk until it’s smooth. Then layer that in like you do the cinnamon swirl. Oh, that sounds good.
- Seasonal Twists:
- Fall Flavors: Add ½ cup of pumpkin puree to the wet ingredients (you might need to use a little less buttermilk) and a teaspoon of pumpkin pie spice to the batter. Hello, autumn!
- Summer Berries: Gently fold ¾ cup of fresh blueberries or raspberries into the batter before you scoop it. Toss the berries in a tablespoon of flour first so they don’t all sink to the bottom.
- Winter Coziness: Add the zest of one orange to the batter and ½ cup of dried cranberries. So festive!
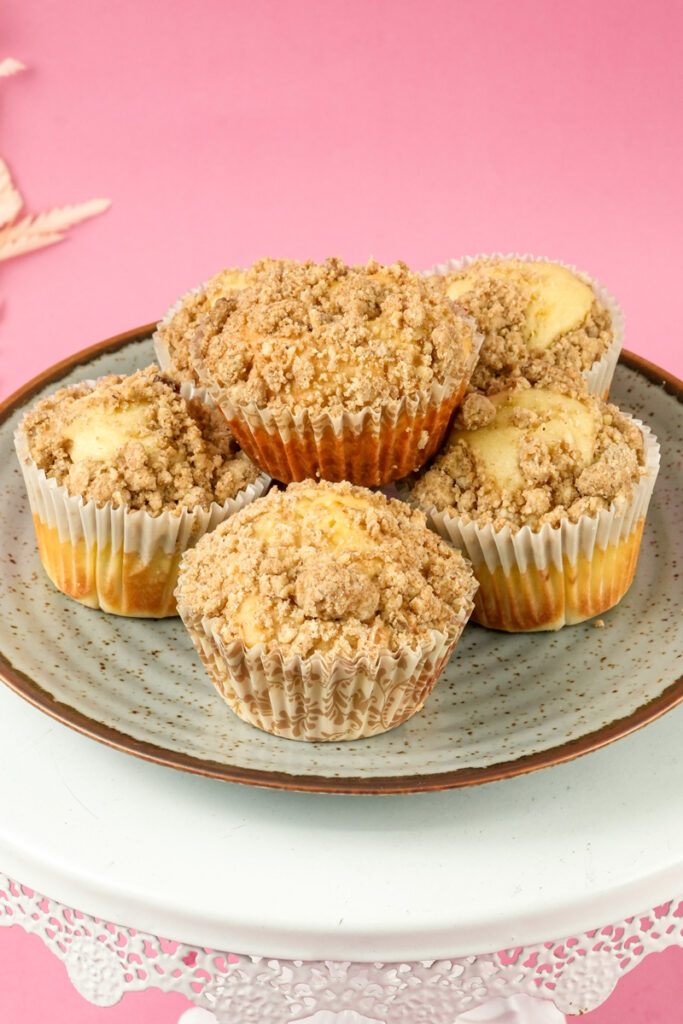
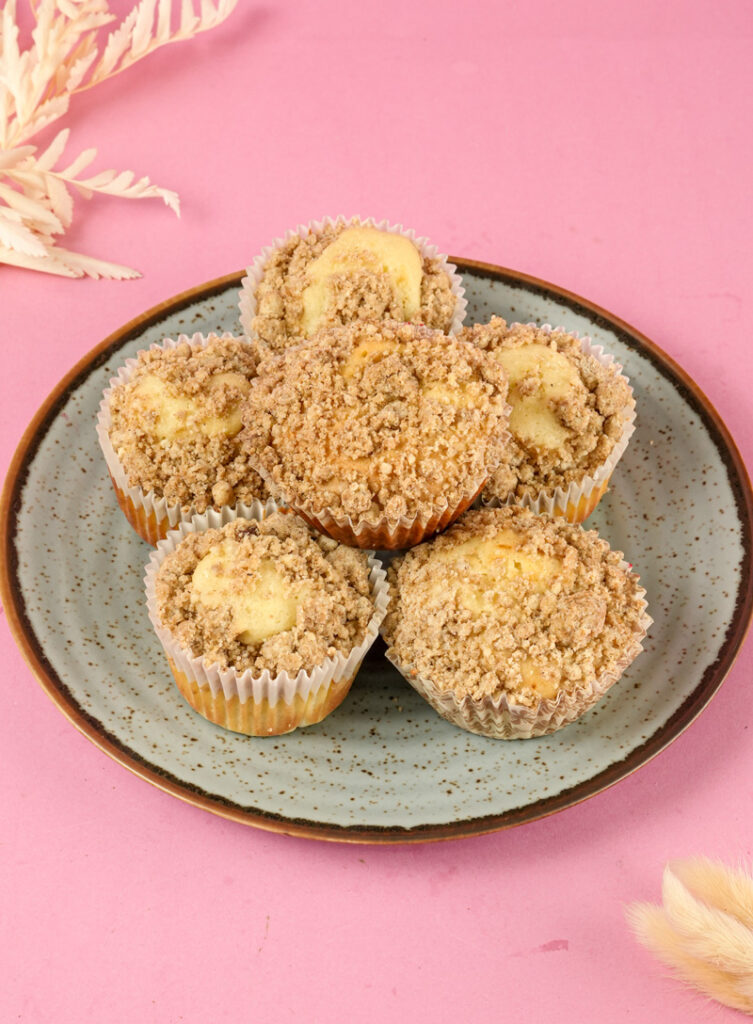
Serving & Storing Your Muffins
These muffins are amazing when they’re warm, but they’re still super yummy at room temperature too!
- How to Serve ‘Em: Put them on a pretty plate for breakfast or brunch. A little extra sprinkle of powdered sugar right before serving always looks nice. Want to go all out? A small spoonful of lightly sweetened whipped cream or a little butter on the side is delicious.
- What to Serve With Them: What’s better with Coffee Cake Muffins than a hot cup of coffee? Not much! Tea, a cold glass of milk, or even a fruit smoothie also go great. A side of fresh berries or a fruit salad is a nice, fresh touch.
- Storing Leftovers (If You Have Any!):
- Keep leftover muffins in an airtight container at room temperature. They’ll be good for up to 2-3 days.
- If you need them to last longer, you can store them in an airtight container in the fridge for up to a week. The crumb topping might get a little less crispy in the fridge, just so you know.
- Reheating – Bringing Back the Warmth:
- To make them warm and yummy again, you can pop an individual muffin in the microwave for about 10-20 seconds.
- Or, warm them in a toaster oven or regular oven at 300°F (150°C) for 5-7 minutes. This way is great for making the topping a bit crispy again.
- Making Ahead & Freezing:
- Good news! These muffins freeze really well. Let them cool completely first. Then, wrap each muffin in plastic wrap, then in aluminum foil. Or, put the plastic-wrapped muffins in a freezer-safe zip-top bag or container.
- They can be frozen for up to 3 months.
- To thaw: You can let them thaw at room temperature for a few hours. Or, unwrap one and microwave it for 30-60 seconds. You can also reheat them from frozen in a 300°F (150°C) oven for about 10-15 minutes, or until they’re warmed through.
I really, really hope you enjoy baking and eating these Coffee Cake Muffins as much as I do. They are a little bit of effort, with all those yummy layers, but the reward is a batch of incredibly tasty, comforting treats. Everyone will love them! Happy baking!
PrintCoffee Cake Muffins
Get ready for your new favorite treat! These Coffee Cake Muffins are pure magic. Think a super soft, buttery muffin, a sweet ribbon of cinnamon sugar hiding inside, and a generous pile of crunchy streusel on top, all finished with a light vanilla drizzle. They’re the perfect cozy bite for breakfast, brunch, or anytime you need a little deliciousness in your day!
- Prep Time: About 25 minutes
- Cook Time: 20 minutes
- Total Time: Around 45 minutes
- Yield: Makes 10 muffins 1x
- Category: Breakfast, Brunch, Snack, Dessert
- Cuisine: American
Ingredients
For the Muffins:
- ½ cup (113g) unsalted butter, melted & slightly cooled
- 1 cup (200g) granulated sugar
- 2 large eggs, room temperature
- ½ cup (120g) sour cream (full-fat is great!)
- ¼ cup (60ml) buttermilk
- 2 teaspoons pure vanilla extract
- 2 cups (240g) all-purpose flour
- 1 Tablespoon baking powder
- ½ teaspoon salt
For the Cinnamon Sugar Swirl:
- ½ cup (100g) brown sugar, packed
- 2 teaspoons ground cinnamon
- Pinch of salt
For the Buttery Crumb Topping:
- ⅓ cup (67g) brown sugar, packed
- ¾ cup (90g) all-purpose flour
- 2 teaspoons ground cinnamon
- 6 Tablespoons (85g) unsalted butter, melted
For the Vanilla Glaze:
- 1 ½ cups (180g) powdered sugar, sifted
- 1 teaspoon pure vanilla extract
- Pinch of salt
- 2–3 Tablespoons milk
Instructions
- Warm Up & Prep: First, get that oven hot! Preheat to 425°F (220°C). Line 10 cups of a standard muffin tin with paper liners. Set it aside.
- Mix Wet Ingredients: In a large bowl, beat the melted butter and granulated sugar together with a hand mixer until smooth. Add eggs one at a time, mixing just until combined. Gently stir in sour cream, buttermilk, and vanilla. Don’t worry if it looks a little curdled – that’s normal!
- Add Dry Ingredients: In a separate bowl, whisk together flour, baking powder, and salt. Add this to the wet ingredients and mix on low speed (or with a spatula) until just combined. Be careful not to overmix! A few lumps are okay. The batter will be thick.
- Make the Swirl & Crumb:
- Swirl: In a small bowl, mix brown sugar, cinnamon, and salt for the swirl.
- Crumb: In another small bowl, mix brown sugar, flour, and cinnamon for the crumb. Pour in the melted butter and mix with a fork until crumbly.
- Assemble the Muffins:
- Spoon batter into each muffin cup, filling them about halfway.
- Sprinkle a layer of the cinnamon swirl mixture (about 1-1 ½ tsp) over the batter in each cup.
- Top with more batter, filling cups to about ¾ full. Gently spread to cover the swirl.
- Crown with Crumbs: Generously spoon the crumb topping over each muffin. Gently press the crumbs into the batter a bit so they stick.
- Bake ‘Em Up!
- Bake at 425°F (220°C) for 5 minutes. This helps them get those nice tall tops!
- Then, WITHOUT opening the oven door, reduce the heat to 375°F (190°C) and bake for another 15 minutes, or until golden brown and a toothpick inserted into the center comes out clean (or with a few moist crumbs).
- Cool Down: Let muffins cool in the tin on a wire rack for at least 15 minutes. They’re delicate when hot!
- Glaze & Enjoy! While muffins cool, whisk together sifted powdered sugar, vanilla, salt, and 2 Tablespoons of milk for the glaze. Add a bit more milk, ½ teaspoon at a time, if needed to get a good drizzling consistency. Drizzle over the warm or cooled muffins. Let the glaze set for a few minutes. Then, dig in!
Notes
- Serving Ideas: These are fantastic warm from the oven with a cup of coffee or tea! A side of fresh berries is also lovely.
- Baker’s Tips:
- Room temperature ingredients (eggs, sour cream, buttermilk) mix better for a lighter muffin.
- Don’t overmix the batter! This is key for tender muffins.
- For perfectly even muffins, try using a cookie scoop for the batter.
- Storage & Reheating:
- Store completely cooled muffins in an airtight container at room temperature for 2-3 days, or in the fridge for up to a week.
- To reheat: Microwave for 10-20 seconds, or warm in a 300°F (150°C) oven for 5-7 minutes to refresh the crumb.
- Freezing: Cool completely, then wrap individually and freeze for up to 3 months. Thaw at room temp or reheat from frozen.