
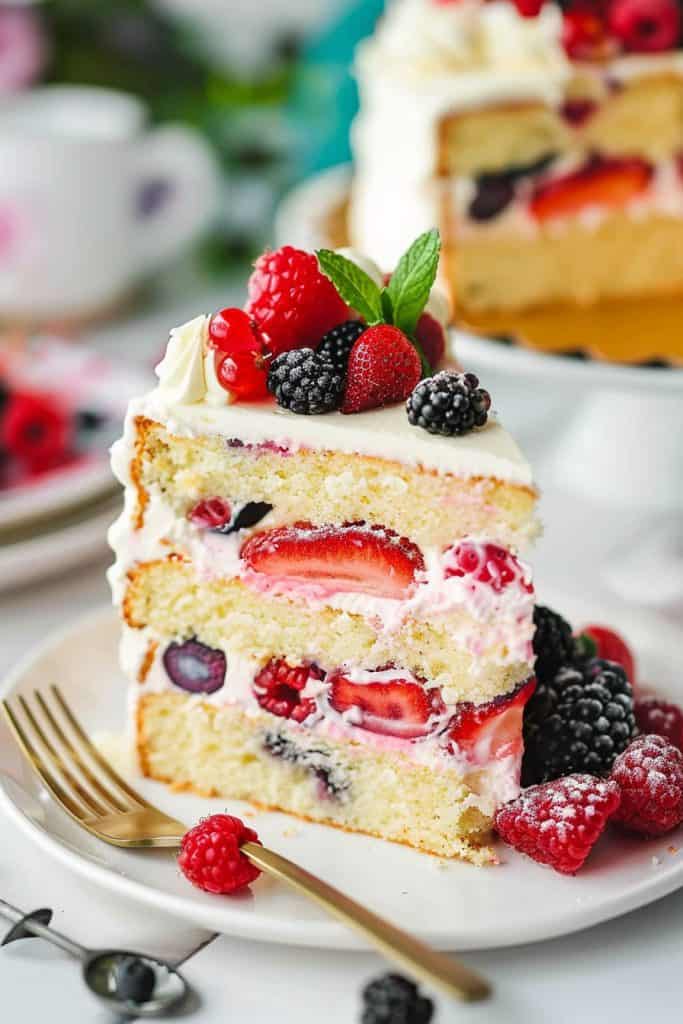
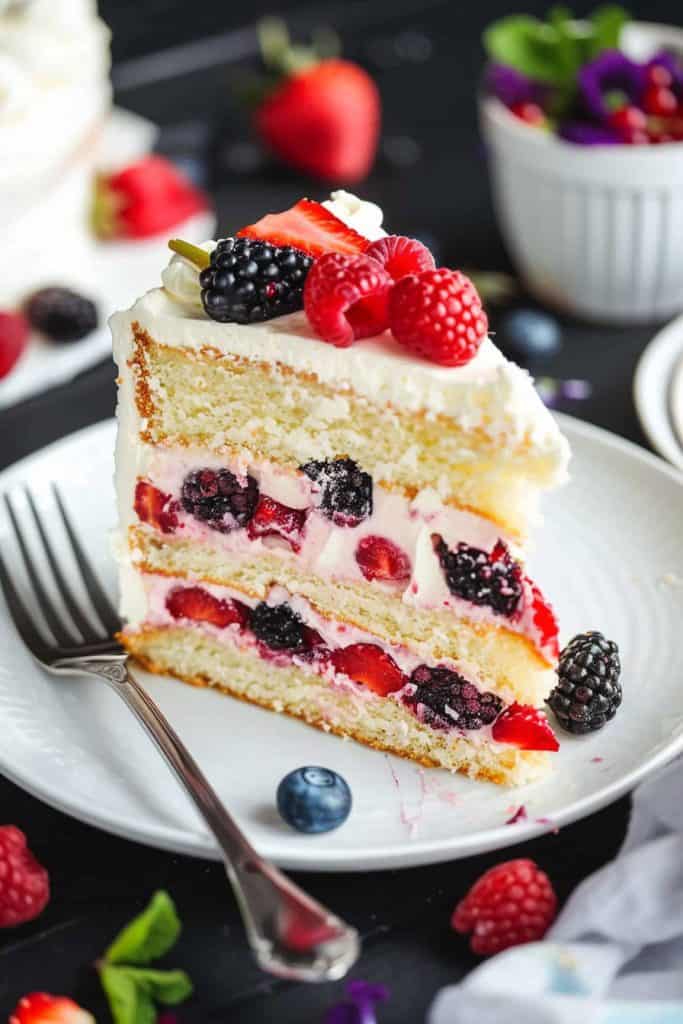
As a seasoned food blogger, I’m thrilled to share a delightful treat that never fails to impress – berry chantilly cake. This luscious dessert is a perfect harmony of fluffy cake layers, decadent chantilly cream, and a burst of fresh berries. Originating from the classic chantilly cream of French cuisine, this cake has evolved into a beloved favorite for celebrations and gatherings.
In this article, I’ll guide you through a simple yet elegant berry chantilly cake recipe that will elevate any occasion. The combination of moist cake, velvety cream, and vibrant berries creates a symphony of flavors and textures that will leave your taste buds singing. Whether you’re a baking enthusiast or a novice in the kitchen, this recipe is sure to become a go-to for creating memorable moments with loved ones.
Ingredients
Creating a delicious berry chantilly cake requires a mixture of carefully selected ingredients. Each component, from the fluffy cake layers to the luscious chantilly cream, plays a crucial role in bringing this delightful dessert together. Let’s dive into the specifics of what you’ll need for each element.
Cake Layers
- 2 cups of cake flour
- 1 ½ cups of granulated sugar
- 1 tablespoon of baking powder
- ½ teaspoon of salt
- ¾ cup of unsalted butter, softened
- 4 large eggs
- 1 cup of whole milk
- 1 teaspoon of vanilla extract
- Zest of one lemon
Berry Filling
- 2 cups of fresh mixed berries (strawberries, blueberries, raspberries)
- ¼ cup of granulated sugar
- 1 tablespoon of lemon juice
- 1 tablespoon of cornstarch
Chantilly Cream
- 2 cups of heavy cream
- ½ cup of powdered sugar
- 1 teaspoon of vanilla extract
- Fresh berries (strawberries, blueberries, raspberries)
- Mint leaves
- Edible flowers (optional)
Required Tools and Equipment
To make the berry chantilly cake recipe a success, having the right tools and equipment on hand is crucial. Here are the essential items you’ll need:
Tools:
- Mixing Bowls: Use various sizes for mixing different components of the cake.
- Whisk or Electric Mixer: To combine and aerate the cake batter and chantilly cream effectively.
- Spatula: For folding and spreading the batter and cream evenly.
- Cake Pans: Two 9-inch round cake pans for baking the cake layers.
- Parchment Paper: To line the cake pans for easy removal of the cakes.
- Cooling Rack: To cool the cake layers evenly before assembly.
- Saucepan: For cooking the berry filling on the stovetop.
- Piping Bag with Decorating Tips: Optional for decorating the cake with chantilly cream.
- Cake Stand or Serving Plate: For a beautiful presentation of the finished cake.
- Oven: Preheat to the specified temperature for baking the cake.
- Stovetop: To prepare the berry filling.
- Refrigerator: To chill the chantilly cream before assembling the cake.
- Mixer (stand or handheld): Ensure efficient mixing of cake batter and cream.
- Sharp Knife or Offset Spatula: For leveling cake layers and spreading cream.
Having these tools and equipment ready will streamline the cake-making process and enhance your baking experience.
Prep Work
Before diving into the baking process, it’s crucial to have all the ingredients and tools ready for a smooth and enjoyable baking experience.
Preparing Ingredients
- Cake Layers:
- 2 cups of cake flour
- 1 ½ cups of sugar
- ¾ cup of unsalted butter (softened)
- 4 large eggs
- ¾ cup of whole milk
- 1 ½ teaspoons of vanilla extract
- Zest of 1 lemon
- Berry Filling:
- 4 cups of mixed berries (e.g., strawberries, blueberries, raspberries)
- ¼ cup of sugar
- 2 tablespoons of lemon juice
- 2 tablespoons of cornstarch
- Chantilly Cream:
- 2 cups of heavy cream
- ½ cup of powdered sugar
- 1 teaspoon of vanilla extract
Tool Setup
Gather the necessary tools to ensure a seamless baking process and presentation:
- Mixing bowls
- Cake pans
- Parchment paper
- Cooling rack
- Saucepan
- Piping bag with decorating tips
- Cake stand or serving plate
With all your ingredients measured and tools in place, you’re ready to kickstart the creation of this exquisite berry chantilly cake.
Directions
I am excited to guide you through the process of creating this exquisite berry chantilly cake. Follow these step-by-step directions to achieve a delightful dessert that will impress your guests.
Baking the Cake Layers
- Preheat the oven to 350°F (175°C) and prepare three 9-inch round cake pans by greasing and lining them with parchment paper.
- In a mixing bowl, cream together sugar and butter until light and fluffy, then add eggs one at a time, beating well after each addition.
- Stir in milk, vanilla extract, and lemon zest until well combined, then gradually add the cake flour and mix until smooth.
- Divide the batter evenly among the prepared cake pans and bake for 25-30 minutes or until a toothpick inserted into the center comes out clean.
- Allow the cakes to cool in the pans for 10 minutes before transferring them to a wire rack to cool completely.
Making the Berry Filling
- In a saucepan, combine mixed berries, sugar, lemon juice, and cornstarch over medium heat, stirring constantly until the mixture thickens.
- Remove the berry filling from the heat and let it cool to room temperature before using it to layer the cake.
- In a chilled mixing bowl, whip heavy cream, powdered sugar, and vanilla extract until stiff peaks form.
- Transfer the chantilly cream to a piping bag fitted with a decorating tip suitable for frosting.
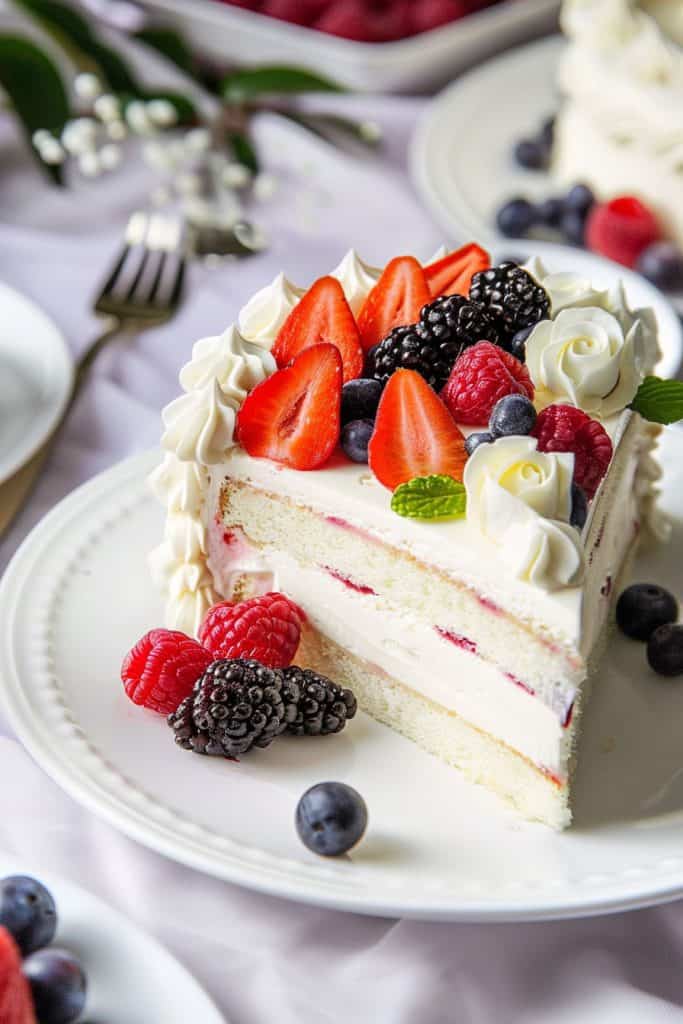
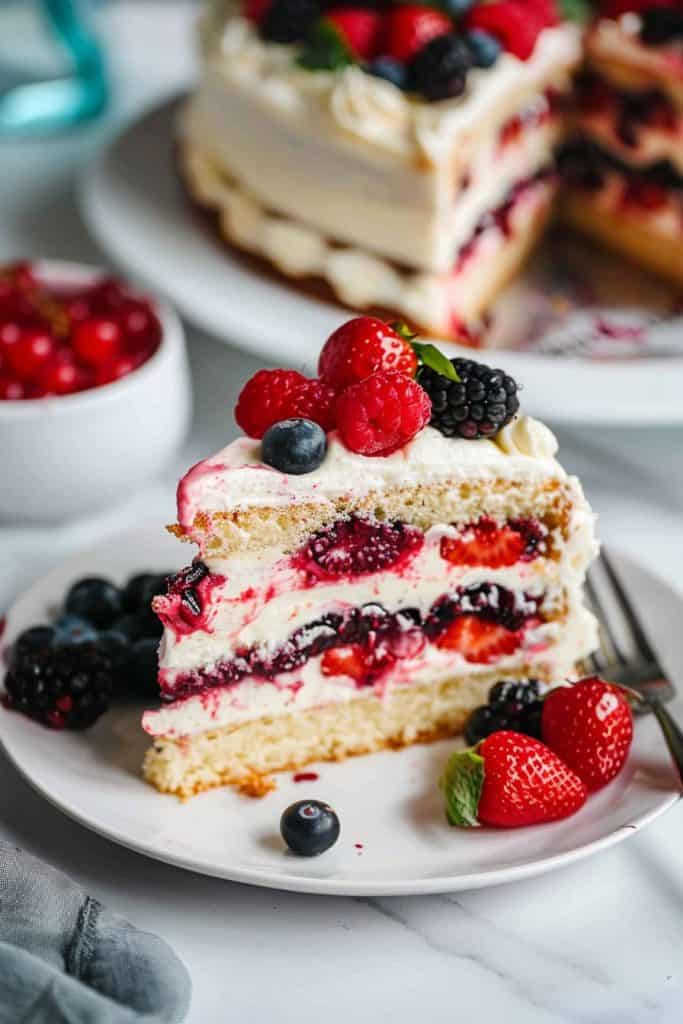
- To assemble the cake, place one cake layer on a serving plate and spread a layer of chantilly cream on top, followed by a generous amount of the berry filling.
- Repeat with the remaining cake layers, then frost the top and sides of the cake with the remaining chantilly cream.
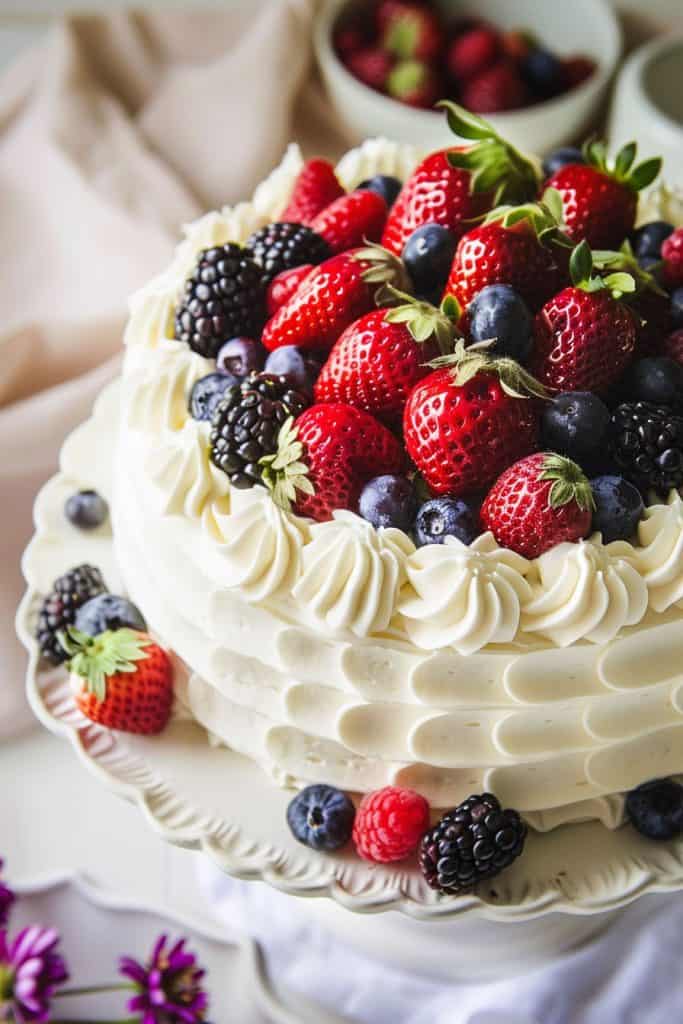
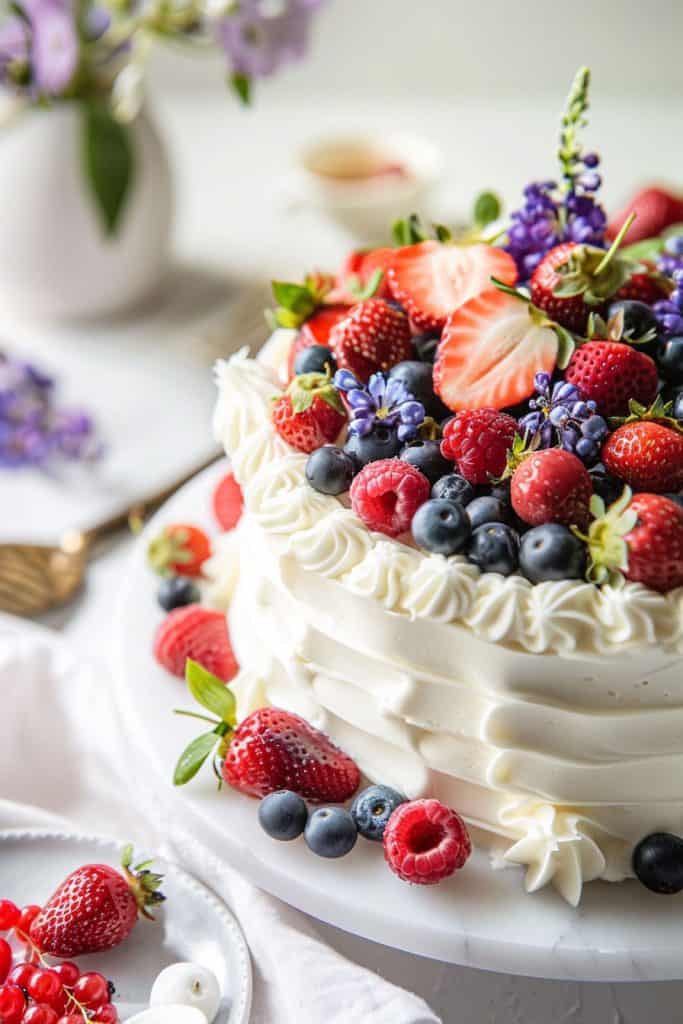
- Garnish the cake with fresh berries, mint leaves, and edible flowers for a visually stunning presentation.
- Chill the cake in the refrigerator for at least an hour before serving to allow the flavors to meld together. Enjoy this indulgent berry chantilly cake with your loved ones!
Assembly
To assemble the berry chantilly cake, follow these simple steps for a stunning presentation that will impress your guests.
Layering and Filling
- Prepare the Cake Layers: Place one cake layer on a cake stand or serving plate. Spread a generous amount of chantilly cream over the top.
- Add the Berry Filling: Spoon a portion of the berry filling on top of the chantilly cream, spreading it evenly to the edges.
- Repeat the Layers: Carefully place the second cake layer on top of the berry filling. Repeat the process by adding chantilly cream and the remaining berry filling.
- Top Layer: Finish with the final cake layer, pressing gently to secure the layers.
- Chantilly Cream Design: Use a piping bag with a decorating tip to add decorative swirls of chantilly cream around the top edge of the cake.
- Garnish with Fresh Berries: Place fresh berries on top of the cake for an elegant and colorful finish.
- Chill Before Serving: Refrigerate the cake for at least 1 hour to set the layers and enhance the flavors before slicing and serving.
Tips for Success
As an experienced food blogger, I have gathered some crucial tips to ensure your berry chantilly cake turns out perfect every time. Follow these steps for a delightful and successful baking experience:
- Room Temperature Ingredients: Allow your butter, eggs, and milk to come to room temperature before starting the baking process. This helps in achieving a smoother batter consistency and ensures even baking.
- Proper Mixing Technique: When making the cake batter, cream the butter and sugar together until light and fluffy. Incorporate the eggs one at a time, mixing well after each addition. Alternate adding the dry ingredients and milk to prevent overmixing.
- Gentle Folding Method: When combining the dry and wet ingredients for the cake batter, use a gentle folding technique. This ensures the batter stays light and airy, resulting in a fluffy cake texture.
- Chilling the Cake Layers: After baking the cake layers, allow them to cool completely before assembling the cake. Chilling the layers in the refrigerator for a few hours makes them easier to work with and prevents the chantilly cream from melting when layered.
- Whipping the Chantilly Cream: Whip the heavy cream until stiff peaks form, being careful not to overwhip. Incorporate the powdered sugar and vanilla extract gently to maintain the cream’s light and airy texture.
- Assembly Technique: When assembling the cake, pipe a border of chantilly cream around the edge of each layer to create a barrier for the berry filling. This helps in keeping the filling in place and adds a decorative touch to the cake.
- Chill Before Serving: For the best flavor and texture, chill the assembled cake in the refrigerator for at least an hour before serving. This allows the flavors to meld together and sets the chantilly cream for a perfect slice.
Storage and Make-Ahead Instructions
I always love to plan ahead when it comes to enjoying a delicious berry chantilly cake. Here are some handy tips on how to store and make this delightful dessert in advance:
Storage Instructions:
- Refrigeration: After assembling your berry chantilly cake, cover it carefully with plastic wrap or an airtight cake container.
- Refrigerator Shelf Life: Your cake can stay fresh in the refrigerator for up to 3 days, allowing you to enjoy its flavors over multiple servings.
- Avoid Freezing: Due to the delicate nature of the chantilly cream and fresh berries, freezing is not recommended as it can alter the texture and taste.
- Prepare Components Separately: You can bake the cake layers a day before assembly. Once cooled, wrap them in plastic wrap and store at room temperature.
- Berry Filling Preparation: Make your berry filling a day in advance and refrigerate it in an airtight container to save time on the day of assembly.
- Chantilly Cream Ready: Whip up your chantilly cream a few hours ahead of time and keep it chilled until you’re ready to decorate the cake.
- Assemble Before Serving: While you can prepare components in advance, it’s best to assemble the cake shortly before serving to maintain the optimal texture and flavor.
By following these storage and make-ahead instructions, you can ensure that your berry chantilly cake is fresh, flavorful, and ready to impress your guests at any celebration or gathering.
Conclusion
Creating a delectable berry chantilly cake is a delightful culinary adventure. By mastering the art of preparation and storage, you can savor the luscious flavors of this exquisite dessert. Remember to chill the cake for the perfect taste and texture. With proper handling and planning, your berry chantilly cake will be the star of any occasion. Enjoy the process of crafting this indulgent treat, and share its deliciousness with your loved ones. Let your creativity shine as you adorn the cake with vibrant berries and velvety chantilly cream. Embrace the joy of baking and relish every slice of this heavenly confection. Cheers to many more delightful baking experiences!