
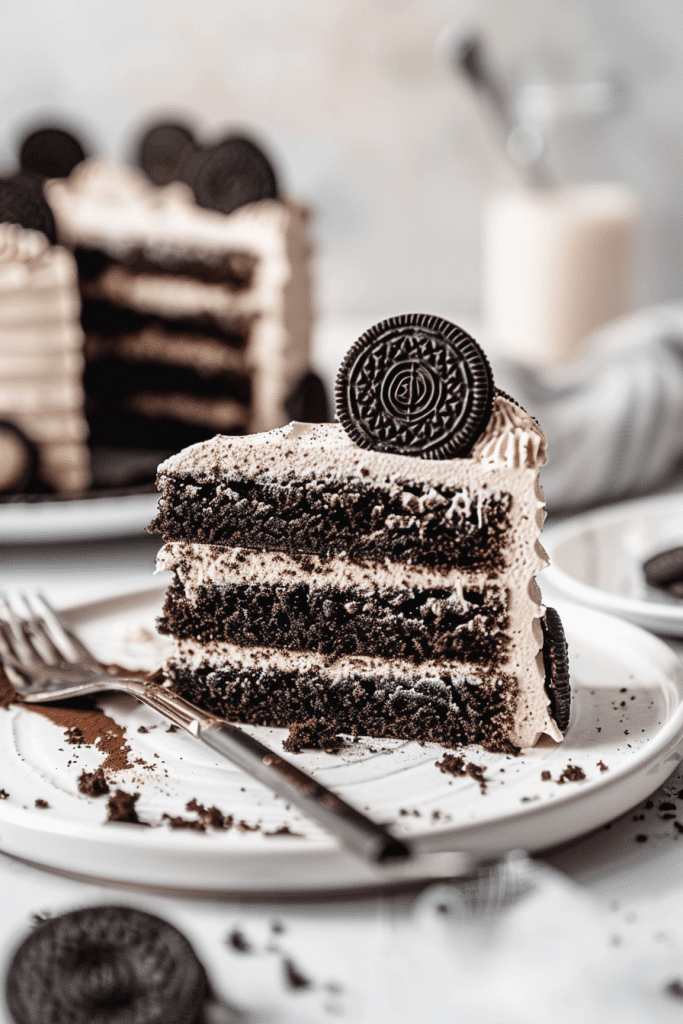
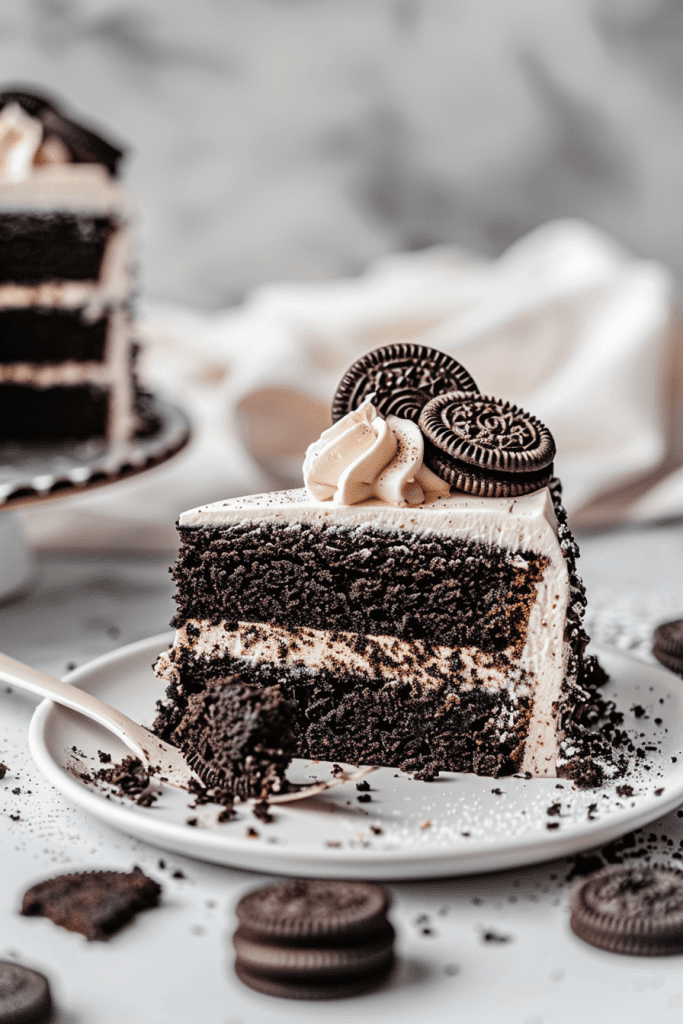
If you’re a cookies and cream fan, get ready to indulge in the ultimate treat with this decadent Oreo cake recipe. Picture this: luscious layers of soft Oreo chocolate cake generously frosted with a velvety Oreo buttercream. It’s a match made in dessert heaven that’s sure to satisfy your sweet tooth cravings.
What sets this Oreo cake apart is its commitment to the iconic Oreo flavor. Every bite is a celebration of the beloved cookie, ensuring that each element of this cake is infused with that classic cookies-and-cream taste. From the moist cake layers to the creamy frosting, this recipe is a tribute to all Oreo enthusiasts looking for a truly indulgent dessert experience.
Prepare to be captivated by the rich chocolatey goodness, the delightful crunch of Oreo cookies, and the silky drizzle of chocolate ganache in every bite. This Oreo cake is a celebration of flavors and textures that will leave you craving more.
Ingredients for Oreo Cake
To create this delectable Oreo cake, you’ll need a carefully curated set of ingredients that perfectly blend to bring out the delightful cookies-and-cream flavors. Below is the revised list of ingredients for the cake base, Oreo frosting, and chocolate ganache.
Cake Base
- 2 Boxes Triple Chocolate Cake Mix
- 6 Eggs
- 1 Cup Butter, softened
- 2 ½ Cups Whole Milk
Oreo Frosting
- 3 Cups Butter, softened
- 6 Cups Powdered Sugar
- 5–7 Tablespoons Heavy Whipping Cream
- 2 Teaspoons Vanilla Extract
- 1 ½ Cups Oreo Cookie Crumbs (about 18 cookies)
Chocolate Ganache
- 1 Cup Semi-Sweet Chocolate Chips
- ⅓ Cup Heavy Whipping Cream
Decoration
- 12 Whole Oreos (for garnish)
Necessary Equipment
To create this scrumptious Oreo cake recipe, you’ll need a few essential tools to ensure smooth preparation and a stunning final product.
Baking Essentials
- Three 9-inch (23 cm) round cake pans
- Parchment paper for lining the cake pans
- Offset spatula or knife for frosting
- Mixing bowls for combining ingredients
- Hand or stand mixer for blending the batter and frosting
- Measuring cups and spoons for precise ingredient measurements
- Cooling rack for cooling the baked cakes
Special Tools
- Piping bag with a star tip for decorative frosting dollops
- Cake leveler for trimming and evening out the layers
- Pastry brush for brushing off excess crumbs before frosting
- Cake stand for assembling and displaying the final creation
- Squeeze bottle for applying the chocolate ganache drips
Step-by-Step Instructions
Making the Cake Base
- Preheat your oven to 350°F (177°C) and spray three 9-inch (23 cm) round cake pans with non-stick baking spray. Line the bottoms with parchment paper for easy removal.
- In a large bowl, combine the triple chocolate cake mix, eggs, softened butter, and milk until the batter is smooth and evenly mixed.
- Divide the batter evenly among the prepared cake pans. Smooth the tops with a spatula.
- Bake in the preheated oven for 30–35 minutes, or until a toothpick inserted in the center comes out clean.
- Allow the cakes to cool completely on a wire rack before removing them from the pans.
Preparing Oreo Frosting
- In a large mixing bowl, beat the softened butter and vanilla extract together until light and fluffy.
- Gradually add the powdered sugar, one cup at a time, mixing well after each addition.
- Add heavy whipping cream as needed, 1 tablespoon at a time, until the frosting reaches your desired consistency.
- Fold in finely crushed Oreo cookie crumbs. If piping decorative dollops, ensure the crumbs are crushed finely enough to not clog your piping tip.
- Scoop 1 cup of the frosting into a piping bag fitted with a star tip and set aside for later.
Making Chocolate Ganache
- Heat the heavy whipping cream in a small saucepan over medium heat until it begins to simmer (do not boil).
- Pour the chocolate chips into a medium heat-safe bowl.
- Remove the cream from the heat and pour it over the chocolate chips. Let sit for 1 minute, then whisk until the mixture is smooth and glossy.
- Transfer the ganache to a squeeze bottle for easy application.
Building the Cake
- Once the cake layers have cooled, use a cake leveler to trim the domes off the tops of the cakes to create flat, even layers.
- Place one cake layer on a cake board or serving plate. Scoop 1 cup of Oreo frosting onto the top and spread it evenly with an offset spatula.
- Repeat this process with the second and third layers, spreading frosting evenly between each.
- Spread the remaining frosting over the top and sides of the cake for a smooth finish. Refrigerate the cake for at least 1 hour to set.
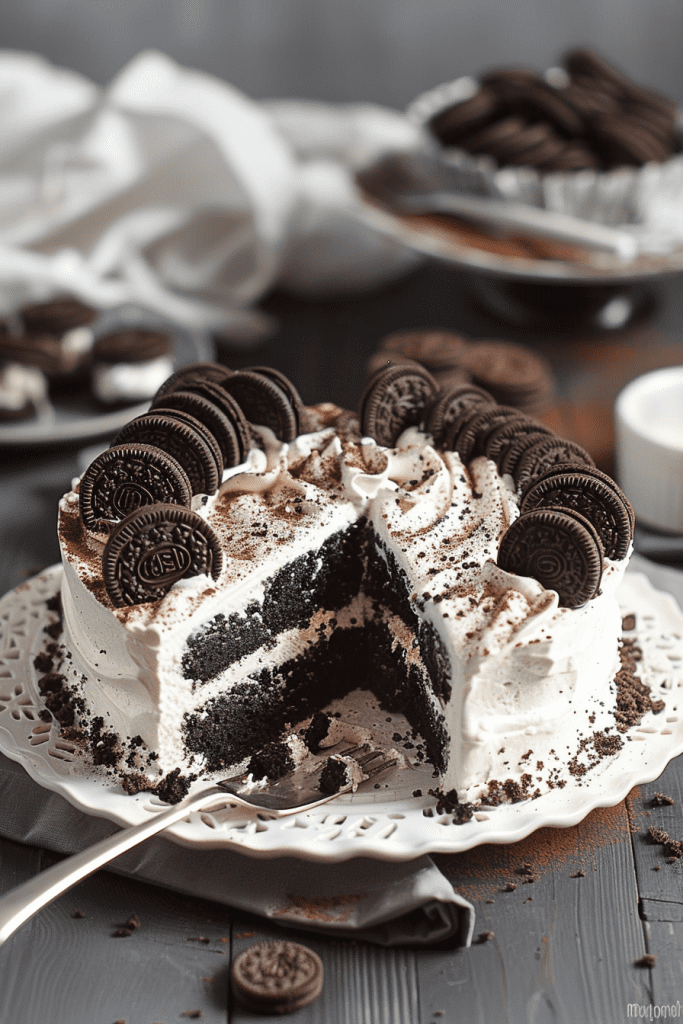
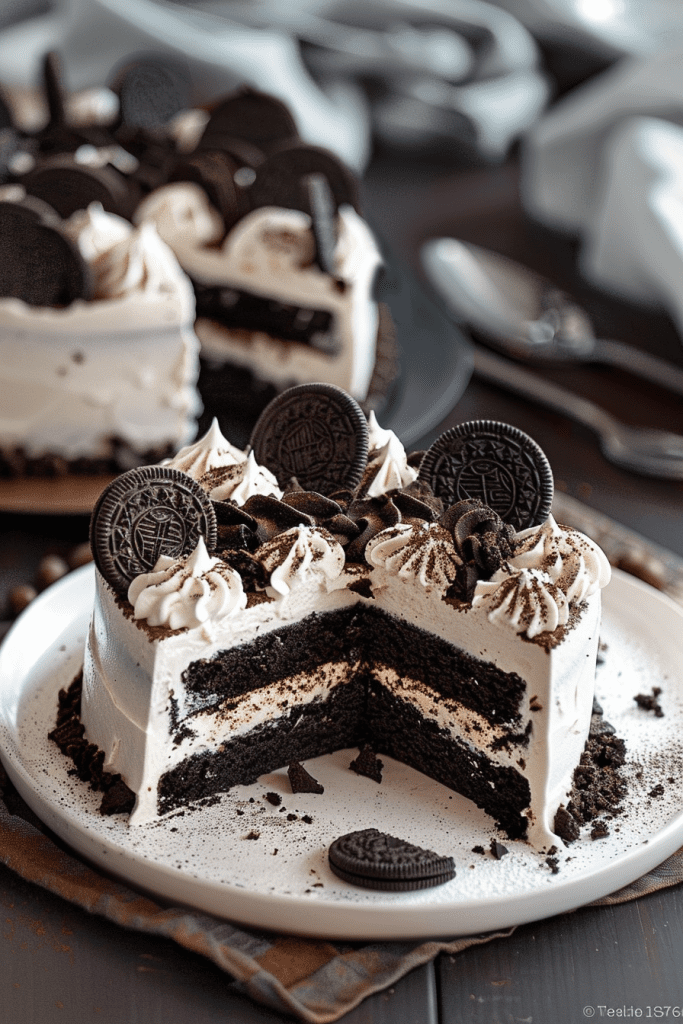
Decorating the Cake
Garnish each dollop with a whole Oreo cookie for an elegant finishing touch.
Remove the chilled cake from the refrigerator. Using the squeeze bottle, drip the chocolate ganache along the edges of the cake for a dramatic effect.
Pipe decorative dollops of Oreo frosting onto the top of the cake using the prepared piping bag with a star tip.
Serving and Presentation
When it comes to serving and presenting your Oreo cake, attention to detail can elevate the overall experience, turning a delicious dessert into a memorable centerpiece. Here are some tips to ensure your cake looks as good as it tastes:
Cutting and Serving
- Slicing Technique: Use a sharp knife dipped in hot water for clean cuts. Wipe the knife between slices to maintain a neat presentation.
- Serving Size: Consider the occasion when determining slice sizes. For a party or celebration, smaller portions may be ideal, while larger slices are perfect for a decadent dessert experience.
Creative Garnishing
- Whipped Cream Swirls: Pipe delicate swirls of whipped cream on top of the cake using a piping bag with a star tip. This adds a touch of elegance and contrasts nicely with the dark chocolate color of the cake.
- Oreo Crumb Border: Create a border around the base of the cake with a generous sprinkle of Oreo crumbs. This not only adds a crunchy texture but also provides a visually appealing frame.
- Cookie Embellishments: Use whole or mini Oreo cookies as decorative elements on the top or sides of the cake. These cookies not only look charming but also offer an extra crunch and a delightful surprise.
Plating Presentation
- Elegant Plates: Serve each slice on a clean, well-chosen plate. Consider using decorative plates or cake stands to further enhance the presentation.
- Personalized Touch: Add a personal touch by writing a message or name on top with melted chocolate or icing. This bespoke element is perfect for special occasions.
By focusing on cutting, serving, and creatively decorating your Oreo cake, you can transform it into a visually stunning centerpiece that will impress your guests and leave them craving more.
Storage and Leftovers
- Freezing: For longer storage, freeze the individual cake layers (wrapped in plastic wrap and foil) for up to 3 months. Thaw them in the refrigerator before assembling.
- Refrigeration: Store the assembled cake in an airtight container in the refrigerator for up to 4 days.
Pro Tips for Success
- Avoid Overbaking: Check the cakes with a toothpick; it should come out clean or with just a few crumbs. Overbaking can result in a dry cake.
- Flat Layers: While you can use cake strips for even baking, trimming the layers with a cake leveler after baking works just as well. Plus, the scraps make a tasty snack!
- Smooth Frosting: For a flawless finish, use an angled spatula and chill the cake periodically between frosting layers.
- Ganache Drips: A squeeze bottle ensures clean, controlled ganache drips down the sides of your cake.
Conclusion
Creating a show-stopping Oreo cake is an exciting journey filled with rich flavors and creative possibilities. From moist chocolate layers to creamy Oreo frosting and a glossy ganache finish, this recipe will captivate both taste buds and eyes. With proper preparation, a few pro tips, and attention to detail, you’ll have a decadent dessert that’s as stunning as it is delicious.
PrintOreo Cake Recipe

Indulge in the ultimate cookies-and-cream delight with this decadent Oreo Cake. Featuring moist chocolate layers and rich Oreo frosting, topped with a luscious chocolate ganache, this cake is perfect for Oreo enthusiasts seeking a truly indulgent dessert experience.
- Prep Time: 30
- Cook Time: 35
- Total Time: 1 hour 30 minutes
- Yield: 12 slices 1x
- Category: Dessert
- Cuisine: American
Ingredients
For the Cake
- 2 Boxes Triple Chocolate Cake Mix
- 6 Eggs
- 1 Cup Butter, softened
- 2 ½ Cups Whole Milk
For the Oreo Frosting
- 3 Cups Butter, softened
- 6 Cups Powdered Sugar
- 5–7 Tablespoons Heavy Whipping Cream
- 2 Teaspoons Vanilla Extract
- 1 ½ Cups Oreo Cookie Crumbs (about 18 cookies, finely crushed)
For the Chocolate Ganache
- 1 Cup Semi-Sweet Chocolate Chips
- ⅓ Cup Heavy Whipping Cream
For Decoration
- 12 Whole Oreos
Instructions
Cake Preparation
- Preheat the Oven: Set your oven to 350°F (177°C). Grease three 9-inch cake pans and line with parchment paper.
- Mix the Batter: In a large bowl, combine cake mix, eggs, butter, and milk. Beat until smooth.
- Bake the Cakes: Divide batter evenly among the pans. Bake for 30–35 minutes, or until a toothpick comes out clean.
- Cool the Cakes: Let them cool on a wire rack before removing from pans.
Oreo Frosting
- Cream the Butter: Beat butter and vanilla until fluffy.
- Add Sugar and Cream: Gradually add powdered sugar and cream; beat until smooth.
- Incorporate Oreos: Fold in the crushed Oreos. Set aside 1 cup of frosting in a piping bag.
Chocolate Ganache
- Simmer Cream: Heat cream in a saucepan until simmering.
- Melt Chocolate: Pour over chocolate chips; let sit for 1 minute, then whisk until smooth.
- Transfer to Bottle: Pour ganache into a squeeze bottle for easy application.
Cake Assembly
- Level the Cakes: Use a cake leveler to trim the tops.
- Layer the Cake: Place a layer on a board, spread with frosting, and repeat with remaining layers.
- Frost the Cake: Apply frosting on top and sides. Chill for at least 1 hour.
Decoration
- Ganache Drip: Drizzle ganache along the edges of the cake.
- Pipe Frosting: Use the piping bag to create frosting dollops on the cake top.
- Garnish: Place whole Oreos on each frosting dollop.
Notes
Serving Suggestions
- Serve chilled or at room temperature.
- Perfect with a glass of cold milk or hot coffee.
Tips & Tricks
- Avoid Overbaking: Check for doneness with a toothpick.
- Smooth Surfaces: Chill cake layers before frosting for easier handling.
- Finely Crushed Oreos: Ensure Oreos are well-crushed to avoid clogging the piping tip.
Storage & Reheating
- Refrigeration: Store in an airtight container for up to 4 days.
- Freezing: Wrap cake layers in plastic wrap and foil for 3 months. Thaw in the fridge before assembling.
- Reheat: Allow refrigerated slices to come to room temperature before serving.
1 Comment
I have a question is it a option to use the cake flour or the vanilla cake mix