
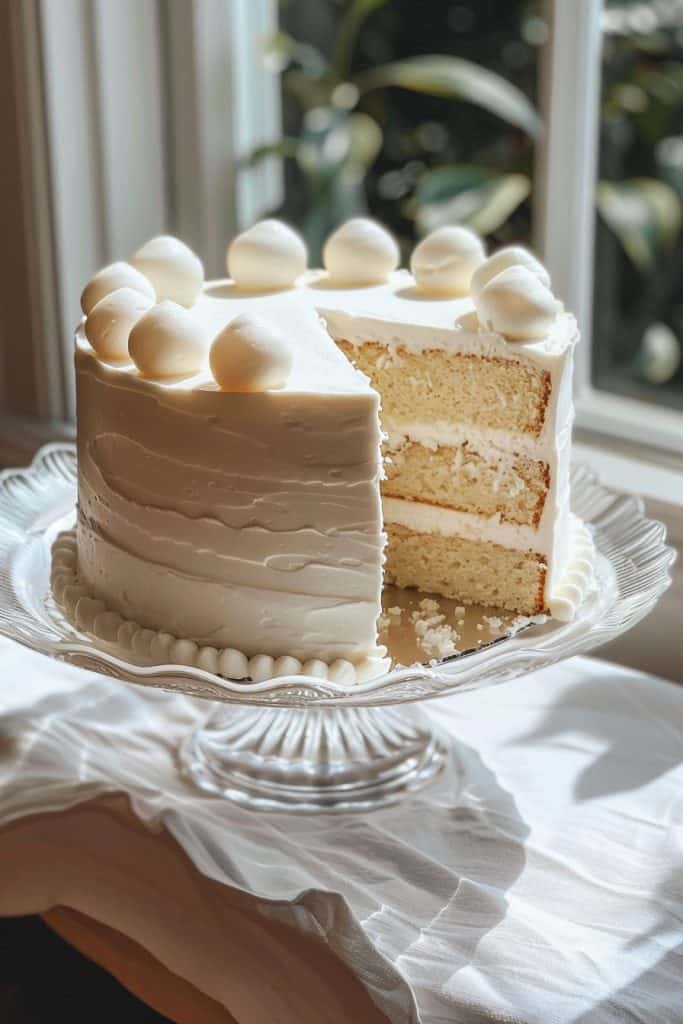
Craving a decadent dessert that’s as luxurious as it is delicious? Indulge in the velvety goodness of white chocolate velvet cake. This exquisite dessert combines the richness of white chocolate with the moist, tender crumb of a classic velvet cake.
In my kitchen, I’ve perfected a recipe that elevates the traditional velvet cake to a whole new level of sophistication. Each bite of this white chocolate velvet cake is a heavenly experience, with the sweetness of white chocolate balanced perfectly with the light and airy texture of the cake.
Whether you’re celebrating a special occasion or simply treating yourself to a slice of pure bliss, this white chocolate velvet cake is sure to impress. Get ready to delight your taste buds with this unforgettable dessert that’s bound to become a new favorite in your baking repertoire.
Ingredients
Creating a decadent white chocolate velvet cake requires a careful selection of premium ingredients to achieve its luxurious flavor and texture. Below are the key items needed to craft this exquisite dessert.
White Chocolate Velvet Cake Ingredients
- 2 cups all-purpose flour, sifted
- 1 1/2 cups granulated sugar
- 1 cup unsalted butter, softened
- 4 large eggs, room temperature
- 1 cup whole milk
- 1 teaspoon vanilla extract
- 1/2 cup white chocolate, melted
White Chocolate Frosting Ingredients
- 1 1/2 cups white chocolate chips
- 1 cup unsalted butter, softened
- 3 cups confectioners’ sugar, sifted
- 1 teaspoon vanilla extract
- 1/4 cup heavy cream
- Fresh berries (such as raspberries and blueberries)
- White chocolate curls or shavings
- Edible flowers for garnish
Necessary Equipment
To ensure the successful creation of this delightful white chocolate velvet cake, you’ll need the following essential equipment:
Cake Preparation:
- Three 9-inch round cake pans
- Parchment paper
- Electric mixer
- Mixing bowls
- Spatulas (for folding and spreading batter)
- Wire cooling racks
- Saucepan
- Whisk
- Mixing bowl
- Offset spatula (for frosting the cake layers)
- Cake turntable (optional but helpful for frosting)
Having these tools ready will streamline the cake-making process and help achieve a professional-looking and delicious white chocolate velvet cake.
Prep Instructions
Prepare the rich and indulgent white chocolate velvet cake by following these meticulous steps for the cake batter and luscious frosting.
Preparing the Cake Batter
- Preheat the oven: Set the oven to the specified temperature for baking the cake to perfection.
- Prepare the cake pans: Grease and line the cake pans with parchment paper to ensure easy removal of the cakes.
- Melt the white chocolate: Gently melt high-quality white chocolate until smooth and creamy. Let it cool slightly.
- Mix the dry ingredients: In a bowl, sift together the flour, baking powder, and salt for a perfectly airy cake texture.
- Cream the butter and sugar: Beat softened butter and sugar until light and fluffy to create a smooth cake batter base.
- Incorporate the white chocolate: Gradually add the melted white chocolate to the butter-sugar mixture, blending until well combined.
- Alternate adding dry ingredients and milk: Slowly add the dry ingredients and milk in batches, mixing just until incorporated without overmixing.
- Beat the egg whites: In a separate bowl, whip the egg whites until stiff peaks form, then gently fold them into the cake batter for added lightness.
- Pour the batter: Divide the batter evenly between the prepared cake pans, smoothing the tops for even baking.
- Bake the cakes: Place the pans in the preheated oven and bake according to the recipe instructions until a toothpick inserted in the center comes out clean.
- Cool the cakes: Allow the cakes to cool in the pans for a few minutes before transferring them to a wire rack to cool completely.
- Chop the white chocolate: Finely chop white chocolate for the velvety smooth frosting texture.
- Heat the cream: In a saucepan, heat heavy cream until just below boiling.
- Pour over the chocolate: Pour the hot cream over the chopped white chocolate and let it sit for a few minutes to melt the chocolate.
- Stir until smooth: Gently stir the mixture until the chocolate is fully melted and the frosting is silky and glossy.
- Chill the frosting: Allow the frosting to cool to room temperature, then chill in the refrigerator until slightly firm for spreading consistency.
- Frost the cake: Once the cakes are completely cooled, generously frost each layer, stacking them to create a deliciously decadent white chocolate velvet cake.
- Garnish as desired: Decorate the frosted cake with fresh berries, white chocolate curls, or delicate edible flowers for a stunning finishing touch.
Baking Directions
To start baking this delightful white chocolate velvet cake, preheat your oven to 350°F (175°C). Grease and line three 8-inch round cake pans with parchment paper for easy removal later.
Mixing the Cake Batter
- In a heatproof bowl, melt 6 ounces of high-quality white chocolate. Stir occasionally until smooth, then set aside to cool slightly.
- In a separate bowl, whisk together 2 1/2 cups of cake flour, 1 teaspoon of baking soda, and 1/2 teaspoon of salt. Set this dry ingredient mixture aside.
- In a large mixing bowl, cream together 1 cup of unsalted butter and 2 cups of granulated sugar until light and fluffy.
- Gradually add the melted white chocolate to the butter mixture, beating well to combine.
- Alternate adding the dry ingredients and 1 cup of buttermilk to the batter, beginning and ending with the dry ingredients. Mix until just combined.
- In a clean bowl, whip 6 egg whites until stiff peaks form. Gently fold the whipped egg whites into the batter until no white streaks remain.
Baking and Frosting the Cake
- Divide the batter evenly among the prepared cake pans. Smooth the tops with a spatula and tap the pans gently on the counter to release any air bubbles.
- Bake the cakes in the preheated oven for 25-30 minutes or until a toothpick inserted into the center comes out clean.
- Remove the cakes from the oven and let them cool in the pans for 10 minutes before transferring to a wire rack to cool completely.
- For the velvety white chocolate frosting, heat 2 cups of heavy cream until just simmering. Pour the hot cream over 12 ounces of white chocolate and let it sit for a few minutes before stirring until smooth.
- Allow the frosting to cool to room temperature, then refrigerate until slightly thickened but still spreadable.
- Place one cake layer on a serving plate and spread a generous layer of the white chocolate frosting on top.
- Repeat with the second layer, then place the final cake layer on top.
- Frost the top and sides of the cake with the remaining frosting, creating a smooth finish.
- Garnish the cake with fresh berries, white chocolate curls, and edible flowers for an elegant touch.
Frosting and Filling Techniques
Applying the White Chocolate Frosting
To achieve a flawless finish on the white chocolate velvet cake, I use a offset spatula to evenly spread the velvety smooth white chocolate frosting over each cake layer. Starting from the center, I gently push the frosting towards the edges, creating a thin, even layer. Repeat this process for each cake layer, ensuring that the frosting is distributed evenly.
Preparing Additional Fillings or Layers
For those looking to elevate the white chocolate velvet cake further, consider adding additional fillings or layers between the cake tiers. I recommend spreading a thin layer of raspberry or strawberry preserves between the cake layers to add a burst of fruity flavor that complements the sweetness of the white chocolate. Another option is to incorporate a layer of whipped cream or white chocolate mousse for a lusciously creamy contrast. Experiment with different fillings to customize the cake to your preferences and create a multi-dimensional dessert experience.
Assembling the White Chocolate Velvet Cake
Now that the cakes are baked, and the white chocolate frosting is ready, it’s time to assemble the decadent white chocolate velvet cake. Follow these steps to create a stunning dessert that will impress your guests.

Step 1: Cooling the Cakes
After removing the cakes from the oven, allow them to cool in the cake pans for about 10-15 minutes. Then, gently run a knife along the edges to loosen the cakes before transferring them to a wire rack to cool completely. It’s crucial to ensure the cakes are completely cool before frosting to prevent the frosting from melting.
Step 2: Leveling the Cakes
When the cakes are cooled, level the tops using a serrated knife or a cake leveler to create a flat surface for stacking. This step helps the cakes to stack evenly and provides a stable base for the frosting.
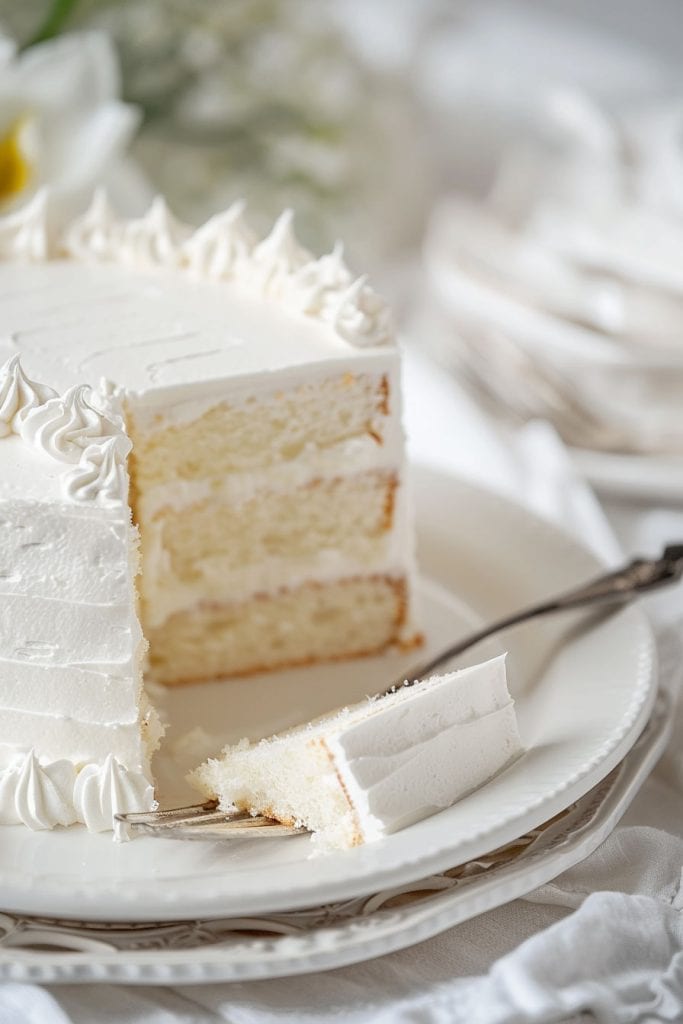
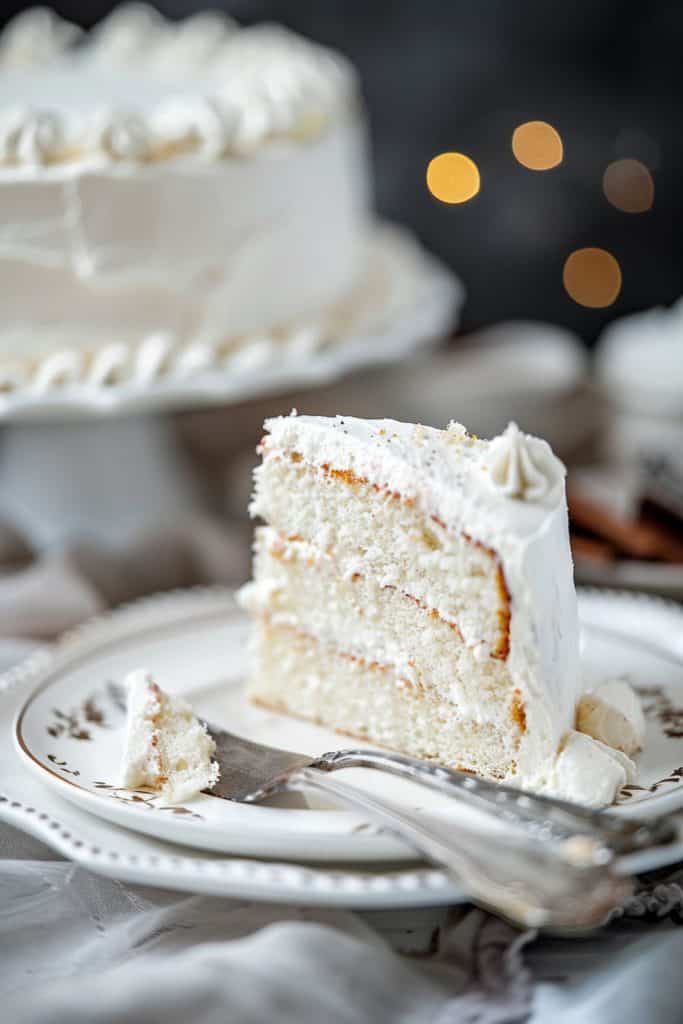
Step 3: Frosting the Cakes
Place one of the cake layers on a serving plate or cake stand. Spread a layer of the prepared white chocolate frosting evenly over the top of the cake using an offset spatula. Gently place the second cake layer on top and repeat the process, covering the entire cake with frosting. Use smooth, even strokes to create a beautifully frosted finish.
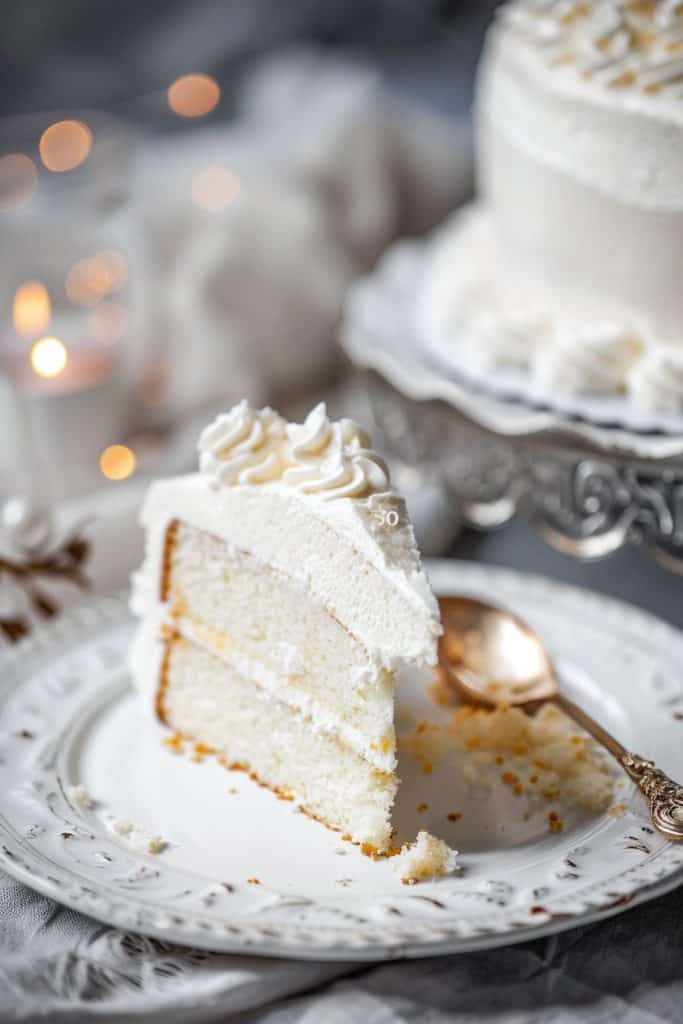
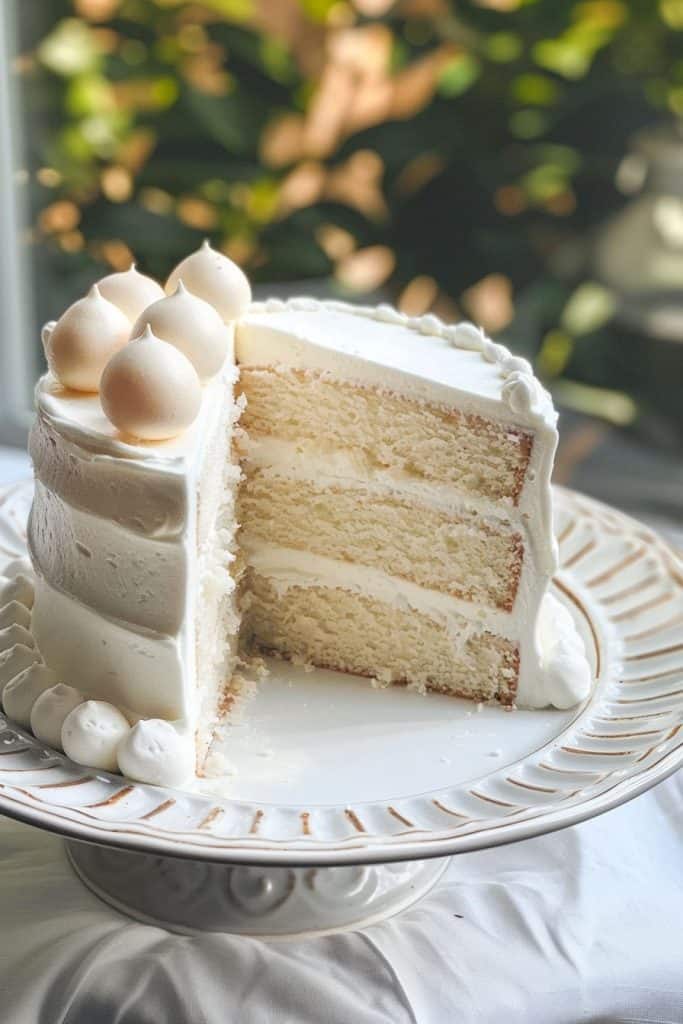
Step 4: Decorating the Cake
To garnish the white chocolate velvet cake, consider using fresh berries like raspberries or strawberries around the edges of the cake. You can also create white chocolate curls using a vegetable peeler on a block of white chocolate and arrange them on top of the cake for an elegant touch. Edible flowers, like pansies or violets, can add a pop of color and sophistication to the presentation.
Step 5: Serving the Cake
Once the cake is assembled and decorated, allow it to chill in the refrigerator for at least 30 minutes to set the frosting. When ready to serve, use a sharp knife dipped in hot water to slice the cake smoothly. Serve each slice on a dessert plate and enjoy the luxurious flavors of the white chocolate velvet cake.
By following these simple steps, you can create a show-stopping white chocolate velvet cake that will delight your taste buds and impress your guests with its irresistible taste and elegant presentation.
Decoration Tips
Let’s move on to the fun part – decorating our white chocolate velvet cake to make it not only taste heavenly but look stunning too. Here are some tips to help you elevate the appearance of your dessert:
1. White Chocolate Curls:
To add a touch of elegance, create delicate white chocolate curls to adorn your cake. Using a vegetable peeler, carefully shave a block of white chocolate to form beautiful curls. Sprinkle these curls generously over the frosted cake for a sophisticated finish.
2. Fresh Berries:
For a burst of color and freshness, consider topping your white chocolate velvet cake with a selection of fresh berries such as strawberries, raspberries, or blueberries. The bright hues of the berries will complement the white chocolate beautifully and add a delightful fruity contrast.
3. Edible Flowers:
To add a touch of whimsy and sophistication, garnish your cake with edible flowers. Choose edible flowers like pansies, roses, or lavender to create a visually stunning presentation. Ensure the flowers are pesticide-free and thoroughly washed before placing them on the cake.
4. Metallic Accents:
For a touch of glamour and luxury, consider incorporating metallic accents into your cake decoration. Use edible gold or silver leaf, metallic sprinkles, or edible glitter to add a touch of shimmer and sparkle to your white chocolate velvet cake.
5. Personalized Message:
For a special occasion or celebration, consider adding a personalized message to your cake. Using icing, piping gel, or fondant, write a heartfelt message or a celebratory phrase on the cake to make it truly memorable and unique.
6. Creative Frosting Techniques:
Experiment with different frosting techniques to create unique patterns and designs on your cake. Try using a piping bag with different tips to pipe rosettes, swirls, or lace patterns onto the cake for a visually appealing finish.
7. Layered Look:
Consider creating a layered look by stacking multiple cake layers with alternating frosting and filling flavors. This will not only add visual interest to your cake but also create a flavor profile that will surprise and delight your guests.
8. Garnish with Nuts or Shavings:
For added texture and flavor, consider garnishing your cake with chopped nuts, such as toasted almonds or hazelnuts, or chocolate shavings. These garnishes will provide a delightful crunch and an extra layer of flavor to your white chocolate velvet cake.
Storing and Serving
After all the hard work baking your white chocolate velvet cake, you’ll want to ensure it stays fresh and delectable for as long as possible. Here’s how I recommend storing and serving this divine dessert:
Storing the Cake:
- Room Temperature: If you plan to serve the cake within two days, store it at room temperature. Make sure it’s covered to prevent it from drying out.
- Refrigeration: For longer storage, refrigerate the cake. Wrap it well to retain moisture and prevent absorption of any odors from the fridge.
- Freezing: To store the cake for an extended period, consider freezing it. Wrap individual slices or the whole cake tightly in plastic wrap and aluminum foil to maintain freshness. Thaw in the fridge before serving.
- Slicing: When it’s time to serve the cake, use a sharp knife dipped in hot water for clean and smooth slices. Wipe the knife clean between each cut for neat servings.
- Plating: Get creative with your plating! Pair each slice with a dollop of fresh whipped cream or a scoop of vanilla ice cream to enhance the indulgent experience.
- Garnishes: Elevate the presentation by adding a sprinkle of cocoa powder, a drizzle of raspberry coulis, or a dusting of powdered sugar just before serving.
- Pairings: Serve the white chocolate velvet cake with a side of fresh berries, a hot cup of coffee, or a glass of champagne for a truly luxurious treat.
By following these storing and serving tips, you can ensure that each slice of your white chocolate velvet cake is as delightful to eat as it is to look at.
Conclusion
Creating a white chocolate velvet cake is a delightful experience that guarantees a luxurious treat for any occasion. With premium ingredients and careful attention to detail, this cake promises a velvety texture and rich flavor that will impress every palate. From preheating the oven to adding the final garnishes, each step contributes to a professional and elegant presentation. Storing options ensure the cake stays fresh and delicious for longer periods, while serving suggestions and garnishing ideas elevate the overall indulgence. By following these tips and techniques, every slice of white chocolate velvet cake will be a visual masterpiece and a true delight for the taste buds.