
Craving a delightful treat that combines the refreshing taste of mint with the irresistible crunch of Oreo cookies? I’ve got just the recipe for you! This mint Oreo cake is a true indulgence, perfect for any occasion that calls for a decadent dessert.
In this scratch recipe, I’ll guide you through creating a moist and flavorful cake that’s bound to impress your friends and family. The fusion of cool mint and rich chocolate flavors in every bite will leave you craving more.

Ingredients
Creating a delectable mint Oreo cake from scratch requires a careful selection of ingredients to ensure the perfect balance of flavors. Let me walk you through the key components needed for this irresistible dessert.
Cake Ingredients
- 2 cups all-purpose flour, sifted
- 1 ¾ cups granulated sugar
- ¾ cup unsweetened cocoa powder
- 2 tsp baking soda
- 1 tsp baking powder
- 1 tsp salt
- 2 large eggs
- 1 cup buttermilk
- ½ cup vegetable oil
- 2 tsp vanilla extract
- 1 cup hot water
- 1 tsp mint extract
- 1 cup chopped Oreo cookies
Buttercream and Filling Ingredients
- 1 cup unsalted butter, softened
- 4 cups powdered sugar
- 1 tsp vanilla extract
- 2-3 tbsp heavy cream
- Green food coloring
- ½ cup crushed Oreo cookies
- Whole Oreo cookies for garnish
- Fresh mint leaves for decoration
Tools and Equipment Needed
When preparing the delicious mint Oreo cake from scratch, having the right tools and equipment on hand ensures a smooth baking experience. Here are the essential items you’ll need:
Cake Baking:
- Two 9-inch round cake pans
- Parchment paper
- Electric mixer
- Mixing bowls (various sizes)
- Whisk
- Cooling rack
Cake Decoration:
- Offset spatula
- Cake turntable (optional but recommended for smooth icing)
- Piping bags and tips (for decorating with buttercream)
- Measuring cups and spoons
- Rubber spatula
- Cake lifter or large flat spatula (for transferring cake layers)
- Serrated knife (for leveling cake tops if needed)
- Kitchen towel or paper towels (for cleaning up spills)
Prep Work
Before diving into making the scrumptious mint Oreo cake, a few essential steps need to be completed to ensure a flawless baking experience.
Preparing the Cake Pans
First and foremost, I recommend preparing the cake pans by greasing them with butter or using a non-stick baking spray. Once greased, line the bottom of each pan with a parchment paper circle to prevent sticking and ensure easy cake removal after baking.
Preheating the Oven
Next, preheat your oven to the specified temperature indicated in the recipe. It’s crucial to allow the oven to reach the correct temperature before placing the cake pans inside to ensure even baking and perfect results. This step sets the stage for a successful baking process, so be sure not to skip it.
Directions
Making the Mint Oreo Cake Base
To begin making the mint Oreo cake base, preheat the oven to 350°F (175°C) and grease two 9-inch round cake pans with butter. Line the bottom of each pan with parchment paper for easy removal later. In a mixing bowl, combine 2 cups of all-purpose flour, 1 cup of granulated sugar, 1/2 cup of unsweetened cocoa powder, 2 teaspoons of baking powder, 1/2 teaspoon of baking soda, and a pinch of salt. Mix these dry ingredients until well combined.
In a separate bowl, whisk together 3 large eggs, 1 cup of buttermilk, 1/2 cup of vegetable oil, and 2 teaspoons of mint extract until smooth. Gradually add the wet mixture to the dry ingredients, stirring until there are no lumps. Divide the batter evenly between the prepared cake pans.
Bake the cakes in the preheated oven for 25-30 minutes or until a toothpick inserted into the center comes out clean. Once baked, allow the cakes to cool in the pans for 10 minutes before transferring them to a wire rack to cool completely.

Mixing the Mint Buttercream
For the mint buttercream, beat 1 cup of unsalted butter in a bowl until creamy. Gradually add 4 cups of powdered sugar, 1 teaspoon of vanilla extract, and 1/2 teaspoon of mint extract, beating until smooth and fluffy. If needed, adjust the consistency by adding a tablespoon of milk at a time until desired thickness is reached.
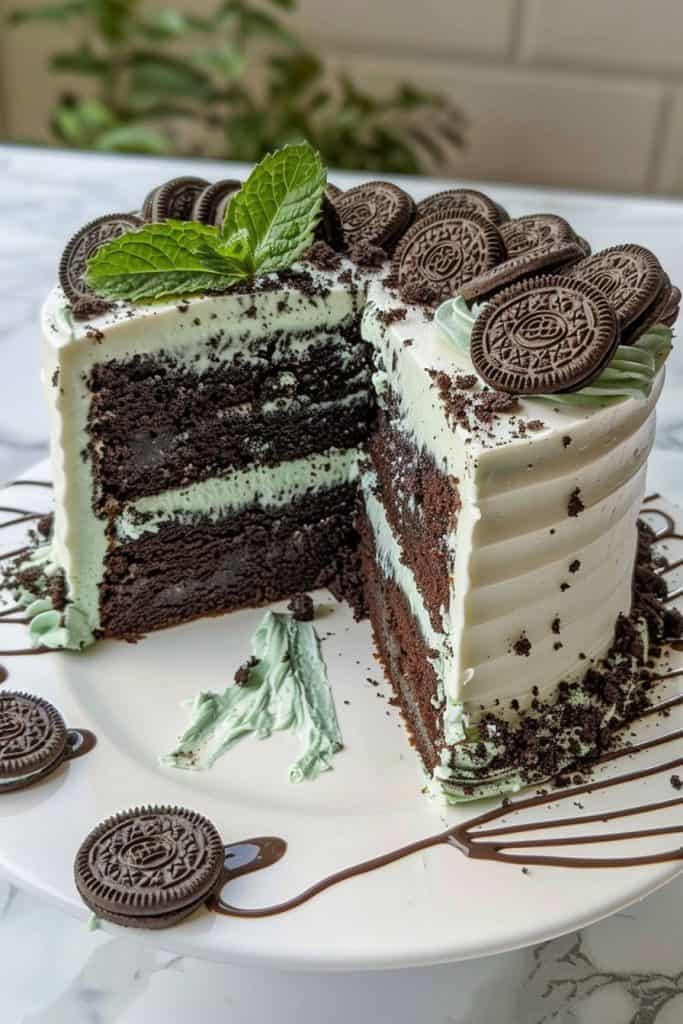
Once the cake layers are completely cooled, place one layer on a serving plate and spread a generous amount of mint buttercream over the top. Gently place the second cake layer on top and frost the top and sides with the remaining buttercream, creating a smooth finish.
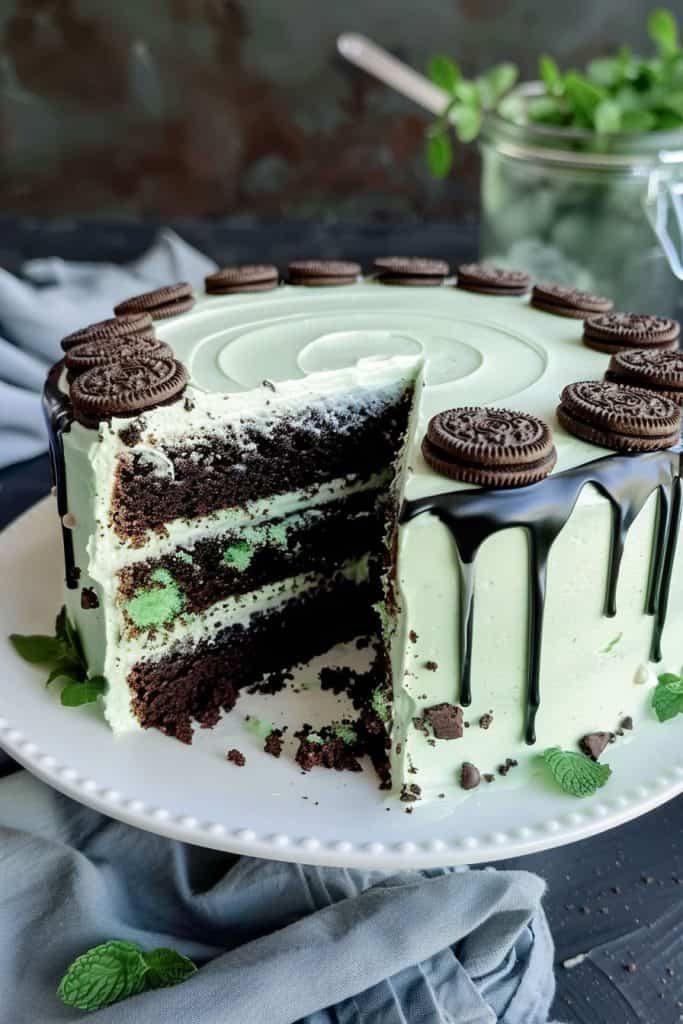
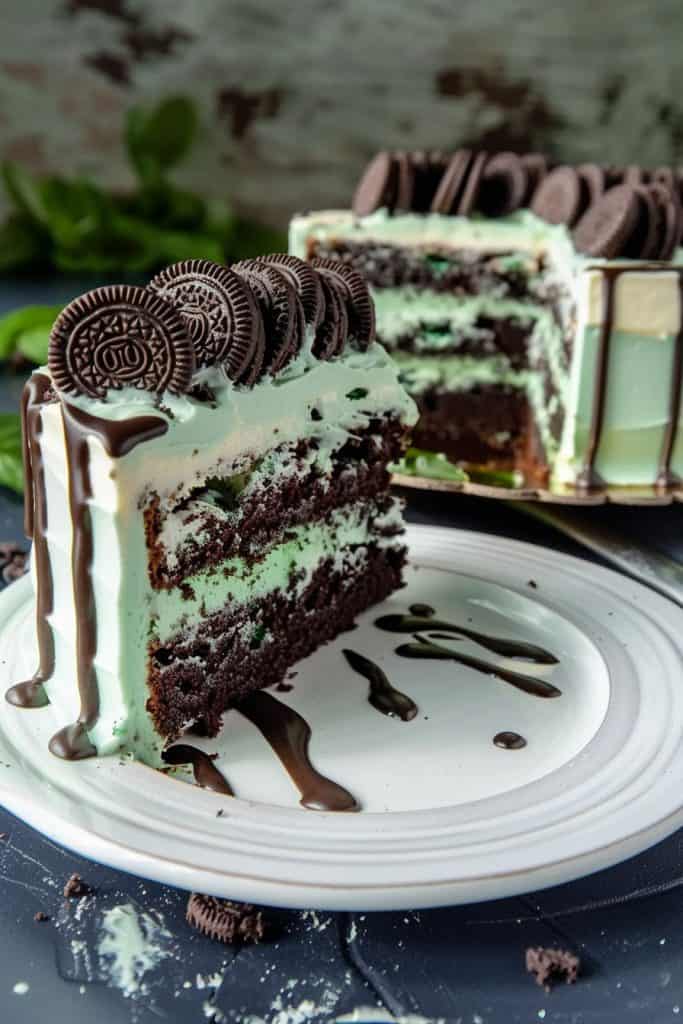
Decorate the cake with whole Oreo cookies around the top edge and garnish with fresh mint leaves for a delightful presentation. Chill the cake for about 30 minutes to allow the flavors to meld together before serving.
Assembling the Cake
Layering the Cake and Buttercream
To start assembling the mint Oreo cake, place the first cake layer on a serving plate or cake stand. Spread a generous amount of mint buttercream evenly over the top using an offset spatula. Repeat this process with the remaining cake layers, stacking them on top of each other with a layer of buttercream in between. This creates a delicious and visually appealing cake with alternating layers of moist cake and creamy frosting.
Applying the Crumb Coat
Once the cake is layered, it’s time to apply the crumb coat. This initial layer of frosting seals in any cake crumbs, creating a smooth base for the final layer of frosting. Using an offset spatula, cover the entire cake with a thin layer of mint buttercream, making sure to spread it evenly across the top and sides. Chill the cake in the refrigerator for about 30 minutes to allow the crumb coat to set before applying the final layer of frosting.
Decorating the Cake
After chilling the cake to set the crumb coat, it’s time to elevate its appearance with the final frosting layer, ganache drip, and decorative toppings.
Adding the Final Frosting Layer
I spread a generous amount of mint buttercream evenly over the chilled cake using an offset spatula. This layer should be smooth and even to create a perfect canvas for the next decoration step.
Creating Ganache Drip
For a touch of elegance, I prepare a silky chocolate ganache by heating cream until just simmering and pouring it over chopped chocolate. After letting it sit for a few minutes, I stir to create a smooth ganache. I carefully pour the ganache on top of the cake’s edges, allowing it to drip down the sides for a visually stunning effect.
Applying Decorative Toppings
To complete the mint Oreo cake, I place halved Oreo cookies around the top edge of the cake, gently pressing them into the frosting. I then garnish the center with fresh mint leaves for a pop of color and added freshness. This final touch adds a decorative flair to the cake, making it a show-stopping centerpiece for any occasion.

Serving and Storage
How to Serve
When serving the mint Oreo cake, I recommend slicing it with a sharp knife dipped in hot water for clean cuts. Each slice should showcase the beautiful layers of moist cake and creamy mint buttercream. Serve the cake chilled for the best flavor experience, allowing the flavors to meld together perfectly.
Storing Leftovers
To store any leftover mint Oreo cake, securely cover the remaining slices with plastic wrap or place them in an airtight container. Store the cake in the refrigerator for up to 3-4 days to maintain its freshness and delicious taste. Before serving refrigerated slices, allow them to sit at room temperature for a few minutes to soften slightly and enhance the flavors.
Conclusion
Creating a mint Oreo cake from scratch is a rewarding experience that results in a delicious and visually appealing dessert. By following the step-by-step guide provided in this article, you can impress your guests with a homemade treat that combines the refreshing flavor of mint with the indulgent taste of Oreo cookies. Remember to take your time during the preparation process, ensuring each layer is assembled with care and attention to detail. From the cake base to the final decorative touches, every step plays a crucial role in the overall presentation and taste of the cake. So, gather your ingredients, preheat your oven, and embark on this baking journey to enjoy a slice of mint Oreo goodness that is sure to delight your taste buds.