
Ever bitten into a warm, pillowy kolache? This delightful pastry has roots in Central Europe, particularly the Czech Republic, and has found a second home in Texas. Kolaches are more than just a treat; they’re a tradition steeped in family gatherings and festive occasions.
I love how versatile kolaches can be. Whether filled with sweet fruit preserves, creamy cheese, or savory sausage, there’s a kolache for every palate. Perfect for breakfast, a snack, or even dessert, these pastries are sure to become a favorite in your kitchen. Let’s dive into the world of kolache recipes and discover the magic of this beloved pastry.
What Are Kolaches?
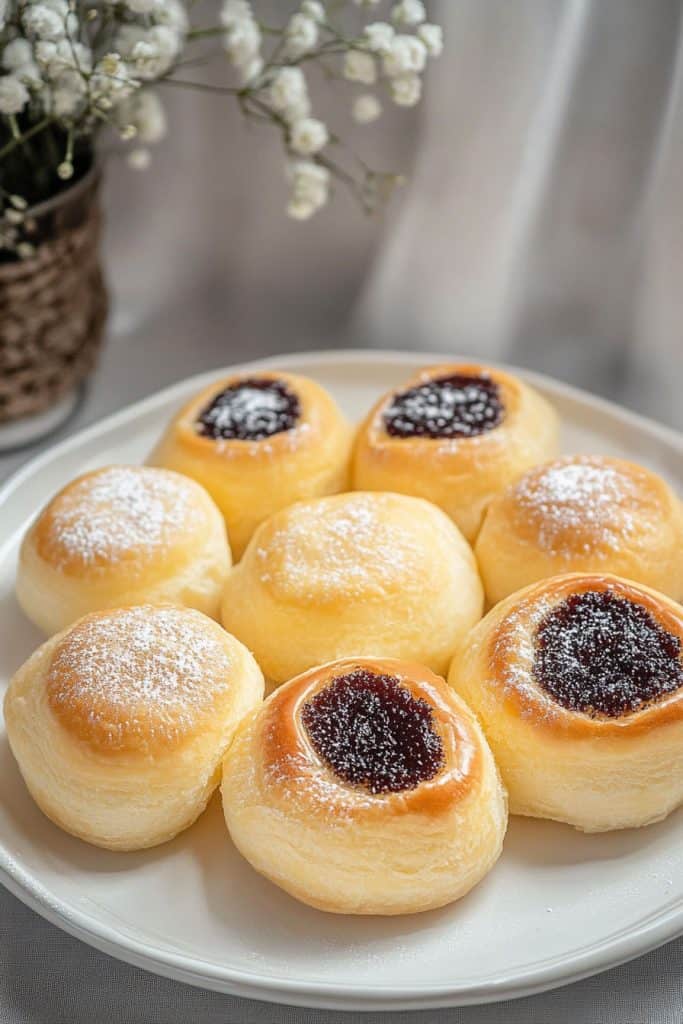
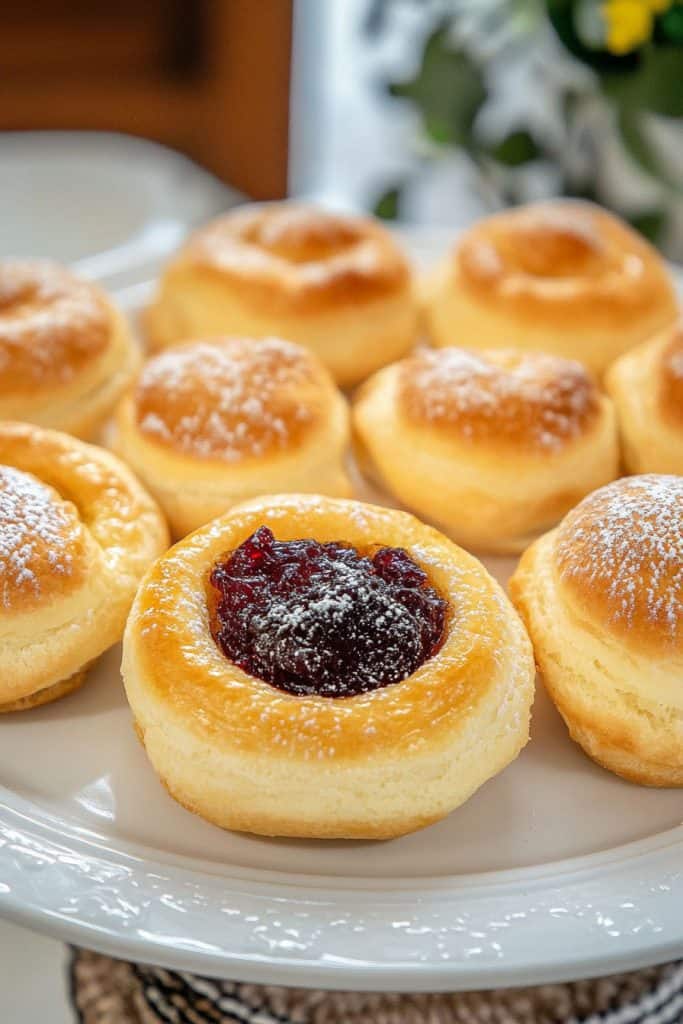
Kolaches are delightful pastries that originated in Central Europe, particularly the Czech Republic. These treats typically feature a soft, slightly sweet dough that encases various fillings. The traditional kolache fillings include fruit preserves, like apricot or plum, and creamy cheese mixtures. As their popularity spread, particularly to Texas, kolaches evolved to include savory options, such as sausage, ham, and cheese.
Kolaches serve as a versatile culinary delight suitable for different occasions. Whether you’re looking for a hearty breakfast, a satisfying snack, or an indulgent dessert, there’s a kolache to meet your needs. The texture of the dough is pillowy and tender, complementing both sweet and savory fillings perfectly. When baked, they achieve a golden brown crust that is lightly crispy on the outside while remaining soft and fluffy inside.
Creating kolaches involves several key steps. First, the dough is prepared, typically from basic ingredients like flour, yeast, milk, sugar, and butter. Once the dough is mixed and allowed to rise, it is portioned into individual rounds, flattened, and then filled with the chosen ingredients. After a second rising period, the kolaches are baked until golden, filling your kitchen with an irresistible aroma.
Kolaches are more than just delicious pastries; they are a testament to the rich culinary traditions of Central Europe and the adaptability of recipes as they migrate and evolve. With endless possibilities for fillings and variations, kolaches offer a delightful baking project that allows for significant personal creativity.

Key Ingredients for Kolache Recipes
One of the joys of making kolaches lies in their simplicity and the rich flavors brought out by just a few key ingredients. Here’s what you’ll need to get started:
Dough Ingredients
- Flour: 4 cups of all-purpose flour, sifted.
- Sugar: 1/2 cup of granulated sugar to add a touch of sweetness.
- Yeast: 2 1/4 teaspoons of active dry yeast to help the dough rise.
- Milk: 1 cup of whole milk, warmed to around 110°F (43°C).
- Butter: 1/2 cup (1 stick) of unsalted butter, melted and cooled.
- Eggs: 2 large eggs, at room temperature, for richness and texture.
- Salt: 1 teaspoon of salt to enhance the flavors.
Sweet Filling Options
- Fruit Preserves: 1 cup, choose your favorite like apricot, cherry, or plum.
- Cream Cheese Mixture: 8 ounces of cream cheese, 1/4 cup of sugar, and 1 teaspoon of vanilla extract, blended until smooth.
- Poppy Seed Filling: 1/2 cup of poppy seeds, 1/4 cup of milk, 2 tablespoons of sugar, and 1 teaspoon of vanilla extract, cooked and cooled.
Savory Filling Options
- Sausage: 1 cup of cooked and crumbled sausage, seasoned to taste.
- Ham and Cheese: 1 cup of diced ham mixed with 1 cup of shredded cheese, like cheddar or Swiss.
- Egg and Bacon: 2 scrambled eggs combined with 1/2 cup of crispy bacon pieces.
- Activate the Yeast: In a bowl, combine the warm milk, yeast, and 1 tablespoon of the sugar. Let sit for 5-10 minutes until frothy.
- Mix Wet Ingredients: In a large bowl, whisk together the melted butter, remaining sugar, and eggs.
- Combine: Add the yeast mixture to the butter mixture and stir until combined.
- Add Dry Ingredients: Gradually add the flour and salt, mixing until a soft dough forms.
- Knead: On a floured surface, knead the dough for about 10 minutes until smooth and elastic.
- Let Rise: Place the dough in a greased bowl, cover with a damp cloth, and let it rise in a warm place for about 1-2 hours until doubled in size.
Essential Tools and Equipment
To create perfect kolaches, having the right tools and equipment makes the process smoother and more enjoyable. Here’s everything you need to get started:
Mixing and Measuring
- Measuring Cups and Spoons: Accurate measurements are crucial, so a set of measuring cups and spoons is essential for both wet and dry ingredients.
- Digital Kitchen Scale: For precise measurements, especially of flour and fillings, a digital kitchen scale is invaluable.
- Mixing Bowls: Various sizes of mixing bowls are necessary for different stages of the dough preparation and filling.
Dough Preparation
- Stand Mixer with Dough Hook: Although you can knead the dough by hand, a stand mixer equipped with a dough hook attachment will save you time and effort.
- Pastry Brush: To apply egg wash or butter on the dough for that perfect golden-brown finish.
- Rolling Pin: For rolling out the dough evenly to the desired thickness.
Baking Essentials
- Baking Sheets: Non-stick or lined with parchment paper, these are essential for baking the kolaches evenly.
- Parchment Paper or Silicone Baking Mats: To prevent the kolaches from sticking to the baking sheets and to make cleanup easier.
- Cooling Rack: Allows the kolaches to cool evenly and prevents them from becoming soggy on the bottom.
Filling and Shaping
- Small Ice Cream Scoop or Spoon: For evenly portioning out the fillings.
- Sharp Knife or Bench Scraper: Useful for cutting the dough into equal pieces and cleaning your work surface.
- Pastry Mat: Provides a non-stick surface for rolling out dough and easy measurement guides.
- Silicone Spatula: Great for mixing and scraping bowls clean, ensuring you use every bit of your ingredients.
Having these tools and equipment ready will set you up for kolache-making success, streamlining each step of the process and helping you achieve consistent results.

How to Make Kolache Dough
Let’s dive into the process of making the perfect kolache dough. This section will guide you through the ingredients, preparation steps, and essential tips for proofing and kneading.
Ingredients for the Dough
- 4 cups all-purpose flour
- 1 package (2 1/4 teaspoons) active dry yeast
- 1/2 cup granulated sugar
- 1/2 teaspoon salt
- 1 cup whole milk (warmed to about 110°F)
- 1/2 cup unsalted butter (melted)
- 3 large egg yolks
- 1 teaspoon vanilla extract
Instructions to Prepare the Dough
- Activate the Yeast: In a small bowl, combine the warm milk and a teaspoon of sugar. Sprinkle the active dry yeast over the mixture and let it sit for about 5 to 10 minutes, or until the yeast becomes frothy.
- Mix Dry Ingredients: In a large mixing bowl, whisk together the all-purpose flour, granulated sugar, and salt. Set aside.
- Combine Wet Ingredients: In another bowl, blend the egg yolks, melted butter, and vanilla extract until well combined. Pour the yeast mixture into this bowl and mix gently.
- Form the Dough: Make a well in the center of the dry ingredients and pour the wet ingredients into it. Stir until a rough dough forms. If using a stand mixer with a dough hook, start the mixer on low speed to combine.
- Knead the Dough: On a lightly floured surface, knead the dough for about 8 to 10 minutes until it is smooth and elastic. If using a stand mixer, knead on medium speed for 5 to 7 minutes.
- First Proof: Place the dough in a lightly greased bowl and cover it with a damp cloth or plastic wrap. Let it rise in a warm place for about 1 to 1.5 hours, or until it has doubled in size.
- Punch Down and Knead Again: After it has risen, punch down the dough to release the trapped air. Knead it gently for another 2 minutes to smooth it out.
- Shape and Second Proof: Shape the dough as desired for your kolaches. Place them on a baking sheet lined with parchment paper, cover, and allow them to proof for another 30 minutes.
By following these steps, you’ll achieve a soft and perfectly risen kolache dough ready for your favorite fillings.
How to Make Fillings for Kolaches
Creating the perfect filling is crucial for delicious kolaches. Here are some of my favorite fillings to satisfy both your sweet and savory cravings.
Sweetened Cheese Filling
For a traditional sweetened cheese filling:
- 8 oz cream cheese, softened
- 1/4 cup granulated sugar
- 1 tablespoon lemon juice
- 1 teaspoon vanilla extract
- 1 egg yolk
- In a medium bowl, combine the softened cream cheese and granulated sugar.
- Add the lemon juice and vanilla extract, mixing well until smooth.
- Finally, mix in the egg yolk until fully incorporated. Your sweetened cheese filling is now ready to use.

Fruit Filling
For a delightful fruit filling, choose your favorite fruit or a mix:
- 2 cups fresh or frozen fruit (e.g., apricots, cherries, blueberries)
- 1/4 cup granulated sugar
- 2 tablespoons cornstarch
- 1 tablespoon lemon juice
- 1/4 cup water
- In a small saucepan, combine the fruit, sugar, and lemon juice.
- Dissolve the cornstarch in water and add it to the fruit mixture.
- Cook over medium heat, stirring constantly, until the mixture thickens and the fruit softens. This usually takes about 5-7 minutes.
- Allow the fruit filling to cool before using it in your kolaches.
- 1/2 lb ground sausage, cooked and crumbled
- 1/2 cup shredded sharp cheddar cheese
- 1/4 cup chopped onions, sautéed
- 1/4 teaspoon black pepper
- 1/4 teaspoon garlic powder
- In a skillet, cook the sausage over medium heat until browned and crumbled.
- Sauté the chopped onions until they are translucent and slightly golden.
- In a bowl, combine the cooked sausage, onions, shredded cheddar cheese, black pepper, and garlic powder.
- Mix well and allow the filling to cool before using it in your kolaches.
Preparing and Assembling Kolaches
Now that we have our dough and fillings ready, it’s time to bring everything together. Let’s dive into the process of shaping and filling the kolaches to create these delightful pastries!
How to Shape and Fill Kolaches
- Prepare the Work Surface: Start by lightly flouring your work surface to prevent the dough from sticking.
- Divide the Dough: After the dough has proofed, gently punch it down and divide it into equal portions. I recommend using a kitchen scale to ensure uniformity. Aim for pieces that are about 2 inches in diameter.
- Shape the Dough: Roll each piece of dough into a smooth ball. Place the balls on a baking sheet lined with parchment paper, leaving about 2 inches of space between them.
- Create Indentations: Using your thumb or the back of a spoon, gently press down the center of each dough ball to create a well for the filling. The indentation should be deep enough to hold the filling but not so deep that it punctures the dough.
- Add the Fillings: Spoon your prepared fillings (fruit, cheese, or savory options) into the indentations. Be careful not to overfill to avoid spillage during baking.
- Final Proofing: Allow the filled kolaches to rise for an additional 20-30 minutes. This second proofing gives them a light, airy texture.
- Room Temperature Ingredients: Ensure that all ingredients, especially butter and milk, are at room temperature before starting. This helps the dough rise evenly.
- Precise Measurements: Use a kitchen scale for measuring ingredients to maintain consistency in dough texture.
- Proper Proofing: Do not rush the proofing stages. Allow the dough to rise fully to ensure fluffy and tender kolaches.
- Uniform Dough Balls: Uniform dough pieces ensure even baking, avoiding some kolaches being underdone or overdone.
- Watch the Filling: Overfilling can lead to messy pastries. Keep an eye on the amount of filling to maintain a neat appearance.
- Even Baking: Rotate your baking sheet halfway through baking to ensure even browning and avoid hotspots in your oven.
- Cool Properly: Let the kolaches cool on a wire rack after baking to prevent them from becoming soggy.
By following these steps and tips, you’ll create perfectly shaped and delicious kolaches every time.

Baking Kolaches
Now that our kolaches are shaped and filled, it’s time to bake them to perfection. Let’s dive into the details of baking time and temperature, along with the finishing touches that add that final flair to these pastries.
Baking Time and Temperature
Preheat your oven to 375°F (190°C). While the oven is heating, let the filled and proofed kolaches rest on the baking sheet for an additional 10 minutes. This final rest allows the dough to relax and rise a bit more, ensuring a soft, tender crumb.
- Baking Temperature: 375°F (190°C)
- Baking Time: 15-18 minutes
Place the baking sheet on the center rack of the oven. Bake for 15-18 minutes, or until the kolaches are golden brown. Keep an eye on them during the final few minutes to prevent over-browning. The exact baking time can vary depending on your oven, so start checking at the 15-minute mark.
Finishing Touches (Egg Wash and Streusel Topping)
Before baking, it’s important to apply an egg wash to ensure a glossy, appealing finish. For an extra touch of texture and sweetness, consider adding a streusel topping.
Egg Wash
- Ingredients: 1 egg, beaten with 1 tablespoon of water
- Steps:
- In a small bowl, beat the egg with water until well combined.
- Using a pastry brush, gently brush the egg wash over the surface of each kolache. This will give them a beautiful, shiny finish once baked.
Streusel Topping
-
Ingredients:
- 1/4 cup (30g) all-purpose flour
- 1/4 cup (50g) granulated sugar
- 2 tablespoons (30g) unsalted butter, cold and cubed
- In a separate bowl, combine the flour, sugar, and cold butter.
- Use your fingers or a pastry cutter to mix until the mixture resembles coarse crumbs.
- Sprinkle a small amount of the streusel topping over each kolache before baking.
By following these steps and applying the finishing touches, your kolaches will not only taste amazing but also look like they’ve come straight from a bakery.
Storing, Freezing, and Reheating Kolaches
Proper storage ensures that your kolaches remain fresh and delicious for as long as possible.
Storing Kolaches
To store freshly baked kolaches, allow them to cool completely at room temperature. Once cooled, place kolaches in an airtight container or a resealable plastic bag. Store them at room temperature for up to 2 days. If you need to store them longer, refrigeration is recommended. In the fridge, kolaches can last up to 5 days, though it’s best to consume them within the first couple of days for optimum freshness.

Freezing Kolaches
To freeze kolaches, first ensure that they are thoroughly cooled. Place the kolaches in a single layer on a baking sheet and freeze them for about an hour. This prevents them from sticking together. Once frozen, transfer the kolaches to a freezer-safe airtight container or a resealable freezer bag. Label the container with the date to keep track of freshness. Kolaches can be frozen for up to 3 months. For best results, consume within the first month.
Reheating Kolaches
To reheat stored or frozen kolaches properly, follow these steps based on how you initially stored them:
Refrigerated Kolaches:
- Preheat your oven to 350°F (175°C).
- Place kolaches on a baking sheet.
- Heat in the oven for 10-15 minutes until warmed through.
Frozen Kolaches:
- Remove kolaches from the freezer and let them thaw at room temperature.
- Preheat your oven to 350°F (175°C).
- Place thawed kolaches on a baking sheet.
- Heat in the oven for 15-20 minutes until they are warmed through.
For a quicker reheating option, microwaving is possible, although it may affect the texture:
- Place a kolache on a microwave-safe plate.
- Cover with a slightly damp paper towel.
- Microwave on medium power for 20-30 seconds if refrigerated, or 1-2 minutes if frozen and then thawed.
By following these storage, freezing, and reheating guidelines, you can maintain the delightful taste and texture of your kolaches for days to come.
Conclusion
Kolaches hold a special place in my heart and kitchen. Their rich history and versatile fillings make them a treat worth mastering. Whether you’re savoring them fresh or storing them for later, following the right techniques ensures they stay delicious. From airtight containers to proper reheating methods, these steps help maintain that perfect kolache experience. So go ahead and enjoy these delightful pastries anytime you crave a taste of Central Europe or Texas.