
Indulge in the heavenly fusion of two beloved desserts with this tantalizing tiramisu cheesecake recipe. Combining the rich flavors of espresso, Kahlua, and velvety mascarpone cheese, this cheesecake is a decadent treat that mirrors the classic taste of tiramisu.
As a devoted fan of tiramisu, I couldn’t resist creating this delightful cheesecake variation that captures the essence of the beloved Italian dessert. The anticipation of waiting for this cheesecake to set is the ultimate test of patience, but the reward is beyond satisfying.
Prepare to have your taste buds dazzled as you savor the luscious layers of this tiramisu cheesecake, where every bite is a harmonious blend of creamy cheesecake and robust coffee flavors. Get ready to embark on a culinary journey that promises to fulfill all your tiramisu dreams in a single slice.
Ingredients
Creating a mouthwatering tiramisu cheesecake requires a perfect balance of ingredients. Let’s delve into the key components that make this dessert a true showstopper.
Chocolate Crust
- 35 chocolate creme cookies (455 g)
- 5 tablespoons unsalted butter, melted (85 g)
Cheesecake Filling
- 24 oz full-fat cream cheese, room temperature (3 8 oz blocks, 680 g)
- 8 oz good-quality mascarpone (e.g., Galbani), room temperature (226 g)
- 1 ½ cups granulated sugar (325 g)
- ½ teaspoon salt
- 1 teaspoon vanilla essence
- 4 large eggs, room temperature
- ½ cup heavy cream (120 g)
- 1 cup sour cream (240 g)
- 1 tablespoon cornstarch
Assembly
- 12 ladyfinger biscuits
- ½ cup strong black coffee
Coffee Mascarpone Cream
- 4 oz good-quality mascarpone, cold (113 g)
- 2–4 tablespoons granulated sugar
- 1 teaspoon instant coffee + 1 teaspoon water
- 1 cup heavy whipping cream, chilled (240 g)
Decoration
- 2 tablespoons cocoa powder for dusting
Equipment Needed
For this tiramisu cheesecake recipe, you will need the following equipment to ensure a smooth and successful baking experience:
- Stand Mixer or Hand Mixer
Essential for blending the cheesecake filling and coffee mascarpone cream to a creamy consistency. - 10-inch Springform Pan (3 inches tall)
This ensures the batter fits perfectly without overflow. - Mixing Bowls
Keep multiple mixing bowls ready for preparing each component. - Whisk and Spatula
Indispensable tools for gently folding ingredients and achieving a smooth texture. - Measuring Cups and Spoons
Accuracy is key to achieving the perfect balance of flavors. - Coffee Maker or Strong Brewed Coffee Setup
A rich coffee base is essential for infusing authentic tiramisu flavor into the dessert.
Preparation Steps
Preparing the Chocolate Crust
- Preheat the oven to 350°F (175°C).
- Grind the chocolate creme cookies and melted butter in a food processor until a fine crumb forms.
- Press the mixture firmly into the bottom of a lightly buttered 10-inch springform pan. Pack it tightly, bringing the crumbs slightly up the edges while keeping most of it on the bottom.
- Bake for 7–8 minutes, then set aside to cool while preparing the filling.
Mixing the Cheesecake Filling
- Adjust the oven temperature to 320°F (160°C).
- Beat cream cheese, mascarpone, granulated sugar, vanilla, and salt in a stand mixer with the paddle attachment for 2–3 minutes on medium-low speed until smooth. Scrape the bowl as needed.
- In a separate bowl, lightly whisk the eggs (do not overbeat). Slowly add eggs to the cheese mixture, mixing on low speed until just combined.
- Add heavy cream, sour cream, and sifted cornstarch. Mix on low speed until fully incorporated, scraping the bowl occasionally to ensure even mixing.
Assembling & Baking
- Seal the outside of your springform pan tightly with aluminum foil to prevent water from seeping in.
- Pour half of the filling into the cooled crust, gently smoothing it out. Tap the pan on the counter to remove air bubbles.
- Quickly dip the ladyfingers into the coffee, ensuring they don’t soak too much, and layer them closely over the cheesecake batter. Cut smaller pieces to fill any gaps.
- Pour the remaining cheesecake batter on top, filling the pan just beneath the brim. Smooth out the surface and tap again to release air bubbles.
- Place a large tray in your oven and fill it with 1–2 inches (2.5–5 cm) of boiling water. Place the cheesecake pan inside the tray for a water bath.
- Bake for ~80 minutes, keeping the oven closed for at least 75 minutes. The cheesecake is ready when the edges are firm, but the center is still slightly jiggly.
- Cool at room temperature for 15 minutes. Run a butter knife along the edge to loosen the cheesecake but do not open the pan. Cool for 2–3 hours, then refrigerate overnight (no cover needed during this time).
Coffee Mascarpone Cream
The next day, whisk mascarpone, sugar, and coffee (dissolved in water) in a bowl until smooth.
Gradually add chilled heavy cream and whisk on low speed until stiff peaks form.
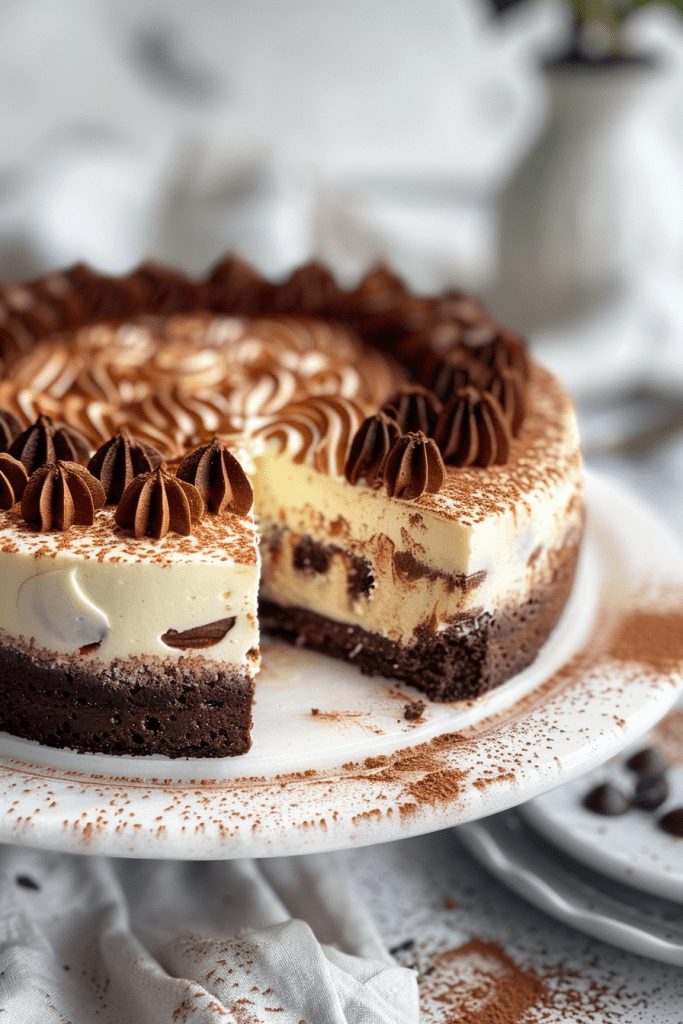
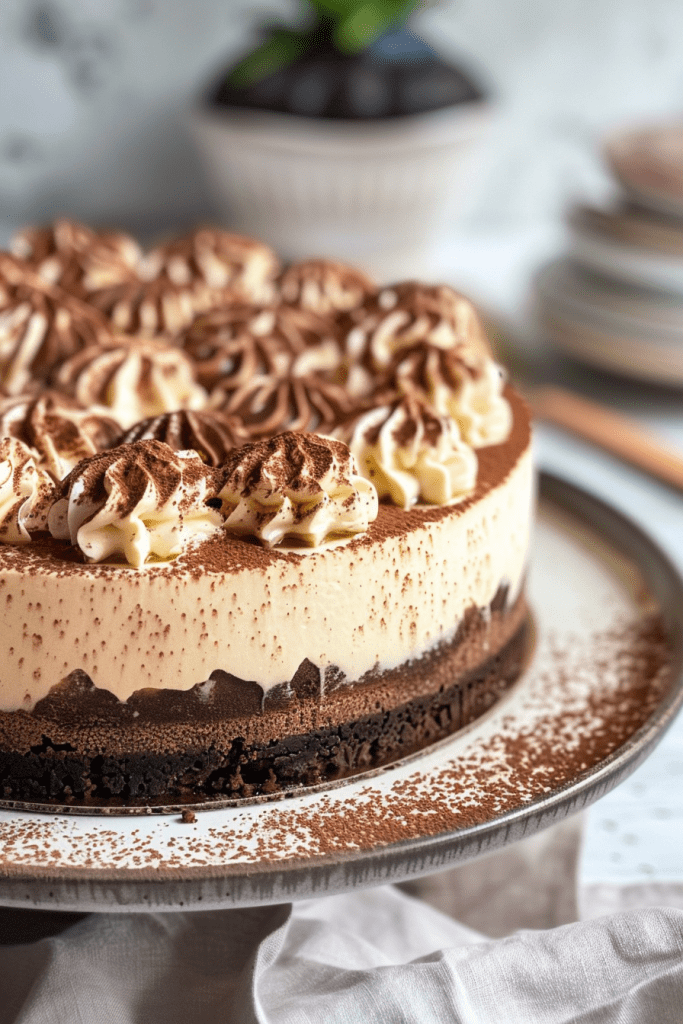
Decoration & Serving
Decoration
- Transfer the Cheesecake: Once your tiramisu cheesecake has chilled overnight, carefully remove it from the springform pan. Use a flat spatula to gently loosen the edges before transferring it to a serving platter. A cake lifter can also be helpful to maintain integrity while transferring.
- Spread Coffee Mascarpone Cream: Apply a thin, even layer of coffee mascarpone cream over the top of the cheesecake. This not only enhances flavor but also provides a smooth base for additional decorations.
- Piping and Patterning: Fill a piping bag with the remaining coffee mascarpone cream. Use a star tip or any decorative nozzle you prefer to pipe patterns across the top of the cheesecake. Consider a spiral, zigzag, or rosette design to add visual appeal.
- Dusting with Cocoa Powder: Use a fine-mesh sieve to dust the top of the cheesecake with cocoa powder. Hold the sieve about 6 inches above the surface for an even dusting. This final touch adds a classic tiramisu aesthetic.
- Garnishing Options: For added flair, consider garnishing with chocolate curls, espresso beans, or shavings of dark chocolate. A sprig of mint can also add a touch of color and freshness.
Serving
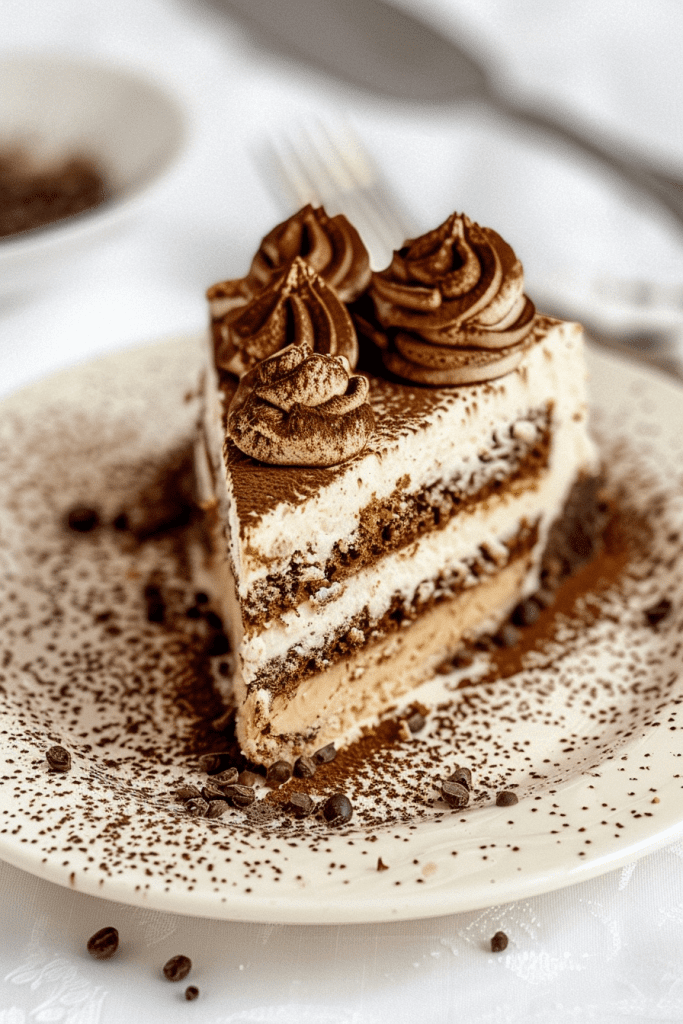
- Slicing Techniques: For clean slices, dip a sharp knife in hot water and wipe it clean before each cut. This helps achieve smooth, neat slices that maintain the layer distinction between crust, filling, and topping.
- Plating Suggestions: Serve slices on individual dessert plates. For an elegant presentation, drizzle each plate with chocolate or coffee sauce before placing the cheesecake slice. Add a dollop of freshly whipped cream or a sprinkle of crushed chocolate cookies for texture contrast.
- Pairing Recommendations: Pair your tiramisu cheesecake with a rich espresso or a sweet dessert wine. The bitterness of coffee contrasts beautifully with the creamy sweetness of the dessert.

Final Tips
- Use a 10-inch pan (3 inches tall). If using a 9-inch pan, expect leftover batter. Avoid overfilling the pan to prevent spills.
- Dip ladyfingers briefly—just enough to coat the surface—since they’ll absorb moisture during baking.
- For clean slices, use a sharp knife dipped in hot water and wiped between cuts.
Storage Tips
Refrigerating
- Covering: After serving, cover the remaining cheesecake with plastic wrap or aluminum foil. Make sure the covering is tight to prevent any refrigerator odors from affecting the cheesecake’s delicate flavors.
- Placement: Store the cheesecake on a flat, stable shelf in the refrigerator. Avoid stacking anything on top to maintain the layered structure.
- Duration: When refrigerated, the cheesecake remains fresh and flavorful for up to 5 days. The structure and taste improve as the flavors meld.
Freezing Options
- Initial Wrapping: For longer storage, wrap the entire cheesecake or individual slices tightly in plastic wrap. Ensure no part of the cheesecake is exposed.
- Secondary Wrapping: Follow the plastic wrap with a layer of aluminum foil or place it in an airtight, freezer-safe container. This double wrapping protects against freezer burn and maintains quality.
- Freezer Storage: The cheesecake can be frozen for up to 2 months. Label the wrap with the date to keep track of storage time.
- Thawing: When ready to enjoy, thaw the cheesecake in the refrigerator overnight. Avoid thawing at room temperature to prevent texture loss. Once thawed, it will be just as delicious as the day it was made.
Following these steps ensures that every serving of your tiramisu cheesecake is as delightful as the first, whether enjoyed immediately or saved for later indulgence.
Conclusion
Creating a tiramisu cheesecake is a delightful culinary adventure that blends the best of two beloved desserts. With its rich coffee flavor, delicate layers, and creamy mascarpone filling, each bite is a little piece of dessert heaven. Whether for a special occasion or a sweet indulgence, this tiramisu cheesecake promises an unforgettable experience for your taste buds.
PrintTiramisu Cheesecake Recipe
Indulge in the ultimate fusion of two classic desserts! This creamy Tiramisu Cheesecake combines the robust flavors of espresso and mascarpone with layers of soaked ladyfingers, all atop a rich chocolate crust. Perfect for any special occasion or simply to impress your taste buds.
- Prep Time: 30 minutes
- Cook Time: 1 hour 20 minutes
- Total Time: 12 hours (includes overnight chilling)
- Yield: 12–14 1x
- Category: Desserts
- Cuisine: Italian-American
Ingredients
Chocolate Crust:
- 35 chocolate creme cookies (455 g)
- 5 tbsp unsalted butter, melted (85 g)
Cheesecake Filling:
- 24 oz (3 blocks) full-fat cream cheese, room temperature (680 g)
- 8 oz mascarpone cheese (e.g., Galbani), room temperature (226 g)
- 1 ½ cups granulated sugar (325 g)
- ½ tsp salt
- 1 tsp vanilla essence
- 4 large eggs, room temperature
- ½ cup heavy cream (120 g)
- 1 cup sour cream (240 g)
- 1 tbsp cornstarch, sifted
Assembly:
- 12 ladyfinger biscuits
- ½ cup strong black coffee (use your favorite brewing method, stronger is better)
Coffee Mascarpone Cream:
- 4 oz mascarpone cheese, cold (113 g)
- 2–4 tbsp granulated sugar
- 1 tsp instant coffee dissolved in 1 tsp water
- 1 cup heavy whipping cream, chilled (240 g)
Decoration:
- 2 tbsp cocoa powder, to dust
Instructions
1. Prepare the Chocolate Crust
- Preheat the oven to 350°F (175°C) and butter the base of a 10″ springform pan (3″ tall).
- Grind the chocolate creme cookies and melted butter in a food processor until a fine crumb forms.
- Transfer the mixture to the pan, packing it down tightly using the bottom of a flat cup. Optionally, press crumbs slightly up the sides.
- Bake for 7–8 minutes, then cool while preparing the filling.
2. Make the Cheesecake Filling
- Adjust the oven temperature to 320°F (160°C).
- Beat cream cheese, mascarpone, sugar, vanilla, and salt in a stand mixer on medium-low speed for 2–3 minutes until smooth. Pro Tip: Scrape down the sides of the bowl for even mixing.
- In a separate bowl, lightly whisk eggs (don’t overbeat). Gradually add them to the filling, mixing on low speed until just incorporated.
- Add heavy cream, sour cream, and sifted cornstarch to the mixture. Mix on low until smooth. Avoid overmixing.
3. Assemble the Cheesecake
- Seal the outside of your springform pan with aluminum foil to prevent water from seeping in.
- Pour half of the cheesecake batter over the crust and smooth it out.
- Quickly dip ladyfingers into the coffee (do not soak), then layer them over the batter, fitting them snugly. Common Mistake: Avoid oversaturating the ladyfingers, as they will break apart.
- Pour the remaining batter over the ladyfinger layer, filling just below the brim. Smooth the top.
4. Bake the Cheesecake
- Place a large roasting tray in the oven and fill it with 1–2 inches (2.5–5 cm) of boiling water. Set the springform pan inside for a water bath.
- Bake for 80 minutes, or until the edges are firm, but the center is slightly jiggly. Avoid opening the oven early to prevent cracking.
- Remove from the oven and let it cool for 15 minutes at room temperature. Run a butter knife around the edges to release the cheesecake.
- Cool completely for 2–3 hours, then refrigerate the cheesecake overnight (uncovered).
5. Prepare the Coffee Mascarpone Cream
- Whisk mascarpone, sugar, and dissolved coffee in a bowl until smooth.
- Add chilled whipping cream and whisk on low speed until stiff peaks form. Be cautious not to overwhip.
6. Decorate & Serve
- Carefully remove the chilled cheesecake from the pan and transfer it to a platter.
- Spread a thin layer of coffee mascarpone cream on top. Use a piping bag with a decorative tip to pipe patterns with the remaining cream.
- Dust the top with cocoa powder using a fine-mesh sieve.
- Slice using a hot knife (wiped clean between cuts) and serve on decorative plates.
Notes
- Serving Suggestions: Pair with espresso or dessert wine for an indulgent experience. Garnish slices with chocolate shavings, fresh berries, or edible flowers for added elegance.
- Storage: Store in the refrigerator, covered, for up to 5 days. To freeze, wrap slices tightly in plastic wrap and store in an airtight container for up to 2 months. Thaw in the refrigerator overnight before serving.
- Reheating: Not recommended as cheesecake is best served chilled.
Tips & Tricks:
- Use a 10″ pan (3″ tall) to fit all layers. If using a 9″ pan, expect leftover batter.
- Don’t oversoak ladyfingers—just a quick dip is enough. They will absorb moisture while baking.
- Avoid overmixing the batter to prevent air bubbles, which can cause cracks during baking.