
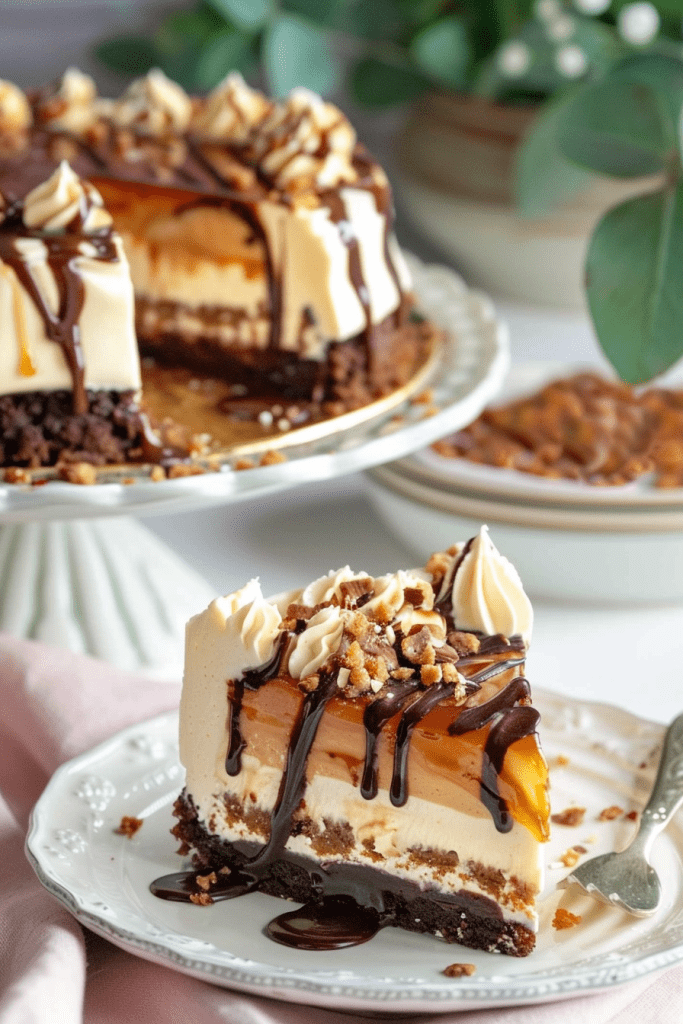
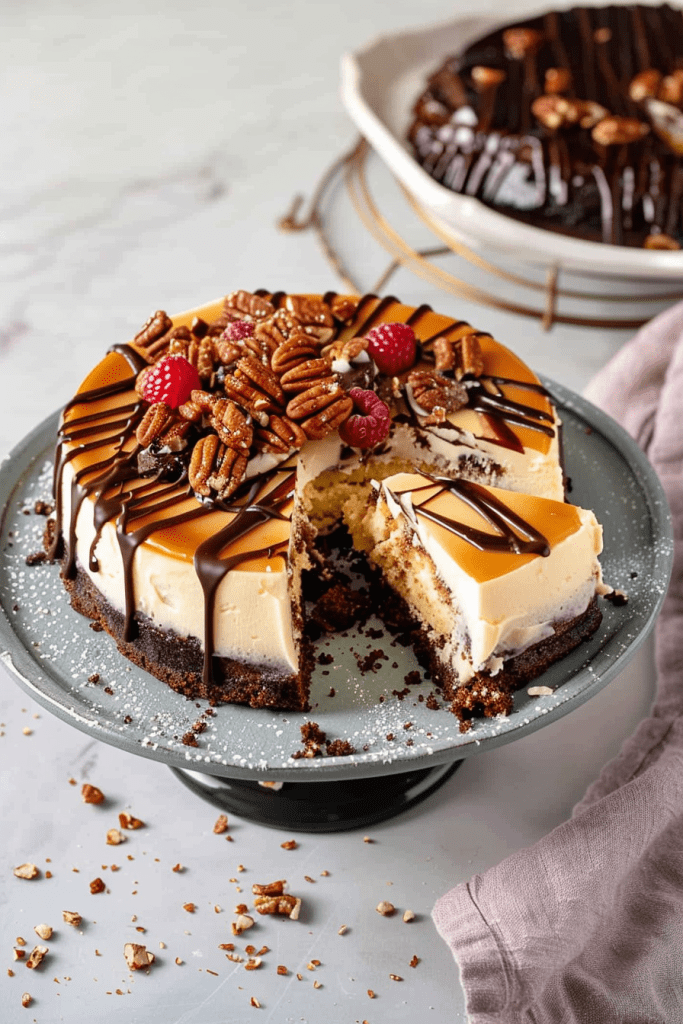
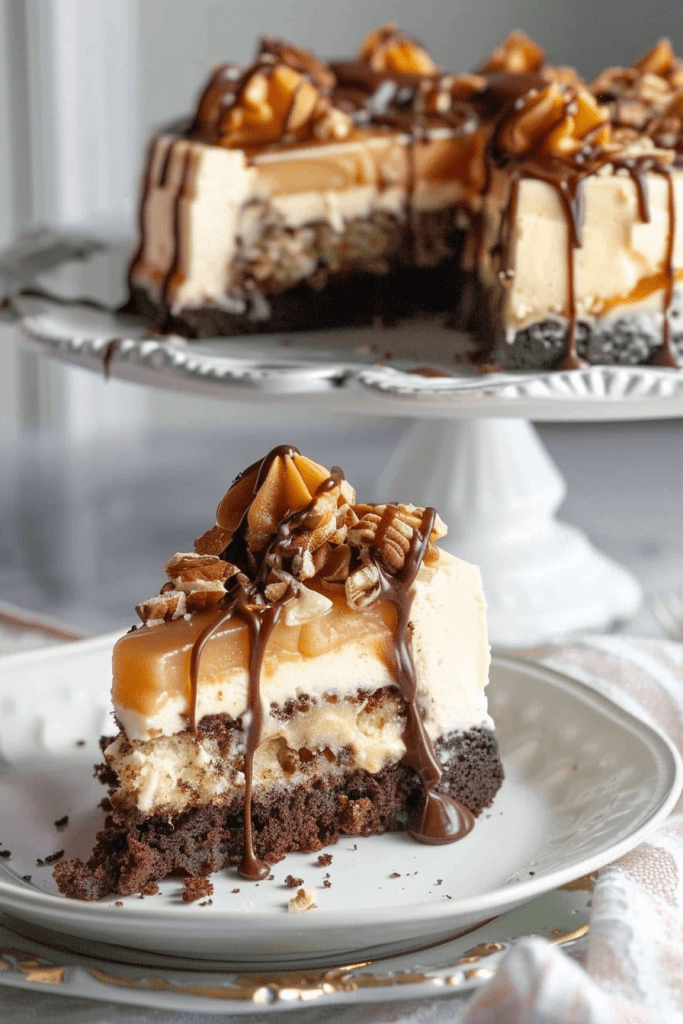
Indulge in the decadent delight of Turtle Cheesecake, a luxurious dessert that embodies the essence of the holiday season. This showstopping treat features a luscious blend of caramel, chocolate, and pecans nestled on a rich chocolate cookie crust, creating a symphony of flavors that will leave your taste buds craving more. If you’re a fan of the classic turtle chocolates, this cheesecake is a must-try, offering all the beloved flavors in a delightful cheesecake form.
With just a few simple ingredients and a mixer, you can whip up this Turtle Cheesecake in no time, making it a perfect choice for festive gatherings and special occasions. As this recipe requires overnight chilling in the fridge, it’s ideal for planning ahead for holiday dinners like Thanksgiving or Christmas. Get ready to impress your guests with this irresistible dessert that will have everyone asking for seconds.
Ingredients for Turtle Cheesecake
This Turtle Cheesecake recipe is a delightful blend of flavors perfect for the holiday season. Let’s gather the ingredients needed to create this decadent dessert.
For the Crust
- 24 Oreo cookies
- 4 tablespoons unsalted butter, melted
- 1/2 cup chopped pecans
For the Caramel-Pecan Layer
- 1 cup caramel sauce
- 1/2 cup chopped pecans
For the Cheesecake Filling
- 24 ounces cream cheese, softened
- 3/4 cup brown sugar
- 1 teaspoon vanilla extract
- 3 large eggs
- 1/4 cup heavy cream
- 3/4 cup heavy cream
- 1/4 cup light corn syrup
- 8 ounces semisweet chocolate, finely chopped
- 1/2 teaspoon vanilla extract
Required Tools and Equipment
To prepare the delightful Turtle Cheesecake, I recommend having the following tools and equipment ready in your kitchen:
- 9-inch Springform Pan: This pan is perfect for baking cheesecakes as it allows easy removal of the cake without damaging its structure.
- Mixing Bowls: Have a set of mixing bowls in various sizes for preparing different components of the cheesecake.
- Electric Mixer: An electric mixer will ensure a smooth and creamy texture for the cheesecake filling.
- Saucepan: You’ll need a saucepan to make the caramel sauce and melt any ingredients that require stovetop heating.
- Whisk: A whisk is essential for mixing ingredients thoroughly, especially when making the caramel sauce.
- Rimmed Baking Dish or Cookie Sheet: Placing the springform pan on a rimmed baking dish or cookie sheet will catch any potential spills during baking.
- Oven Thermometer: To ensure the oven temperature is accurate for baking the cheesecake to perfection.
Having these tools and equipment on hand will make the process of creating your Turtle Cheesecake much smoother and enjoyable.

Preparation Steps
Preparing the Baking Pan
To ensure your turtle cheesecake bakes perfectly, start by greasing a 9-inch springform pan thoroughly. Place the pan on two doubled-up sheets of heavy-duty foil, about an 18-inch square. Wrap the foil securely around the pan, as it will help in case of any leaks during the baking process.
- In a medium bowl, mix graham cracker crumbs, finely chopped pecans, and brown sugar until well combined.
- Place a greased 9-inch springform pan on a double thickness of heavy-duty foil, about an 18-inch square, and wrap the foil securely around the pan.
- In a small bowl, combine the flour, brown sugar, and pecans. Cut in the butter until crumbly, then press the mixture onto the bottom of the prepared pan.
- Bake the crust at 325°F until set, about 12-15 minutes. Allow it to cool on a wire rack before proceeding with the cheesecake preparation.
Assembling the Cheesecake
Layering the Caramel-Pecan and Cheesecake Fillings
To create layers of flavor in your Turtle Cheesecake, start by spreading a generous amount of dulce de leche over the baked crust. Drizzle in some heavy cream for added richness. Scatter chopped toasted pecans evenly over the caramel layer, adding a delightful crunch. Next, carefully pour the creamy cheesecake filling over the caramel-pecan layer, ensuring it covers the surface uniformly. Smooth out the top with a spatula for a visually appealing finish.
Adding Toppings and Final Touches
After baking the cheesecake to perfection, let it cool completely before refrigerating it to set. Once chilled, carefully remove the springform pan and adorn the top with freshly whipped cream swirls, accentuating the indulgent flavors. Finally, garnish the cheesecake with decadent chocolate turtles, enhancing both the presentation and taste. Serve slices of this luscious Turtle Cheesecake and delight in the harmonious blend of dark chocolate, caramel, and pecans in every bite.
Baking the Cheesecake
Baking the cheesecake is a crucial step to ensure a perfectly creamy and decadent dessert. Follow these detailed instructions to achieve the best results.
Water Bath Method Explained
Using a water bath method while baking a cheesecake helps insulate the delicate dessert from direct heat, allowing it to bake evenly without drying out on the sides while the center cooks. To set up the water bath, ensure you use hot water. This method is especially useful in preventing cracks on the cheesecake’s surface, ensuring a flawless final presentation.
Cooling and Decorating
Once the cheesecake is baked to perfection, it’s essential to cool and decorate it properly to enhance its texture and taste. Follow these steps to ensure your Turtle Cheesecake looks and tastes amazing.
Setting the Cheesecake
- Cooling Process: After baking the cheesecake, let it cool gradually. Turn off the oven and leave the cheesecake inside for at least an hour. This slow cooling process helps prevent cracks and ensures a creamy texture.
- Room Temperature Cooling: Once the initial cooling is done, remove the cheesecake from the oven and let it cool at room temperature. This additional cooling step further sets the cheesecake and allows it to hold its shape.
- Chilling Time: Transfer the cheesecake to the fridge and let it chill for a minimum of 4 hours, preferably overnight. Chilling allows the flavors to meld together and results in a firm and delicious cheesecake.
- Preparation: Melt 2 ounces of semisweet chocolate chips with 3 tablespoons of heavy whipping cream to make a luxurious ganache that will elevate the flavor profile of the cheesecake.
- Drizzling: Once the cheesecake is thoroughly chilled, drizzle the ganache over the top. The ganache will add a rich and decadent touch to the Turtle Cheesecake, making it visually appealing and even more irresistible.
By following these steps for setting and decorating your Turtle Cheesecake, you’ll present a stunning dessert that not only looks impressive but also tastes absolutely divine.
Advanced Tips for the Perfect Cheesecake
Preventing Cracks
To prevent cracks on your turtle cheesecake, avoid overmixing the batter or mixing it at too high a speed. Overmixing can introduce more air into the filling, leading to air bubbles, cracking on the surface, or the cheesecake rising too much and cracking as it deflates. Bringing your ingredients to room temperature before mixing can help achieve a smooth batter without overmixing.
Ensuring the Cheesecake Is Done
It’s essential not to overbake your cheesecake. The cheesecake will still be wobbly and jiggly in the middle when it’s ready. It will continue to cook as it cools and will set into a smooth, creamy texture. If it feels too firm, it has been overbaked, resulting in a coarse texture. To ensure doneness, gently shake the pan, and the center should have a slight jiggle. Remember, it will firm up as it chills in the refrigerator.
Make-Ahead Instructions
To make ahead of time, this Turtle Cheesecake offers the convenience of preparing in advance for upcoming gatherings or special occasions. The flavors meld together even more, resulting in a richer taste profile when allowed to chill for an extended period. Follow these simple steps for successful preparation ahead of serving:
Step 1: Cooling and Chilling
After baking the cheesecake, allow it to cool to room temperature before transferring it to the refrigerator. It’s crucial to chill the cheesecake for at least 4 hours, preferably overnight, to ensure a firm and set texture. Cover the cheesecake with plastic wrap or airtight foil to prevent any refrigerator odors from seeping in.
Step 2: Serving Preparation
When ready to serve, gently remove the chilled cheesecake from the refrigerator. If desired, you can top it with additional caramel sauce, chopped pecans, and chocolate shavings for an extra decadent touch. Cut the cheesecake into slices using a sharp knife dipped in hot water for clean cuts.
Step 3: Storage
If there are any leftovers, store them in the refrigerator for up to 3-4 days. Ensure to cover the remaining cheesecake with plastic wrap or foil to maintain its freshness and prevent drying out.
By following these make-ahead instructions, you can enjoy the delightful flavors of this Turtle Cheesecake without the last-minute rush, allowing you to savor each bite without any extra stress.
Storing and Freezing Tips
After preparing this indulgent Turtle Cheesecake, it’s essential to store and freeze it correctly to maintain its rich flavors and creamy texture.
Refrigerating Overnight
Once your Turtle Cheesecake is baked and cooled, allow it to set in the refrigerator overnight. Chilling the cheesecake enhances the flavors and ensures a firm yet creamy texture when sliced.
Freezing for Long-Term Storage
If you want to freeze your Turtle Cheesecake for long-term storage, ensure it’s fully cooled and set in the refrigerator overnight. Wrap the cheesecake securely in plastic wrap, followed by a layer of aluminum foil, to prevent freezer burn. Frozen Turtle Cheesecake can be stored for up to 2-3 months. To serve, thaw the cheesecake overnight in the refrigerator before enjoying its decadent flavors.
Conclusion
Creating a luscious Turtle Cheesecake is a delightful journey filled with creamy textures, rich flavors, and elegant presentations. By following the detailed steps and expert tips shared in this guide, you can master the art of making this decadent dessert. Remember the importance of room temperature ingredients, proper baking techniques, and thoughtful garnishes to elevate your cheesecake to perfection. Whether enjoying it fresh from the fridge or savoring a frozen slice months later, the flavors and textures will continue to impress. Embrace the process, experiment with variations, and share the joy of indulging in a slice of homemade Turtle Cheesecake with your loved ones. Happy baking!